Home >Backend Development >C#.Net Tutorial >How to use C# to create graphic code tutorials for Minesweeper game
How to use C# to create graphic code tutorials for Minesweeper game
- 黄舟Original
- 2017-06-18 10:20:313322browse
This article mainly introduces the detailed explanation of starting from scratch---making a minesweeper game with C#, which is very practical. Friends who need it can refer to it
The reason for learning C# is actually quite simple, because it has always been I am very interested in games, and I checked that the main development language of the popular game engine Unity is C#, so I decided to start with C# and learn object-oriented programming methods.
In the past, I basically did embedded development. After doing embedded development for a long time, I basically only used C language. The process-oriented characteristics of C language are extremely popular in embedded programming resources. It is indeed very advantageous in limited situations, but this method is difficult to do when faced with the development of large-scale software. The programming model is actually a habit of thinking. After you have been used to it for a long time, it is indeed a difficult process to change... At that time, I didn’t think of it as an object-oriented language (in fact, I didn’t know what object-oriented was at that time). I felt that there was only a little syntax difference with C language. All usages were classified as syntax differences, which is amazing. , this method can also be programmed. At the end of the semester, I handed in a minesweeper game developed with Winform, which ended my C# learning. After that, I never touched C# again.
Now I am back to C#. In order to avoid unnecessary interference, I did not study directly on Unity, but still studied in VS, but this time I chose the relatively new WPF instead of WInform. To learn, the first task is to make a minesweeper game as before.
Written in the front: This article mainly shares the program analysis process. The specific implementation method is not the focus of this article. Friends who have problems with the implementation can leave a message in the comment area to request the source code or ask questions^_^.
1. Analysis
1. Game analysisNow let’s get to the point, how to complete it this game. Ignoring the details (such as timing, display of remaining mines, menu bar, etc.), let’s just talk about the main body of the game: the mine clearing area.
Before the game started, there was actually only one thing in the minesweeper area, and that was the block...
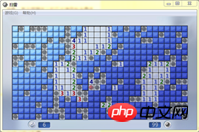 Ignore the light and shadow effects ( Yes, I ignored it again...), all the blocks are the same color and respond to the same events, which are left and right clicks. Left click to open the block, right click to mark the block as a mine. Continuing the analysis, there are different types of blocks. After clicking on some blocks, a large block of blocks will open around them. There are mines under some blocks, click them to GameOver. There are also numbers under the squares, which represent how many mines are around. (Sure enough, I ignored the function of pressing two mouse buttons at the same time to automatically open the surrounding grid and the second right-click to display question marks... But in fact, I will find out later that this function is actually very simple to add).
So, let’s first summarize the core implementation of the Minesweeper game:
- The blocks will respond to mouse events (left-click, left-click, right-click, Mouse in, mouse out).
- There are three effects after a block is clicked (bomb, number, empty). When it is empty, all surrounding blocks will be automatically expanded.
- The block can only be opened once and will no longer respond to key events.
- When the number of squares with flags is equal to the number of mines, and every square containing mines has a flag, the game is won.
- When the block containing the mine is opened, the game fails.
After analysis, have you found that the gameplay of minesweeper is actually very simple, and the technology to implement it is not difficult. It's all static with no animation.
The box behaves much like a button that can only be pressed once (in fact, I directly inherited the button control when I was in college).
But this time in order to use more C# related things, I used a more troublesome custom control method.
The cube has three forms of expression, which are unique, but obviously also have commonalities, so when designing, I extracted the commonalities of the buttons and designed them into an abstract base class Cube. There are three types of cubes, but because I am lazy, I merged two of them (blank and number) into the NumCube class, and the one containing mines is the BombCube class. These two classes inherit Cube respectively.
Cube implementation:
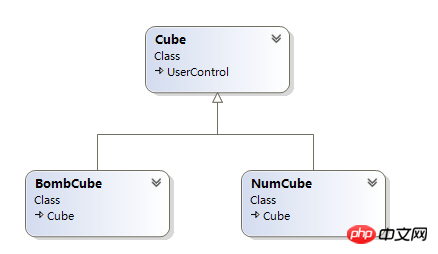 The Cube class has the following fields:
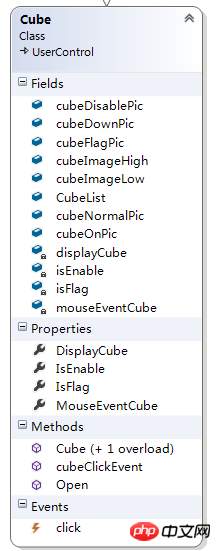
ImageSource cubeNormalPic
ImageSource cubeOnPic
ImageSource cubeDownPic
ImageSource cubeDisablePic
ImageSource cubeFlagPic
These 5 fields are used to set the pictures displayed by Cube in various states (normal, mouse entry, left button pressed, disabled, mark)
Bool isEnable
Bool isFlag
这两个字段就是标记Cube是否被使能和Flag
Image cubeImageHigh
Image cubeImageLow
这2个是两个image控件,作用是用来显示图片,之所以要2个图片是因为旗子图片被设计为一个叠加在Cube上的图片。
下面再来重点讲下下面2个东西:
displayCube
mouseEvent
在设计中,这是两个接口,分别用来处理鼠标事件和方块的展开。不同于直接在内部直接实现接口,将两个接口设计为Cube属性是为了能动态的修改这两个接口的实现方式,不至于每次修改都需要对Cube内的代码进行修改,且可以实现每个不同的Cube都使用不同的代码而不需要使用重写,这种方式在设计模式中也叫“策略模式”。
Cube只拥有一个方法,那就是Open,但这个方法其实也是有display接口代理实现。
public void Open()
{
 if (displayCube != null)
 {
  displayCube.Open(this);
 }
}
displayCube.Open(this)之所以要把自身传入,是因为Open方法要用到Cube自己的参数和方法。
BombCube继承自Cube

只添加了一个字段:
ImageSource bombPic
用来存储地雷图片.
NumCube 继承自Cube
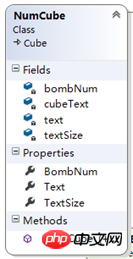
Int bombNum
用来记录方块周围有多少个BombCube,当其为0的时候,NumCube就是显示为空的方块。
添加了一个组件lable用来显示数字Text。
interface的实现
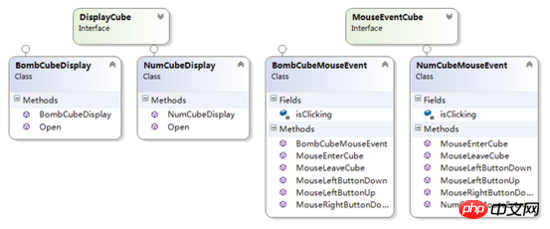
分别为每种Cube设计了一种接口的实现方式,使用这种方式,若后期需要改为动画显示,也只需要实现一个动画的接口,赋值给对应的Cube就可以了。
二、实现
控件继承:
Wpf进行控件继承的时候需要注意,被继承的控件不能有xaml。
在继承的时候,xaml中需要加入如下语句:
< myTypes:Cube x:Class="扫雷.UserControl.NumCube"

xmlns=" http:// schemas.microsoft.com/w infx/2006/xaml/presentation "

xmlns:x=" http:// schemas.microsoft.com/w infx/2006/xaml "

xmlns:mc=" http:// schemas.openxmlformats.org /markup-compatibility/2006 "

xmlns:d=" http:// schemas.microsoft.com/e xpression/blend/2008 "

mc:Ignorable="d"

xmlns:myTypes="clr-namespace:扫雷.UserControl"

d:DesignHeight="18" d:DesignWidth="18">
Cube 鼠标事件的实现:
鼠标事件主要是在各个事件中实现对Cube图片的变换,例如鼠标移出事件
public void MouseLeaveCube(object sender, MouseEventArgs e)
{
 BombCube bombCube = sender as BombCube;
 if (bombCube.IsEnable)
 {
  isClicking = false;
  bombCube.cubeImageLow.Source =
  bombCube.cubeNormalPic;
 }
}
关于地雷位置的生成算法实现:
游戏很重要的一个方面是,每次地雷的位置应该不同。很容易想到应该用随机数来产生地雷的位置。这就需要随机生成N个不相同的坐标。本程序的实现方法是创建一个listbd43222e33876353aff11e13a7dc75f6,之后使用随机数在0-sizeX * sizeY - 1之间随机生成一个数,检查list中是否包含该数字,若不包含则添加进list,直到list拥有N个元素停止。
List<int> BombIndexList=new List<int>();

Random ran = new Random();

do

{
 int bombIndex = ran.Next(0,sizeX * sizeY - 1);
 if(!BombIndexList.Contains(bombIndex))
 {
  BombIndexList.Add(bombIndex);
 }
 else
 {
   continue;
 }
} while (BombIndexList.Count < BombNum);
IndexList = BombIndexList;
之后根据生成的list来确定坐标上应该是NumCube还是BombCube
for (int y = 0; y < sizeY; y++)
{
 for (int x = 0; x < sizeX;x++)
 {
  //cube属性设置
  if(bombIndexList.Exists((int temp) => temp == x + y * cubeX))
  {
   cubexMatrix[x, y] =bombCubeList[bombIndex++];
  }
  else
  {
   numCubeList[numIndex].Text ="";
   cubexMatrix[x, y] =numCubeList[numIndex++];
  }
  cubexMatrix[x, y].IsFlag =false;
  cubexMatrix[x, y].Margin =new Thickness(x * 18, y * 18, 0, 0);
  cubexMatrix[x, y].IsEnable = true;
  SetCubeBombNum(cubexMatrix,cubeX, cubeY);
  bombGrid.Children.Add(cubexMatrix[x, y]);
 }
}
如何让空白Cube打开以后会打开周围的Cube:
因为这种打开方式有点类似于递归,需要有传染性(即若打开的也是空白Cube,则其也应该打开周围的Cube),所以执行该事件的时候一定要具有周围Cube的信息(即能获取到周围的控件)。
获取周围的Cube的方法有两种:
1.保存Cube自身的位置,并获取所有Cube的位置
2.保存周围Cube的信息
我使用的是第二种方式,之前Cube类中的Cubelist就是用来保存周围Cube的信息的。通过CubeList找到周围Cube,并触发他们的左键单击事件。
public void MouseLeftButtonUp(object sender, MouseButtonEventArgs e)
{
  NumCube numCube = sender as NumCube;
  if (numCube.IsEnable && numCube.IsFlag == false)
  {
    // 完成在控件上点击
    if (isClicking)
    {
      isClicking = false;
      numCube.IsEnable = false;
      if (numCube.BombNum != 0)
        numCube.Text = Convert.ToString(numCube.BombNum);
      else
      {
        foreach (Cube cubeTemp in numCube.CubeList)
        {
          MouseButtonEventArgs args = new MouseButtonEventArgs(Mouse.PrimaryDevice, 0, MouseButton.Left);
          args.RoutedEvent = Cube.MouseLeftButtonDownEvent;
          cubeTemp.RaiseEvent(args);
          args.RoutedEvent = Cube.MouseLeftButtonUpEvent;
          cubeTemp.RaiseEvent(args);
        }
      }
    }
  }
}
一些小技巧:
1.可以把一些图片的修改放在属性的set内,例如disable的图片。
public bool IsEnable
{
  get { return isEnable; }
  set
  {
    isEnable = value;
    if (isEnable)
    {
      if (cubeNormalPic != null)
        cubeImageLow.Source = cubeNormalPic;
    }
    else
    {
      if (cubeDisablePic != null)
        cubeImageLow.Source = cubeDisablePic;
    }
  }
}
2.Wpf创建控件较慢,为了提升(修改宽度长度或地雷数量之后)游戏开始速度,应该预先创建控件,并把控件放入list或者arr保存,按照需求取出。
到这扫雷游戏的制作就没什么难度技术上的难度的,只需要通过百度了解一些WPF常用的事件,控件,xalm相关的知识就能做出一个扫雷游戏啦。相关源码就不发在这了,需要的朋友可以评论中找我,这次游戏制作让我对面向对象的基本编程方法的了解有了一个很大的提升,下次应该就可以在Unity中做游戏啦 哈哈。
The above is the detailed content of How to use C# to create graphic code tutorials for Minesweeper game. For more information, please follow other related articles on the PHP Chinese website!

