Home >Backend Development >C#.Net Tutorial >Detailed introduction to Raspberry Pi (RPi)
Detailed introduction to Raspberry Pi (RPi)
- 零下一度Original
- 2017-06-24 10:15:176751browse
Preface
## The Raspberry Pi (RPi) is specially designed for students’ computer programming education. It is only a credit card-sized card. Computer, can run Linux or Windows 10 IoT Core operating system. This article will use Raspberry Pi and UWP (Universal Windows Platform) development technology to build a weather station system that can be monitored in real time.
Hardware and related technologies
Hardware part:
- A Raspberry Pi 2 or 3, a memory card of 8G or above, and a card reader (or a computer with an SD card interface);
- Dht11 One temperature and humidity sensor, one GY-68 BMP180 barometer;
- One LY-69 soil moisture meter, one MQ-2 smoke gas sensor, one raindrop sensor;
- Several male and female DuPont cables, a breadboard, a micro USB cable, a power supply;
- An HDMI interface monitor (or HDMI to other interfaces ).
- Integrated development environment: Visual Studio 2017 (community is recommended Version);
- Development language: C#;
- Development platform: UWP;
- Communication Protocol: MQTT;
- Raspberry Pi Operating System: WIndows 10 IoT Core;
- Database: Sqlite
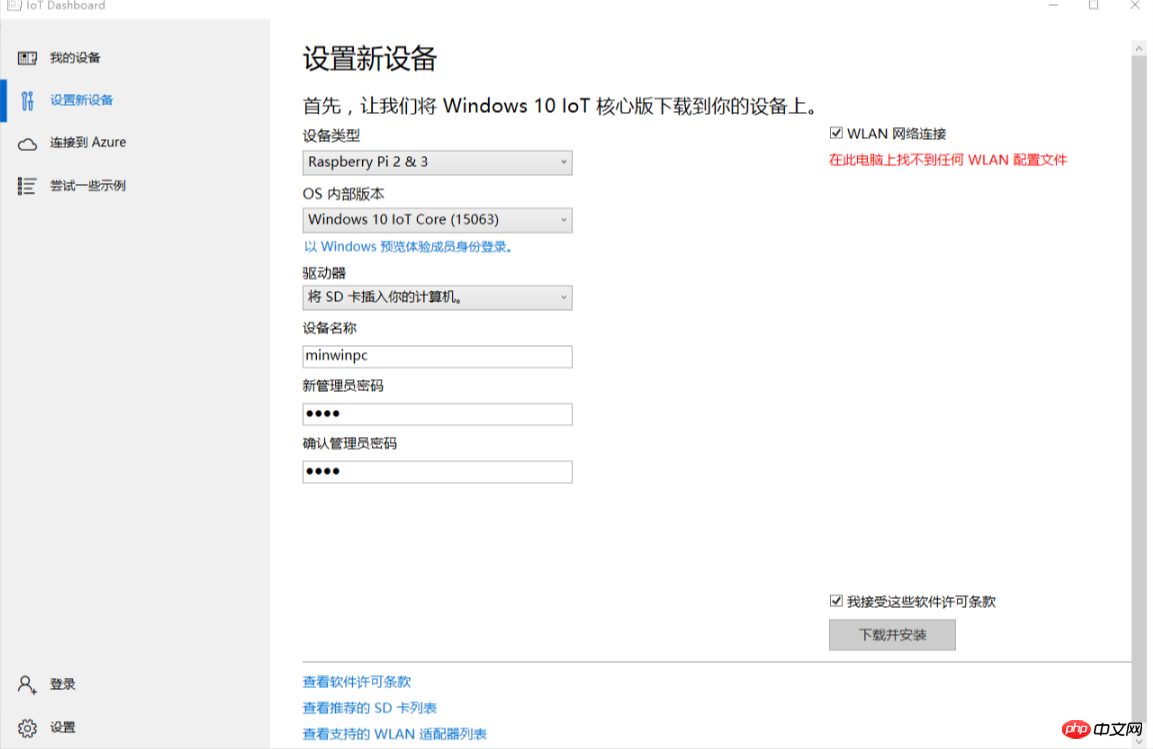
- Install the Windows 10 IoT Core Dashboard application, visit the Microsoft Developer Center and select Raspberry Pi 3, Install onto my blank microSD card, Windows10 IoT core, click the Next button to come to the new page, click the Download Dashboard button to download, and then install it.
- Burn the operating system to the MicroSD card. After the installation is complete, select the Set New Device item to enter the burning page. Select Raspberry Pi 2&3 as the device type; select Windows 10 IoT Core (15063) as the OS internal version; select the inserted MicroSD card as the driver; enter the device name, password, and confirm password; check WLAN network connection (check this option to connect the current computer to The connected WLAN information is copied to the operating system of the Raspberry Pi development board, eliminating the trouble of reconfiguration); at this point, the installation of the Windows 10 IoT operating system on the Raspberry Pi is completed.

Implementation
MQTT communication:
MQTT (Message Queuing Telemetry Transport) is an instant messaging protocol developed by IBM. After years of development, MQTT has been widely used in various fields. It can be used as a message push tool for mobile clients and accounts for a large proportion of Android applications. As a communication protocol specially designed for the Internet of Things, MQTT has the characteristics of working normally in low-bandwidth and unstable network environments. Its message delivery has three modes:- At most once, message loss or duplication will occur. This mode is suitable for sensor-type data transmission. Even if the message is lost, Will send again soon.
- Only once, ensuring that the message arrives without duplicate data. It is suitable for systems that require accurate data, such as billing systems.
At least once to ensure the message can arrive, but duplication may occur.
For the construction of MQTT server, please refer to:
For the use of MQTT under UWP, please refer to:
To use MQTT under UWP, you need to install the nuget package m2mqtt
Here I will post the MQTT connection code:
 public class Mqtt : MqttClient
    {public Mqtt(string host) : base(host, 61613, false, MqttSslProtocols.None)
        {
            Connect(Guid.NewGuid().ToString(), "admin", "password");
            Subscribe(new string[] { "atmo" }, new byte[] { MqttMsgBase.QOS_LEVEL_EXACTLY_ONCE });           // PostData("Hello World!");        } public void RequestData(string msg)
        {
            Publish("atmo", Encoding.UTF8.GetBytes(msg));
        }public void PostData(string msg)
        {
            Publish("atmo", Encoding.UTF8.GetBytes(msg));
        }
    }
Sqlite implementation: To use Sqlite under UWP, you need to first install the VS extension Sqlite for Universal Windows Platform and the Nuget package SQLite .Net-PCL. For detailed usage of sqlite, please refer to: The following is the Database class in this system:
  public class DataBase : SQLiteConnection
    {public static string path = Path.Combine(ApplicationData.Current.LocalFolder.Path, "atmo.db");public DataBase() : base(new SQLitePlatformWinRT(), path)
        {
            CreateTable<DataModel>();
        }
    }
INotifyPropertyChanged interface implementation
 public class ViewModelBase : INotifyPropertyChanged
    {public event PropertyChangedEventHandler PropertyChanged;protected void OnPropertyChanged([CallerMemberName]string name = "")
        {
            PropertyChanged?.Invoke(this, new PropertyChangedEventArgs(name));
        }
    }
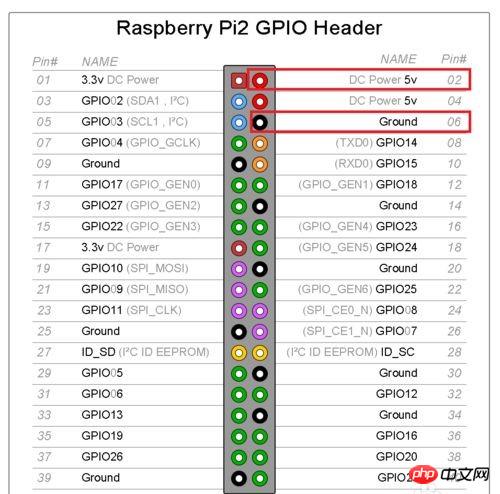
Raspberry Pi GPIO diagram

Hardware connection diagram:

Sensor pin diagram:


Project address:
This project is not yet complete, everyone is welcome Supplements and corrections!
The above is the detailed content of Detailed introduction to Raspberry Pi (RPi). For more information, please follow other related articles on the PHP Chinese website!

