Home >Java >javaTutorial >Java application maven project custom zip package example (must read)
Java application maven project custom zip package example (must read)
- 黄舟Original
- 2017-05-21 10:38:161780browse
The following editor will bring you an example of creating a custom zip package for a java application maven project (recommended). The editor thinks it’s pretty good, so I’ll share it with you now and give it as a reference. Let’s follow the editor to take a look
1. Configure the pom.xml file and add the build node
<build>
    <!-- 输出的包名 -->
    <finalName>p2p</finalName>


    <sourceDirectory>src/main/java</sourceDirectory>

    <resources>
      <!-- 控制资源文件的拷贝(默认复制到classes目录,最后打进jar包) -->
      <resource>
        <directory>src/main/resources</directory>
        <includes>
          <include>**/*.properties</include>
          <include>**/*.xml</include>
        </includes>
        <!-- 排除外置的配置文件(运行时注释上使IDE能读取到配置文件;打包时放开注释让配置文件外置方便修改) -->
        <excludes>
          <exclude>config.properties</exclude>
        </excludes>
      </resource>
      <!-- 配置文件外置的资源(存放到config目录,也是classpath路径,下面会配置) -->
      <resource>
        <directory>src/main/resources</directory>
        <includes>
          <include>config.properties</include>
        </includes>
        <targetPath>${project.build.directory}/config</targetPath>
      </resource>
    </resources>

    <plugins>
      <!-- 设置编译版本 -->
      <plugin>
        <groupId>org.apache.maven.plugins</groupId>
        <artifactId>maven-compiler-plugin</artifactId>
        <version>3.1</version>
        <configuration>
          <source>1.7</source>
          <target>1.7</target>
          <encoding>UTF-8</encoding>
        </configuration>
      </plugin>

      <!-- 打包jar文件时,配置manifest文件,加入lib包的jar依赖 -->
      <plugin>
        <groupId>org.apache.maven.plugins</groupId>
        <artifactId>maven-jar-plugin</artifactId>
        <configuration>
          <archive>
            <!-- 清单文件,设置入口类和classpath -->
            <manifest>
              <mainClass>com.hdwang.Application</mainClass>
              <addClasspath>true</addClasspath>
              <classpathPrefix>lib/</classpathPrefix>
            </manifest>
            <!-- 给清单文件添加键值对,增加classpath路径,这里将config目录也设置为classpath路径 -->
            <manifestEntries>
              <Class-Path>config/</Class-Path>
            </manifestEntries>
          </archive>
          <classesDirectory>
          </classesDirectory>
        </configuration>
      </plugin>


      <!-- 拷贝依赖的jar包到lib目录 -->
      <plugin>
        <groupId>org.apache.maven.plugins</groupId>
        <artifactId>maven-dependency-plugin</artifactId>
        <executions>
          <execution>
            <id>copy</id>
            <phase>package</phase>
            <goals>
              <goal>copy-dependencies</goal>
            </goals>
            <configuration>
              <outputDirectory>
                ${project.build.directory}/lib
              </outputDirectory>
            </configuration>
          </execution>
        </executions>
      </plugin>


      <!-- 解决资源文件的编码问题 -->
      <plugin>
        <groupId>org.apache.maven.plugins</groupId>
        <artifactId>maven-resources-plugin</artifactId>
        <version>2.5</version>
        <configuration>
          <encoding>UTF-8</encoding>
        </configuration>
      </plugin>

      <!-- 自定义打zip包 -->
      <plugin>
        <groupId>org.apache.maven.plugins</groupId>
        <artifactId>maven-assembly-plugin</artifactId>
        <version>2.2.1</version>
        <configuration>
          <descriptors>
            <descriptor>src/main/assembly/assembly.xml</descriptor>
          </descriptors>
        </configuration>
        <executions>
          <execution>
            <id>make-assembly</id>
            <phase>package</phase>
            <goals>
              <goal>single</goal>
            </goals>
          </execution>
        </executions>
      </plugin>
    </plugins>
  </build>
Pay attention to the red font part in this pom configuration file. This is the key configuration to realize the external configuration file. The idea is that the configuration file is not put into the jar package, placed outside, and the folder is set to classpath, so that the subroutine can pass It is easy to read the configuration file according to the classloader. The following is the java code for reading the configuration file. The code does not need to be modified when the IDE is running or after packaging, because the configuration file can always be found from the classpath! ! !

Maven information of the toolkit
<dependency>
  <groupId>commons-configuration</groupId>
  <artifactId>commons-configuration</artifactId>
  <version>1.10</version>
</dependency>
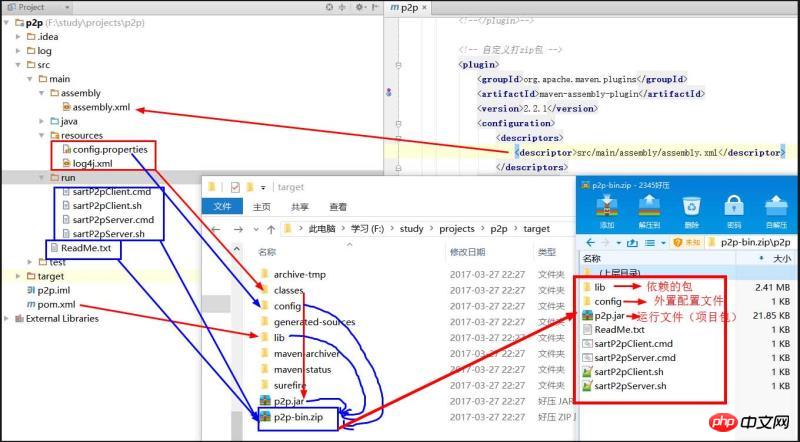
2. Create new maven- The configuration file assembly.xml of the assembly-plugin plug-in has the following content:
<assembly>
  <id>bin</id>
  <formats>
    <format>zip</format>
  </formats>
  <!-- 使用assembly拷贝依赖包 -->
  <!--<dependencySets>-->
    <!--<dependencySet>-->
      <!--<!– 是否包含自己(将项目生成的jar包也输出到lib目录) –>-->
      <!--<useProjectArtifact>false</useProjectArtifact>-->
      <!--<outputDirectory>lib</outputDirectory>-->
    <!--</dependencySet>-->
  <!--</dependencySets>-->
  <fileSets>
    <!-- 从目标目录拷贝文件去压缩 -->
    <fileSet>
      <directory>target</directory>
      <includes>
        <include>*.jar</include>
      </includes>
      <outputDirectory>/</outputDirectory>
    </fileSet>
    <fileSet>
      <directory>target/lib</directory>
      <outputDirectory>/lib</outputDirectory>
    </fileSet>
    <fileSet>
      <directory>target/config</directory>
      <outputDirectory>/config</outputDirectory>
    </fileSet>

    <!-- 从源目录拷贝文件去压缩 -->
    <fileSet>
      <directory>src/main/run</directory>
      <includes>
        <include>*.sh</include>
        <include>*.cmd</include>
      </includes>
      <outputDirectory>/</outputDirectory>
    </fileSet>
    <fileSet>
      <directory>src/main</directory>
      <includes>
        <include>ReadMe.txt</include>
      </includes>
      <outputDirectory>/</outputDirectory>
    </fileSet>
  </fileSets>
</assembly>
This plug-in runs in package life cycle and executes mvn package or mvn inst all can trigger the execution of this plug-in. I commented out the code for copying dependency packages here because the maven-dependency-plugin has been configured in the pom.xml file to perform such an operation, and there is no need to repeat the configuration. fileSet can configure the files that need to be copied and compressed. The directory path is relative to the project root directory, the outputDirectory path is relative to the output directory target, and includes can filter the copied files. Here you can copy the files in the compressed output directory. It should be because this plug-in runs after the program is compiled and packaged. In this way, our custom packaging requirements are met: compile->copy resource files->project packaging->copy dependencies The jar package->assembly is copied and compressed. Then use the generated zip package to deploy and publish it, and it can be run after decompression.
3. Schematic diagram of program packaging process

The above is the detailed content of Java application maven project custom zip package example (must read). For more information, please follow other related articles on the PHP Chinese website!

