Home >Backend Development >C#.Net Tutorial >Detailed introduction to ASP.NET MVC--View
Detailed introduction to ASP.NET MVC--View
- 零下一度Original
- 2017-05-20 13:34:392682browse
Understanding Views
ASP.NET MVCUnlike ASP.NET or Dynamic Server Pages (ASP), it does not have anything directly corresponding to a page thing. In an ASP.NET MVC application, there is no page on disk that corresponds to the URL path you enter in the browser address bar. In an ASP.NET MVC application, the closest thing to a page is something called a view. In an ASP.NET MVC application, incoming browser requests are mapped to controller actions. A controller action may return a view. However, a controller action may perform some type of action, such as redirecting you to another controller action.
Code Listing 1 contains a simple controller called HomeController. HomeController exposes two controller actions called index() and details().
代码清单1 - HomeController.cs
使用系统; 使用 System.Collections.Generic; 使用 System.Linq; 使用 System.Web; 使用 System.Web.Mvc; 命名空间 MvcApp.Controllers{     [HandleError]     public class HomeController:Controller     {          public ActionResult Index()          {               return View();           }          public ActionResult Details()          {               return RedirectToAction( “Index”);           }     }}
You can call the first action, the index() action, by entering the following URL in the browser's address bar:
/首页/index
You can The second action, the details() action, is called by entering this address in the browser:
/Homepage/Details
The index() action returns a view. Most actions you create will return a view, however, actions can return any type of action result. For example, the details() action returns a RedirectToActionResult, which can redirect incoming requests to the index() action.
The index() action contains the following line of code:
return View();
This line of code returns a view, and the path of the view on the server must be Same as the following path: Index.aspx
\View\Home\\
The path to the view is inferred from the names of the controller and controller actions.
If you wish, you can explicitly specify the view. The following line of code returns a view named "Fred":
Return View("Fred");
When this line of code is executed, a view will be returned from the following path:
\View\Home\Fred.aspx
2. Create a view
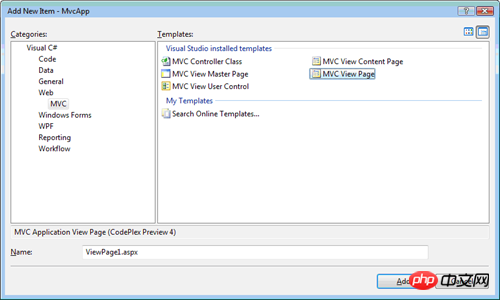
You can right-click on the folder in the solution browser and select the menu item "Add", "New Project" (Figure 1). Select the "MVC View Page" template to add standard views to your project.
 You should be aware that you cannot add views to your project at will like you can in ASP.NET or ASP applications. You have to add the view to a folder with the same name as the controller (without the controller suffix) For example, if you want to create a new view called index, the view can be created by A controller named ProductController is returned, then you must add this view to the following folder of the project:
\View\Product\Index.aspx
The folder containing the view The name must correspond to the name of the controller that returns the view.
3. Add content to the view
A view is a standard (X)
HTML documentthat can contain scripts. You use scripts to add dynamic content to views. For example, the view in Listing 2 displays the current date and time.
Code Listing 2 - \Views\Home\Index.aspx
<%@ Page Language =“C#”AutoEventWireup =“true”CodeBehind =“Index.aspx.cs”Inherits =“MvcApp.Views.Home.Index”%>
<!DOCTYPE html PUBLIC“ - // W3C // DTD XHTML 1.0 Transitional // EN“”http://www.w3.org/TR/xhtml1/DTD/xhtml1-transitional.dtd“>
<html xmlns =”http://www.w3.org/1999/xhtml“>
     <头RUNAT = “服务器”>
          <TITLE>索引</ TITLE>
     </ HEAD>
     <BODY>
          <DIV>
               的当前日期和时间是:
               <%回复于(DateTime.Now);%>
          </ DIV>
     </ body>
</ html>
Notice that the body of the HTML page in Code Listing 2 contains the following script:
<%Response.Write(DateTime.Now);%>
Use Script delimiters mark the beginning and end of a script. This script is written in C#. It displays the current date and time, rendering the content to the browser script by calling the reply() method. The delimiters can be used to execute one or more statements.
Because the reply to () method is often called, Microsoft provides you with a simple way to call the reply to () method. The view in Listing 3 uses as a simple way to call the reply() method.
Code Listing 3 - Views \ Home \ Index2.aspx
<%@ Page Language =“C#”AutoEventWireup =“true”CodeBehind =“Index2.aspx.cs”Inherits =“MvcApp.Views.Home.Index2”%>
<!DOCTYPE html PUBLIC“ - // W3C // DTD XHTML 1.0 Transitional // EN“”http://www.w3.org/TR/xhtml1/DTD/xhtml1-transitional.dtd“>
<html xmlns =”http://www.w3.org/1999/xhtml“>
     <头RUNAT = “服务器”>
          <TITLE>索引2 </ TITLE>
     </ HEAD>
     <BODY>
          <DIV>
               的当前日期和时间是:
               <%= DateTime.Now%>
          </ DIV>
     </ BODY>
< / HTML>
You can use any .NET language to generate dynamic content in the view, you can use Visual Basic.Net or C# to write your controllers and views.
4. Use HTML Helpers to generate view content
为了使向视图中添加内容更加容易一些,你可以利用叫做HTML Helper的东西.HTML Helper是一个生成字符串的方法。你可以使用HTML帮助者来生成标准的HTML元素,例如文本框,链接,下拉框和列表框。
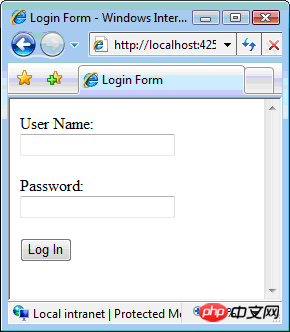
举个例子,代码清单4中的视图利用了两个HTML Helpers,TextBox()和Password(),用于生成一个登录窗体(见图2)。
代码清单4 - \ Views \ Home \ Index3.aspx
<%@ Page Language =“C#”AutoEventWireup =“true”CodeBehind =“Index3.aspx.cs”Inherits =“MvcApp.Views.Home.Index3”%>
<!DOCTYPE html PUBLIC“ - // W3C // DTD XHTML 1.0 Transitional // EN“”http://www.w3.org/TR/xhtml1/DTD/xhtml1-transitional.dtd“>
<html xmlns =”http://www.w3.org/1999/xhtml“>
     <head runat =“server”>
          <title>登录表单</ title>
     </ head>
     <body>
          <p>
               <form method =“post”action =“/ Home / Login”>
                    <label for =“userName” >用户名:</ label>
                    <br />
                    <%= Html.TextBox(“userName”)%>
                    <br /> <br />
                    <label for =“password”>密码:</ label>
                    <br />
                    <%= Html.Password(“password” %>
                    <br /> <br />
                    <input type =“submit”value =“登录”/>
               </ form>
          </ p>
     </ body>
</ html><br /> <%= Html.Password( “密码”)%> <br /> <br /> <INPUT TYPE = “提交”值= “登录”/> </ FORM> </ DIV> </ body> </ html><br /> <%= Html.Password( “密码”)%> <br /> <br /> <INPUT TYPE = “提交”值= “登录”/> </ FORM> </ DIV> </ body> </ html>
所有的HTML帮助者方法都在视图的Html属性上调。举个例子,你可以通过调用Html.TextBox()方法来呈现(render)一个文本框。
注意,当你在调用HTML Helper时,必须使用脚本分隔符。HTML Helper只是返回一个字符串你需要调用Response.Write()来将字符串呈现到浏览器中。
使用HTML帮助方法是可选的。它们通过减少你编写的HTML和脚本数量来使开发更为简单。代码清单5中的视图呈现了与代码清单4中完全相同的窗体,但是没有使用HTML助手。
代码清单5 - \ Views \ Home \ Index4.aspx
<%@ Page Language =“C#”AutoEventWireup =“true”CodeBehind =“Index4.aspx.cs”Inherits =“MvcApp.Views.Home.Index4”%>
<!DOCTYPE html PUBLIC“ - // W3C // DTD XHTML 1.0 Transitional // EN“”http://www.w3.org/TR/xhtml1/DTD/xhtml1-transitional.dtd“>
<html xmlns =”http://www.w3.org/1999/xhtml“>
     <head runat =“server”>
          <title>没有帮助的登录表单</ title>
     </ head>
     <body>
          <p>
               <form method =“post”action =“/ Home / Login”>
                    <label for = userName“>用户名:</ label>
                    <br />
                    <输入名称= “userName的”/>
                    <br /> <br />
                    </标签>:密码<用于= “密码”的标签>
                    <br />
                    <输入名称= “密码”类型= “密码”/>
                    < br /> <br />
                    <input type =“submit”value =“登录”/>
               </ form>
          </ p>
     </ body>
</ html></标签> <br /> <输入名称= “密码”类型= “密码”/> <br /> <br /> <INPUT TYPE = “提交”值= “登录”/> </ FORM> < / p> </ body> </ html></标签> <br /> <输入名称= “密码”类型= “密码”/> <br /> <br /> <INPUT TYPE = “提交”值= “登录”/> </ FORM> < / p> </ body> </ html>/ body> </ html>/ body> </ html>你可以创建自己的HTML帮助者。据个例子,你可以创建一个GridView()Helper方法,它自动地在一个HTML表格中显示一系列的数据库记录。我们将在创建自定义HTML帮助者这篇教程中探讨这一话题。
5.使用ViewData属性将数据传递给视图
你可以使用视图的另一个属性,ViewData的属性,将数据从控制器传递给视图。例如,代码清单6中的控制器向ViewData的添加了一条消息。
代码清单6 - ProductController.cs
使用系统;
使用System.Collections.Generic;
使用System.Linq;
使用System.Web;
使用System.Web.Mvc;
namespace MvcApp.Controllers
{
     public class ProductController:Controller
     {
          public ActionResult Details()
          {
               ViewData [“message”] =“Hello World!”;
               return View();
          }
     }
}
控制器的ViewData属性代表着一个名称/值对的集合。在代码清单6中,详细()方法向ViewData集合中添加了一个名为消息的项,其值为“Hello World!”当视图由详情()方法返回时,ViewData的将会自动传递给视图。
代码清单7中的视图从ViewData的中获取了消息,并且将消息呈现到了浏览器中。
代码清单7 - \ Views \ Product \ Details.aspx
<%@ Page Language =“C#”AutoEventWireup =“true”CodeBehind =“Details.aspx.cs”Inherits =“MvcApp.Views.Product.Details”%>
<!DOCTYPE html PUBLIC“ - // W3C // DTD XHTML 1.0 Transitional // EN“”http://www.w3.org/TR/xhtml1/DTD/xhtml1-transitional.dtd“>
<html xmlns =”http://www.w3.org/1999/xhtml“>
     <头RUNAT = “服务器”>
          <TITLE>产品详细信息</ TITLE>
     </ HEAD>
     <BODY>
          <DIV>
               <%=了Html.Encode(计算机[ “消息”])%>
          </ DIV>
     </ BODY >
</ html>
注意到当前呈现消息时,视图利用了Html.Encode()Helper方法.Html.Encode()HTML Helper方法将例如“”这样的特殊字符编码为在网页面中能够安全显示的字符。无论何时呈现用户提交到网站的内容时,你都应该对内容进行编码,以避免的JavaScript注入攻击。
(因为我们自己在ProductController的中创建了消息,所以并不是真的需要对消息进行编码。然而,当在视图中显示获取自的ViewData中的内容时,总是调用了Html.Encode()是一个很好的习惯。)
在代码清单7中,我们利用了的ViewData来将一个简单的字符串消息从控制器传递到了视图。你也可以使用的ViewData将其他类型的数据从控制器传递到视图,例如一个数据库记录集合。举个例子,如果你想要在视图中显示产品数据库表的内容,那么你可以将数据库记录的集合保存在ViewData的中进行传递。
你也可以从控制器向视图传递强类型查看数据。我们将在教程“理解强类型查看数据和视图”中探讨这个话题。
总结
这篇教程提供了对ASP.NET MVC视图,视图数据(查看数据)和HTML帮助者的一个简短的介绍。在第一部分,你学习了如何向项目中添加新的视图你学习了必须将视图添加到正确的文件夹中,以使其能够被特定的控制器调用。接下来,我们讨论了HTML帮助者这一主题。你学习了HTML帮助者是如何轻松地生成标准的HTML内容的最后,你学习了如何利用ViewData将数据从控制器传递给视图。
【相关推荐】
1. 什么是ASP.NET MVC ?总结ASP.NET MVC
2. 详细介绍ASP.NET MVC--控制器(controller)
4. Detailed introduction to ASP.NET MVC--routing
5. Code example for developing WeChat custom menu editing tool through asp.net mvc
The above is the detailed content of Detailed introduction to ASP.NET MVC--View. For more information, please follow other related articles on the PHP Chinese website!

