 Backend Development
 Python Tutorial
 Detailed introduction to the use tutorial of Django open source framework
There are many different web frameworks under Python. Django is the most representative of the heavyweight players. Many successful websites and apps are based on Django. Django is an open source web application framework written in Python. Let’s learn it step by step
This article is aimed at: Beginners who have a python foundation and are new to web frameworks.
Environment: windows7 python3.5.1 pycharm professional version Django 1.10 version pip3
1. DjangoIntroduction
Baidu Encyclopedia: An open source web application framework written in Python...
Focus: A large and comprehensive framework that has everything considered for you.
1. Introduction to web framework
Before introducing Django in detail, concepts such as WEB framework must be introduced first.
Web framework: A web website template has been set by others. You learn its rules, and then "fill in the blanks" or "modify" it to what you need.
The architecture of a general web framework is like this:

Model View Controller, is model(model )-View(view)-Abbreviation of controller(controller), a software design model that uses a method to separate business logic, data, and interface display to organize code and The business logic is gathered into a component, and there is no need to rewrite the business logic while improving and personalizing the interface and user interaction.
Popular explanation: a form of organization and management of files! Don't be scared by the abbreviation, this is actually a way to put different types of files in different directories, and then give them a fancy name. Of course, it brings many benefits, such as front-end and back-end separation, loose coupling, etc., so I won’t go into details. Model (model): Defines database-related content, usually placed in the models.py file. View: Define HTML and otherstatic web page file related things, that is, those front-end things such as html, css, js.
Controller: defines business logic, which is your main code. MTV: Some WEB frameworks think the literal meaning of MVC is awkward, so they change it. View is no longer related to HTML, but the main business logic, which is equivalent to a controller. HTML was placed in Templates, called templates, so MVC became MTV. This is actually a word game. It is essentially the same as MVC. It just has a different name and method. It does not change the medicine. 3.Django’s MTV model organization If the directories are separated, there must be a mechanism to couple them inside. In Django, urls, orm, static, settings, etc. play an important role. A typical business process is as shown in the figure below:
Directory structureSpecification
2. urlsroutingmethod
3. settings configuration 4.ORM operation5. 6. Others2. Django project example
1. Program Python3.5, pip3 and pycharm professional version are installed by yourself. (1) Install Django: Here we only introduce the simpler pip3 command installation method. Win+r, bring up cmd, run the command: pip3 install django, automatically install the latest version provided by Pypi.

After successfully installing Django, you can find the django-admin.exe file in the path in the figure below and add it to the operating system environment variables. This will make future calls more convenient.


Run: django-admin help. If you see the following content, it means OK.

2. Create a django project
Under command line interfaces such as Linux, project development can also be carried out using the commands and vim provided by django. However, it is recommended to use pycharm, the best Python development IDE
at present. It has powerful functions and friendly interface. (All the following operations are performed in pycharm.)
Click: file-->new project, and the following dialog box appears.

Select the Django column and enter the project name. The international practice of mysite is used here. Select the python interpreter version and click create.
Django will automatically generate the following directory structure:

The directory with the same name as the project is the configuration file, and the templates directory is html File storage is the T in MTV. manage.py is the django project management file.

3. Create APP
Each Django project can contain multiple APPs, which are equivalent to subsystems, submodules, Functional components, etc., are relatively independent of each other, but they are also related.
All APPs share project resources.
Enter the command in the terminal below pycharm:
python manage.py startapp cmdb
This creates an APP called cmdb, and django automatically generates "cmdb" folder.

4. Write routes
Routes are all in the urls file, which maps the URL input by the browser to the corresponding business processing logic.
The simple method of writing urls is as follows:

5. Write business processing logic
The business processing logic is all in the views.py file inside.

Through the above two steps, we point the index url to the index()function in views, which receives the user request and returns a "hello world"String.
6. Run the web service
Now we can run the web service.
The command line method is: python manage.py runserver 127.0.0.1:8000
But in pycharm, you can do this:
Found in the upper toolbar icon shown below.

Click the drop-down arrow

Click edit configurations

Fill in host: 127.0.0.1 Fill in port: 8000
After OK, click the green triangle, and the web service will start.

As shown in the picture, it will automatically jump to the browser program interface. What is displayed is the 404 page shown below:

Modify the url, add "/index", and everything is ok!

At this point, the simplest web service written in Django has been started successfully.
7. Return HTML file
What did we return to the user’s browser above? A string! In fact, this is definitely not possible. Usually we return the html file to the user.
Next, we write an index.html file like this:

Modify the views file again:

In order to let django know where our html files are, we need to modify the settings file accordingly. content. But by default, it works just fine and you don't need to modify it.

Next, we can restart the web service. Refresh the browser and you will see "hello world" with style.
Note: Here is a little trick. When the service is restarted frequently, the service may not be started due to the port not being released. Just modify the port and it will be OK.
8. Use static files
We can already return html files to users, but it is not enough. The three major parts of the front end are html, css, js and various plug-ins. They are complete. It is a complete
page. In Django, static files are generally placed in the static directory. Next, create a new static directory in mysite.

Your CSS, JS and various plug-ins can be placed in this directory.
In order for django to find this directory, settings still need to be configured:

Similarly, in the index.html file, the js file can be introduced:

Restart the web service, refresh the browser, and view the results.
9. Receive data sent by the user
Above, we returned an html file with complete elements to the user's browser. But this is not enough because there is no dynamic interaction between the web server and the user.
Next we design a form to allow users to enter their username and password and submit it to the index URL, and the server will receive this data.
First modify the index.html file

and then modify the views.py file

At this time , an error will occur when restarting the web service, because Django has a cross-site request protection mechanism, and we turn it off in the settings file.

Enter the browser again and refresh the page:

Enter something, and then we can see it in pycharm corresponding data.
10. Return to the dynamic page
We have received the user's data, but what is returned to the user is still a static page. Usually we will process it based on the user's data and then return it to the user.
At this time, django uses its own template language, similar to jinja2, and replaces the corresponding parts of the html based on the provided data. After getting started with the detailed syntax, learn more about it.
First transform the views.py file:

Then transform the index.html file:

Restart the service and refresh the browser:

As you can see, we have obtained the data entered by the user in real time and displayed it on the user page in real time. This is good. interactive process.
11. Using the database
At this point in the process, Django’s MTV framework has basically surfaced, leaving only the final database part.
Although we interacted well with the user above, we did not save any data. Once the page is closed or the server is restarted, everything will return to the original state.
There is no doubt about using the database. Django operates the database through its own ORM framework and comes with its own lightweight sqlite3 database. Let’s take a look below:
First, register the app:

If you don’t register it, your database will not know which app to create a table for.
Then we configure the database-related parameters in settings. If you use the built-in sqlite, there is no need to modify it.

Then edit the models.py file, which is the M in MTV.

Here we create 2 fields to save the user's name and password respectively.
Next, we need to create the table of the database through the command in the terminal of pycharm. There are 2 commands, namely:
python manage.py makemigrations

Then enter the command: python manage.py migrate

Modify the business logic in views.py

After restarting the web service, refresh the browser page, and the data interacted with the user will be saved. into the database. Data can be read from the database at any time and displayed on the page.
At this point, a Django project with complete elements and a clear main frame display is completed. It is actually very simple, right?
3. Summary of Django
As a necessary web framework for python, Django has powerful functions and comprehensive content, but it also means many restrictions and low flexibility. , poor modifiability, which means you can’t have your cake and eat it too. When we learn Django, we actually learn a software. We need to understand its basic principles, grasp its overall framework, and keep in mind some basic rules. The rest is to continue to delve into the details, and then practice makes perfect, and the amount of experience is a matter of it. There is no such thing as too advanced. Master the technology.
Suggestions on learning methods: When learning anything, don’t dive directly into the details. You should first understand its peripheral knowledge, look at its overall structure, then learn its basic content, and then study in depth. Polish your skills!
The whole article is complete. Please correct me if there are any mistakes. If you think it is good, please give it a like and support.
【Related Recommendations】
1. Special Recommendation: "php Programmer Toolbox" V0.1 version download
3. Video tutorial on the application of Python in data science
The above is the detailed content of Detailed introduction to the use tutorial of Django open source framework. For more information, please follow other related articles on the PHP Chinese website!
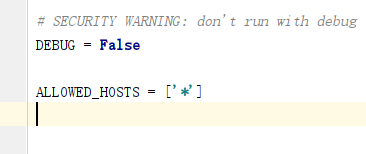 怎么将Django项目迁移到linux系统中Jun 01, 2023 pm 01:07 PM
Django项目配置修改我们需要把原先的Django项目进行修改才能更好地进行项目迁移工作,首先需要修改的是settings.py文件。由于项目上线之后不能让用户看到后台的运行逻辑,所以我们要把DEBUG改成False,把ALLOWED_HOSTS写成‘*’,这样是为了允许从不同主机进行访问。由于linux中如果不加这句可能会出现文件找不到的情况,所以我们要把模板的路径进行拼接。由于做Django项目肯定进行过数据库的同步,所以我们要把migrations
 centos+nginx+uwsgi部署django项目上线的方法May 15, 2023 am 08:13 AM
我django项目叫yunwei,主要app是rabc和web,整个项目放/opt/下如下:[root@test-codeopt]#lsdjango_virtnginxredisredis-6.2.6yunwei[root@test-codeopt]#lsyunwei/manage.pyrbacstatictemplatesuwsgiwebyunwei[root@test-codeopt]#lsyunwei/uwsgi/cut_log.shloguwsgi.iniuwsgi.loguwsgi.p
 Django框架中的数据库迁移技巧Jun 17, 2023 pm 01:10 PM
Django是一个使用Python语言编写的Web开发框架,其提供了许多方便的工具和模块来帮助开发人员快速地搭建网站和应用程序。其中最重要的一个特性就是数据库迁移功能,它可以帮助我们简单地管理数据库模式的变化。在本文中,我们将会介绍一些在Django中使用数据库迁移的技巧,包括如何开始一个新的数据库迁移、如何检测数据库迁移冲突、如何查看历史数据库迁移记录等等
 Django框架中的文件上传技巧Jun 18, 2023 am 08:24 AM
近年来,Web应用程序逐渐流行,而其中许多应用程序都需要文件上传功能。在Django框架中,实现上传文件功能并不困难,但是在实际开发中,我们还需要处理上传的文件,其他操作包括更改文件名、限制文件大小等问题。本文将分享一些Django框架中的文件上传技巧。一、配置文件上传项在Django项目中,要配置文件上传需要在settings.py文件中进
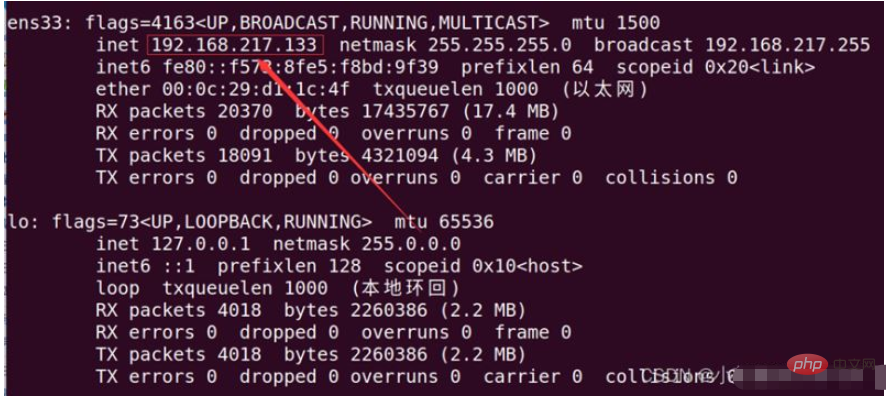 如何用nginx+uwsgi部署自己的django项目May 12, 2023 pm 10:10 PM
第一步:换源输入命令换掉Ubuntu的下载源sudonano/etc/apt/sources.list将以下全部替换掉原文件,我这里用的是阿里的源,你也可以换其他的。debhttp://mirrors.aliyun.com/ubuntu/bionicmainrestricteddebhttp://mirrors.aliyun.com/ubuntu/bionic-updatesmainrestricteddebhttp://mirrors.aliyun.com/ubuntu/bionicunive
 使用Django构建RESTful APIJun 17, 2023 pm 09:29 PM
Django是一个Web框架,可以轻松地构建RESTfulAPI。RESTfulAPI是一种基于Web的架构,可以通过HTTP协议访问。在这篇文章中,我们将介绍如何使用Django来构建RESTfulAPI,包括如何使用DjangoREST框架来简化开发过程。安装Django首先,我们需要在本地安装Django。可以使用pip来安装Django,具体
 使用Python Django框架构建博客网站Jun 17, 2023 pm 03:37 PM
随着互联网的普及,博客在信息传播和交流方面扮演着越来越重要的角色。在此背景下,越来越多的人开始构建自己的博客网站。本文将介绍如何使用PythonDjango框架来构建自己的博客网站。一、PythonDjango框架简介PythonDjango是一个免费的开源Web框架,可用于快速开发Web应用程序。该框架为开发人员提供了强大的工具,可帮助他们构建功能丰
 Django+Bootstrap构建响应式管理后台系统Jun 17, 2023 pm 05:27 PM
随着互联网技术的快速发展和企业业务的不断扩展,越来越多的企业需要建立自己的管理后台系统,以便于更好地管理业务和数据。而现在,使用Django框架和Bootstrap前端库构建响应式管理后台系统的趋势也越来越明显。本文将介绍如何利用Django和Bootstrap构建一个响应式的管理后台系统。Django是一种基于Python语言的Web框架,它提供了丰富的功


Hot AI Tools

Undresser.AI Undress
AI-powered app for creating realistic nude photos

AI Clothes Remover
Online AI tool for removing clothes from photos.

Undress AI Tool
Undress images for free

Clothoff.io
AI clothes remover

AI Hentai Generator
Generate AI Hentai for free.

Hot Article

Hot Tools

Zend Studio 13.0.1
Powerful PHP integrated development environment

Notepad++7.3.1
Easy-to-use and free code editor

Atom editor mac version download
The most popular open source editor

SAP NetWeaver Server Adapter for Eclipse
Integrate Eclipse with SAP NetWeaver application server.

MinGW - Minimalist GNU for Windows
This project is in the process of being migrated to osdn.net/projects/mingw, you can continue to follow us there. MinGW: A native Windows port of the GNU Compiler Collection (GCC), freely distributable import libraries and header files for building native Windows applications; includes extensions to the MSVC runtime to support C99 functionality. All MinGW software can run on 64-bit Windows platforms.


