
 Backend DevelopmentPython TutorialDetailed example of organizational structure adjustment (python)
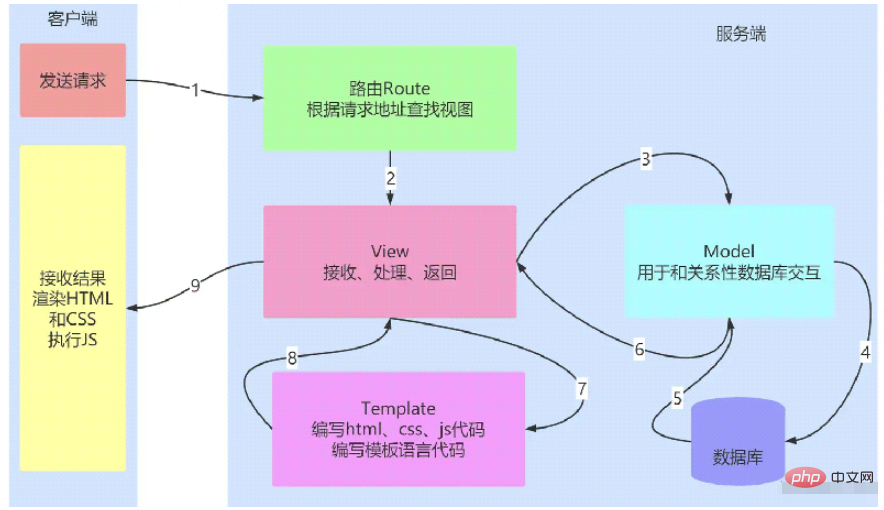
The birth of a web application based on flask is the seventh article. This article mainly introduces the adjustment of the organizational structure and has a certain reference value. Interested friends can refer to
All Py now The codes are all written in the default.py file. Obviously, under this method, once the program becomes responsible, it will cause many problems for both development and maintenance.
The Flask framework does not force projects to use a specific organizational structure, so the organizational structure used here is not necessarily the same as in other projects.

According to the code in default.py, it can be roughly divided into three categories: form model, data model, and view method, so models are also distinguished by this category. Therefore, according to the experience gained from other languages (java), each class is a py file and placed in the corresponding folder

In a single file, all configurations They are all written in a single file. After performing multi-file reconstruction, it is obviously inappropriate to do this, so it is necessary to create an independent config file:
class Config:
 SECRET_KEY="Niu_blog String"
 SQLALCHEMY_DATABASE_URI='mysql://root:1234@localhost/cblog'
 SQLALCHEMY_COMMIT_ON_TEARDOWN=True
 LOGIN_PROTECTION="strong"
 LOGIN_VIEW="login"
Then the initialization file ( app/__init__.py):
from flask import Flask
from flask_bootstrap import Bootstrap
from flask_sqlalchemy import SQLAlchemy
from flask_login import LoginManager
import pymysql
pymysql.install_as_MySQLdb()
from config import Config

bootstrap = Bootstrap()
db = SQLAlchemy()
login_manager=LoginManager();

def create_app():
 app = Flask(__name__)
 app.config.from_object(Config)
 bootstrap.init_app(app)
 login_manager.init_app(app)
 login_manager.session_protection=Config.LOGIN_PROTECTION
 login_manager.login_view=Config.LOGIN_VIEW
 db.init_app(app)
 return app
Further modularization requires the use of blueprints. The functions of blueprints are somewhat similar to areas in asp.net mvc, integrating the view methods of different modules and distinguishing them through URLs. , first the entrance, that is, the index page is defined as the main blueprint. The method is as follows:
Create the main folder
Create a new blueprint initialization file in the folder_ _init__.py
Create the view method file view.py
Create the error page view method errors.py
## in the main blueprint
from flask import Blueprint

main=Blueprint("main",__name__) # 创建蓝本
from . import errors,views
Currently, the view method file has only one index method, the code is as follows: from flask import render_template
from . import main
@main.route("/")
def index():
return render_template("index.html",site_name='myblog')The error page code is omittedThe URL of the main blueprint does not use the prefixThen the login registration and logout page is concentrated in the permission blueprint (auth). The permission blueprint initialization code is as follows: from flask import Blueprint
auth=Blueprint("auth",__name__)
from . import views The view is mainly completed before Migrate the view: from . import auth
from .. import db,login_manager
from ..forms.LoginForm import LoginForm(*)
from ..models.User import User (*)
from flask_login import login_user,logout_user
from flask import render_template,flash,redirect,url_for
@auth.route("/login",methods=["GET","POST"])
def login():
form = LoginForm()
print(url_for("main.index"))
if form.validate_on_submit():
username = form.username.data
password = form.password.data
print(User)
user = User.query.filter_by(username=username, password=password).first()
if user is not None:
login_user(user, form.remember_me.data)
print(url_for("main.index"))
return redirect(url_for("main.index"))
else:
flash("您输入的用户名或密码错误")
return render_template("/auth/login.html", form=form) # 返回的仍为登录页
return redirect(url_for("main.index"))
return render_template("/auth/login.html",form=form)
@auth.route("/logout",methods=["GET","POST"])
def logout():
logout_user()
return redirect(url_for("main.index"))
@login_manager.user_loader
def load_user(user_id):
return User.query.get(int(user_id))Pay attention to the two lines marked with asterisks. Be sure to pay attention to the py file and py object. The object must be imported in the file.The code in the LoginForm file is as follows:from flask_wtf import FlaskForm
from wtforms import StringField,PasswordField,SubmitField,BooleanField
from wtforms.validators import DataRequired
class LoginForm(FlaskForm):
username=StringField("请输入用户名",validators=[DataRequired()])
password=PasswordField("请输入密码")
remember_me=BooleanField("记住我")
submit=SubmitField("登录")The code in the User file is as follows: from flask_login import UserMixin
from .. import db
class User(UserMixin,db.Model):
__tablename__="users"
id=db.Column(db.Integer,primary_key=True)
username=db.Column(db.String(50),unique=True,index=True)
password=db.Column(db.String(50))
nickname=db.Column(db.String(50))
email=db.Column(db.String(100))
birthday=db.Column(db.DateTime)
gender=db.Column(db.Integer)
remark=db.Column(db.String(200))
role_id=db.Column(db.Integer,db.ForeignKey("roles.id"))Note that the import method of the flask plug-in has been changed from flask.ext.* to the flask_* method recommended by the new version. Thank you for this. Reminder from Yuji Denbaicai. Of course, the blueprint must be registered in the end, so the final code of the create_app method is: def create_app(): app = Flask(__name__) app.config.from_object(Config) bootstrap.init_app(app) login_manager.init_app(app) login_manager.session_protection=Config.LOGIN_PROTECTION login_manager.login_view=Config.LOGIN_VIEW db.init_app(app) from .main import main as main_blueprint from .auth import auth as auth_blueprint app.register_blueprint(main_blueprint) #无url前缀 app.register_blueprint(auth_blueprint,url_prefix="/auth") #url前缀为/auth return appThe last modification is the way to start the operation, create a new manager.py file, and configure the startup code As follows:
from app import create_app, db
from flask_script import Manager,Shell
from flask_migrate import Migrate,MigrateCommand
from app.models.User import User
from app.models.Role import Role
import pymysql
pymysql.install_as_MySQLdb()
app=create_app()
manager=Manager(app);
migrate = Migrate(app, db)
def make_shell_context():
 return dict(app=app,db=db,User=User,Role=Role) #注册shell命令
manager.add_command("db", MigrateCommand) #新增db命令用于数据库迁移
manager.add_command("shell" ,Shell(make_context=make_shell_context()))

if __name__ =='__main__':
 manager.run()
Use the most rustic way to run it. The running result is the same as when there was only default.py. At this time, the system directory is as follows, for reference only:

The above is the detailed content of Detailed example of organizational structure adjustment (python). For more information, please follow other related articles on the PHP Chinese website!

 Flask和Intellij IDEA集成: Python web应用程序开发技巧(第二部分)Jun 17, 2023 pm 01:58 PM
在第一部分介绍了基本的Flask和IntellijIDEA集成、项目和虚拟环境的设置、依赖安装等方面的内容。接下来我们将继续探讨更多的Pythonweb应用程序开发技巧,构建更高效的工作环境:使用FlaskBlueprintsFlaskBlueprints允许您组织应用程序代码以便于管理和维护。Blueprint是一个Python模块,能够包
 如何使用python+Flask实现日志在web网页实时更新显示May 17, 2023 am 11:07 AM
一、日志输出到文件使用模块:logging可以生成自定义等级日志,可以输出日志到指定路径日志等级:debug(调试日志)=5){clearTimeout(time)//如果连续10次获取的都是空日志清除定时任务}return}if(data.log_type==2){//如果获取到新日志for(i=0;i
 Flask + Vue.js:快速实现单页面应用Jun 17, 2023 am 09:06 AM
随着移动互联网和Web技术的迅速发展,越来越多的应用需要提供流畅、快速的用户体验。传统的多页面应用已经无法满足这些需求,而单页面应用(SPA)则成为了解决方案之一。那么,如何快速实现单页面应用呢?本文将介绍如何利用Flask和Vue.js来构建SPA。Flask是一个使用Python语言编写的轻量级Web应用框架,它的优点是灵活、易扩
 Flask-RESTful和Swagger: Python web应用程序中构建RESTful API的最佳实践(第二部分)Jun 17, 2023 am 10:39 AM
Flask-RESTful和Swagger:Pythonweb应用程序中构建RESTfulAPI的最佳实践(第二部分)在上一篇文章中,我们探讨了如何使用Flask-RESTful和Swagger来构建RESTfulAPI的最佳实践。我们介绍了Flask-RESTful框架的基础知识,并展示了如何使用Swagger来构建RESTfulAPI的文档。本
 Flask-Security: 在Python web应用程序中添加用户身份验证和密码加密Jun 17, 2023 pm 02:28 PM
Flask-Security:在Pythonweb应用程序中添加用户身份验证和密码加密随着互联网的不断发展,越来越多的应用程序需要用户身份验证和密码加密来保护用户数据的安全性。而在Python语言中,有一个非常流行的Web框架——Flask。Flask-Security是基于Flask框架的一个扩展库,它可以帮助开发人员在Pythonweb应用程序中轻
 Flask和Sublime Text集成: Python web应用程序开发技巧(第六部分)Jun 17, 2023 pm 04:08 PM
Flask和SublimeText集成:Pythonweb应用程序开发技巧(第六部分)SublimeText和Flask都是Pythonweb应用程序开发中的重要工具。然而,如何将二者集成起来,使得开发过程更加高效呢?本文将介绍一些SublimeText的插件和配置技巧,帮助你更方便地开发Flask应用程序。一、安装SublimeText插件F
 Flask和Eclipse集成: Python web应用程序开发技巧(第三部分)Jun 17, 2023 pm 03:27 PM
Flask和Eclipse集成:Pythonweb应用程序开发技巧(第三部分)在前两篇文章中,我们介绍了如何将Flask与Eclipse集成,以及如何创建Flask应用程序。在本文中,我们将继续探讨如何开发和调试Flask应用程序,以及如何管理数据库。一、开发和调试Flask应用程序创建和运行Flask应用程序在Eclipse的ProjectExplo
 Python Flask JinJa2语法如何使用May 16, 2023 am 09:19 AM
一、概述Flask是一个轻量级的PythonWeb框架,支持Jinja2模板引擎。Jinja2是一个流行的Python模板引擎,它可以使用Flask来创建动态Web应用程序。web页面一般需要html、css和js,可能最开始学习pythonweb的时候可能这样写:fromflaskimportFlaskapp=Flask(__name__)@app.route('/')defhello():return'hellohelloworld!!!&am


Hot AI Tools

Undresser.AI Undress
AI-powered app for creating realistic nude photos

AI Clothes Remover
Online AI tool for removing clothes from photos.

Undress AI Tool
Undress images for free

Clothoff.io
AI clothes remover

AI Hentai Generator
Generate AI Hentai for free.

Hot Article
Hot Tools

Notepad++7.3.1
Easy-to-use and free code editor

Atom editor mac version download
The most popular open source editor

Dreamweaver Mac version
Visual web development tools

Dreamweaver CS6
Visual web development tools

DVWA
Damn Vulnerable Web App (DVWA) is a PHP/MySQL web application that is very vulnerable. Its main goals are to be an aid for security professionals to test their skills and tools in a legal environment, to help web developers better understand the process of securing web applications, and to help teachers/students teach/learn in a classroom environment Web application security. The goal of DVWA is to practice some of the most common web vulnerabilities through a simple and straightforward interface, with varying degrees of difficulty. Please note that this software

