


Tutorial continues from WeChat Mini Program Development Tutorial (Basics) 7-Data Binding. When you need to display a set of data, you can use wx:for
//.wxml
<view wx:for="{{array}}">
{{index}}: {{item.message}}
</view>
//.js
age({
data: {
array: [{
message: 'foo',
}, {
message: 'bar'
}]
}
})whereindex is the default variable name of the current data index, item is the default variable name of the current data item.
You can also use wx:for-item and wx:for-index to specify the alias
<view wx:for="{{array}}" wx:for-index="idx" wx:for-item="itemName">
  {{idx}}: {{itemName.message}}
</view>
can also be used in nested form, as shown below. Nine multiplication table
<view wx:for="{{[1, 2, 3, 4, 5, 6, 7, 8, 9]}}" wx:for-item="i">
  <view wx:for="{{[1, 2, 3, 4, 5, 6, 7, 8, 9]}}" wx:for-item="j">
    <view wx:if="{{i <= j}}">
      {{i}} * {{j}} = {{i * j}}
    </view>
  </view>
</view>
Similar to block wx:if, you can also use wx:for on the
<block wx:for="{{[1, 2, 3]}}">
  <view> {{index}}: </view>
  <view> {{item}} </view>
</block>
wx:key
To understand why wx:key is needed, first look at an example:
//.wxml
<checkbox wx:for="{{objectArray}}" value="{{item.name}}" style="display: block;"> {{item.name}} </checkbox>
<button bindtap="addToFront">在上方添加一个新的check组件</button>
//.js
Page({
data: {
objectArray: [
{id: 1, name: '我没有被选中'},
{id: 2, name: '我没有被选中'},
],
},
addToFront: function(e) {
const length = this.data.objectArray.length
this.data.objectArray = [{id: length, name: '我没有被选中'}].concat(this.data.objectArray)
this.setData({
objectArray: this.data.objectArray
})
},
})The above code Two checkbox components and a button are created. When the button is clicked, a checkbox component will be added at the top.
Compile the code and the following interface will be displayed:

Write the picture description here
Click the button and the interface will be as follows:

Write the picture description here
ok, everything is normal here. In order to better explain the problem, add the processing of the checkbox selection event. When the checkbox is selected, Change the text to "I was selected", the relevant code is as follows:
//wxml
<checkbox-group bindchange="checkboxChange">
<checkbox wx:for="{{objectArray}}" value="{{item.id}}" style="display: block;" > {{item.name}}
</checkbox>
</checkbox-group>
<button bindtap="addToFront">在上方添加一个新的check组件</button>
//js
Page({
data: {
objectArray: [
{id: 1, name: '我没有被选中'},
{id: 2, name: '我没有被选中'},
],
},
addToFront: function(e) {
const length = this.data.objectArray.length
this.data.objectArray = [{id: length + 1, name: '我没有被选中'}].concat(this.data.objectArray)
this.setData({
objectArray: this.data.objectArray
})
},
checkboxChange: function(e){
console.log('checkboxChange')
const length = this.data.objectArray.length
let checkBoxArray = this.data.objectArray
for (let i = 0; i < length; i++) {
let ischecked = false
for (let j = 0; j < e.detail.value.length; j++){
if (checkBoxArray[i].id == e.detail.value[j]){
checkBoxArray[i].name = '我被选中了'
ischecked = true
}
}
if (!ischecked){
checkBoxArray[i].name = '我没有被选中'
}
}
this.setData({
objectArray: this.data.objectArray
})
}
})When the first checkbox is selected, the interface is as follows
Write picture description here
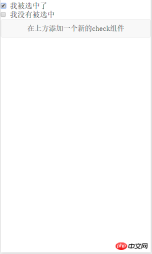
What will happen if you click the Add Component button at this time? The expected effect should be as follows

Write picture here Description
However, the actual effect is indeed like the picture below

Write the picture description here
You can see that the rendering engine and The selected effect is not bound to the data, resulting in unexpected results. If you want to achieve the expected effect, you need to use wx:key
<checkbox-group bindchange="checkboxChange">
  <checkbox wx:for="{{objectArray}}" wx:key = "id" value="{{item.id}}" style="display: block;" > {{item.name}}
  </checkbox>
</checkbox-group>

<button bindtap="addToFront">在上方添加一个新的check组件</button>
to modify the .wxml file as shown in the above code. You can achieve the expected effect. The key point is wx :key = "id" This sentence
If the position of the items in the list will change dynamically or new items are added to the list, and you want the items in the list to maintain their own characteristics and Status (such as the input content in
, the selected status of), you need to use wx:keyto specify the unique identifier of the item in the list.
wx:keyThe value is provided in two forms
1 String, representing a property of the item in the array of the for loop, the value of the property needs to be in the list A unique string or number that cannot be changed dynamically.
2 Reserved keywords*thisrepresents the item itself in the for loop. This representation requires the item itself to be a unique string or number,
quoted above From WeChat official tutorial. In addition to maintaining the state of view components, using wx:key also helps improve rendering efficiency
When data changes trigger the rendering layer to re-render, the band will be corrected For components with keys, the framework will ensure that they are reordered rather than recreated to ensure that the components maintain their own state and improve the efficiency of list rendering.
The above is the detailed content of Basics of Mini Program Development: Data Binding (8). For more information, please follow other related articles on the PHP Chinese website!

Hot AI Tools

Undresser.AI Undress
AI-powered app for creating realistic nude photos

AI Clothes Remover
Online AI tool for removing clothes from photos.

Undress AI Tool
Undress images for free

Clothoff.io
AI clothes remover

Video Face Swap
Swap faces in any video effortlessly with our completely free AI face swap tool!

Hot Article
Hot Tools

mPDF
mPDF is a PHP library that can generate PDF files from UTF-8 encoded HTML. The original author, Ian Back, wrote mPDF to output PDF files "on the fly" from his website and handle different languages. It is slower than original scripts like HTML2FPDF and produces larger files when using Unicode fonts, but supports CSS styles etc. and has a lot of enhancements. Supports almost all languages, including RTL (Arabic and Hebrew) and CJK (Chinese, Japanese and Korean). Supports nested block-level elements (such as P, DIV),

SublimeText3 Linux new version
SublimeText3 Linux latest version

Dreamweaver Mac version
Visual web development tools

MantisBT
Mantis is an easy-to-deploy web-based defect tracking tool designed to aid in product defect tracking. It requires PHP, MySQL and a web server. Check out our demo and hosting services.

Notepad++7.3.1
Easy-to-use and free code editor

