
Home >WeChat Applet >Mini Program Development >Detailed explanation of the login page production example of WeChat applet
Detailed explanation of the login page production example of WeChat applet

- Y2JOriginal
- 2018-05-11 11:29:0419448browse
This article mainly introduces the actual login page production code of WeChat mini program in detail. It has certain reference value. Interested friends can refer to
to provide a login page case. For students to use
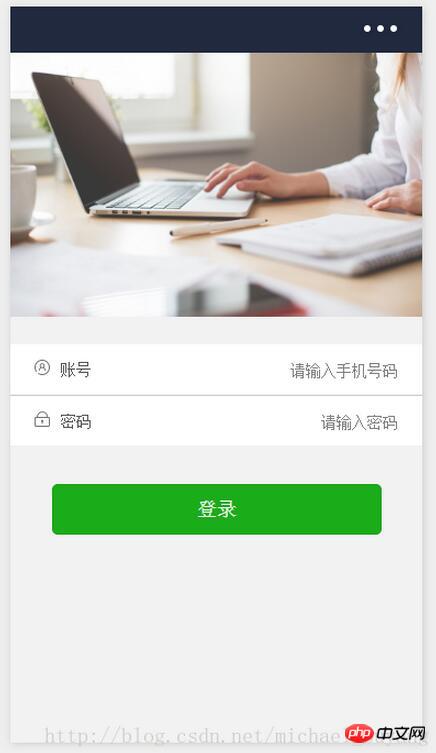
Project renderings:
## Directory structure:

Image resource:
name.png


##login.wxml:
<view class="container">
 <view class="login-icon">
 <image class="login-img" src="../images/loginLog.jpg"></image>
 </view>
 <view class="login-from">

 <!--账号-->
 <view class="inputView">
  <image class="nameImage" src="../images/name.png"></image>
  <label class="loginLab">账号</label>
  <input class="inputText" placeholder="请输入账号" bindinput="phoneInput" />
 </view>
 <view class="line"></view>

 <!--密码-->
 <view class="inputView">
  <image class="keyImage" src="../images/key.png"></image>
  <label class="loginLab">密码</label>
  <input class="inputText" password="true" placeholder="请输入密码" bindinput="passwordInput" />
 </view>

 <!--按钮-->
 <view class="loginBtnView">
  <button class="loginBtn" type="primary" size="{{primarySize}}" loading="{{loading}}" plain="{{plain}}" disabled="{{disabled}}" bindtap="login">登录</button>
 </view>
 </view>
</view>
login.wxss:
page{
 height: 100%;
}

.container {
 height: 100%;
 display: flex;
 flex-direction: column;
 padding: 0;
 box-sizing: border-box;
 background-color: #f2f2f2
}

/*登录图片*/
.login-icon{
 flex: none;
}
.login-img{
 width: 750rpx;
}

/*表单内容*/
.login-from {
 margin-top: 20px;
 flex: auto;
 height:100%;
}

.inputView {
 background-color: #fff;
 line-height: 44px;
}
/*输入框*/
.nameImage, .keyImage {
 margin-left: 22px;
 width: 14px;
 height: 14px
}

.loginLab {
 margin: 15px 15px 15px 10px;
 color: #545454;
 font-size: 14px
}
.inputText {
 flex: block;
 float: right;
 text-align: right;
 margin-right: 22px;
 margin-top: 11px;
 color: #cccccc;
 font-size: 14px
}

.line {
 width: 100%;
 height: 1px;
 background-color: #cccccc;
 margin-top: 1px;
}
/*按钮*/
.loginBtnView {
 width: 100%;
 height: auto;
 background-color: #f2f2f2;
 margin-top: 0px;
 margin-bottom: 0px;
 padding-bottom: 0px;
}

.loginBtn {
 width: 80%;
 margin-top: 35px;
}
login.js:
Page({
 data: {
 phone: '',
 password:''
 },

// 获取输入账号
 phoneInput :function (e) {
 this.setData({
  phone:e.detail.value
 })
 },

// 获取输入密码
 passwordInput :function (e) {
 this.setData({
  password:e.detail.value
 })
 },

// 登录
 login: function () {
 if(this.data.phone.length == 0 || this.data.password.length == 0){
  wx.showToast({
  title: '用户名和密码不能为空',
  icon: 'loading',
  duration: 2000
  })
}else {
 // 这里修改成跳转的页面
  wx.showToast({
  title: '登录成功',
  icon: 'success',
  duration: 2000
  })
 }
 }
})
Run result:

The above is the detailed content of Detailed explanation of the login page production example of WeChat applet. For more information, please follow other related articles on the PHP Chinese website!
Statement:
The content of this article is voluntarily contributed by netizens, and the copyright belongs to the original author. This site does not assume corresponding legal responsibility. If you find any content suspected of plagiarism or infringement, please contact admin@php.cn
Previous article:Detailed explanation of custom toast examples of WeChat mini programNext article:Detailed explanation of custom toast examples of WeChat mini program
Related articles
See more- WeChat Mini Program Simple DEMO layout, logic, and style exercises
- Detailed explanation and examples of WeChat applet wx.request (interface calling method)
- WeChat Mini Program - Detailed explanation of WeChat login, WeChat payment, and template messages
- WeChat applet (application account) simple example application and detailed explanation of the example
- Detailed explanation of WeChat applet for loop