
 Web Front-endJS TutorialIntroduction to the implementation method of linked list of JavaScript data structure (picture and text)
Linked list is a common data structure. It is a structure that dynamically allocates storage. This article mainly introduces the implementation of linked lists in JavaScript data structures, which has a good reference value. Let’s take a look with the editor below
The previous poster discussed the implementation of data structure stacks and queues respectively. The data structures used at that time were all implemented using arrays, but sometimes arrays are not the most optimal. Optimal data structure, for example, when adding and deleting elements in an array, other elements need to be moved, and using the spit() method in JavaScript does not require access to other elements. If you find it slow when using arrays, consider using linked lists.
The concept of linked list
Linked list is a common data structure. It is a structure that dynamically allocates storage. The linked list has a "head pointer" variable, represented by head, which stores an address pointing to an element. Each node uses a reference of an object to point to its successor. A reference pointing to another node is called a chain.

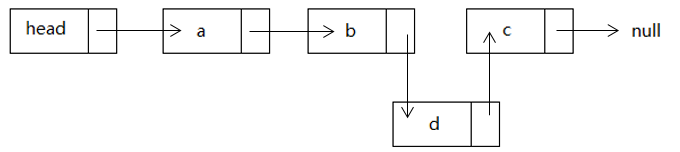
Array elements are referenced by subscripts (positions), while linked list elements are referenced by their relationships. Therefore, the insertion efficiency of linked list is very high. The following figure demonstrates the insertion process of linked list node d:
Deletion process:

Object-based linked list
We define two classes, the Node class and the LinkedList class. Node is the node data, and LinkedList saves the methods for operating the linked list.
First look at the Node class:
function Node(element){
  this.element = element;
   this.next = null;
 }
element is used to save the data on the node, and next is used to save the link pointing to the next node.
LinkedList class:
function LinkedList(){
     this.head = new Node('head');
     this.find = find;
     this.insert = insert;
     this.remove = remove;
     this.show = show;
}
find() method, starting from the head node, searching along the linked list nodes until an element equal to the item content is found, then the node is returned, if not found Returns empty.
function find(item){
     var currentNode = this.head;//从头结点开始
     while(currentNode.element!=item){
         currentNode = currentNode.next;
     }
     return currentNode;//找到返回结点数据,没找到返回null
}
Insert method. As can be seen from the previous element insertion demonstration, there are four simple steps to insert:
1. Create a node
2. Find the target node
3. Modify the target node The next point of the point points to the link
4. Assign the next value of the target node to the next
function insert(newElement,item){
     var newNode = new Node(newElement);
     var currentNode = this.find(item);
     newNode.next = currentNode.next;
     currentNode.next = newNode;
 }
Remove() method of the node to be inserted. To delete a node, you need to first find the previous node of the deleted node. For this we define the method frontNode():
function frontNode(item){
var currentNode = this.head;
while(currentNode.next.element!=item&¤tNode.next!=null){
currentNode = currentNode.next;
}
return currentNode;
}Three simple steps:
1. Create node
2. Find the previous node of the target node
3. Modify the next node of the previous node to point to the node n after the deleted node
function remove(item){
     var frontNode = this.frontNode(item);
     //console.log(frontNode.element);
     frontNode.next = frontNode.next.next;
 }
Show() method :
function show(){
     var currentNode = this.head,result;
     while(currentNode.next!=null){
         result += currentNode.next.element;//为了不显示head结点
         currentNode = currentNode.next;
     }
}
Test program:
var list = new LinkedList();
list.insert("a","head");
list.insert("b","a");
list.insert("c","b");
console.log(list.show());
list.remove("b");
console.log(list.show());
Output:

Doubly linked list
From It is very simple to traverse the linked list from the head node to the tail node, but sometimes, we need to traverse from back to front. At this point we can add a attribute to the Node object, which stores the link to the predecessor node. The poster uses the following diagram to illustrate the working principle of a doubly linked list.

First we add the front attribute to the Node class:
function Node(element){
  this.element = element;
  this.next = null;
   this.front = null;
 }
Of course, we also need to do the corresponding insert() method and remove() method accordingly Modification:
function insert(newElement,item){
  var newNode = new Node(newElement);
  var currentNode = this.find(item);
  newNode.next = currentNode.next;
  newNode.front = currentNode;//增加front指向前驱结点
  currentNode.next = newNode;
}
function remove(item){
  var currentNode = this.find(item);//找到需要删除的节点
  if (currentNode.next != null) {
    currentNode.front.next = currentNode.next;//让前驱节点指向需要删除的节点的下一个节点
    currentNode.next.front = currentNode.front;//让后继节点指向需要删除的节点的上一个节点
    currentNode.next = null;//并设置前驱与后继的指向为空
    currentNode.front = null;
  }
}
Display the linked list in reverse order:
Need to add a method to the doubly linked list to find the last node. The findLast() method finds the last node in the linked list, eliminating the need to traverse the chain from front to back.
function findLast() {//查找链表的最后一个节点
  var currentNode = this.head;
  while (currentNode.next != null) {
    currentNode = currentNode.next;
  }
  return currentNode;
}
Realize reverse order output:
function showReverse() {
  var currentNode = this.head, result = "";
  currentNode = this.findLast();
  while(currentNode.front!=null){
    result += currentNode.element + " ";
    currentNode = currentNode.front;
  }
  return result;
}
Test program:
var list = new LinkedList();
list.insert("a","head");
list.insert("b","a");
list.insert("c","b");
console.log(list);
list.remove("b");
console.log(list.show());
console.log(list.showReverse());
Output:

Loop Linked list
Circular linked list is another form of linked storage structure. Its characteristic is that the pointer field of the last node in the list points to the head node, and the entire linked list forms a ring. Circular linked lists are similar to one-way linked lists, and the node types are the same. The only difference is that when creating a circular linked list, let the next attribute of its head node point to itself, that is:
head.next = head
This behavior It will be transmitted to each node in the linked list, so that the next attribute of each node points to the head node of the linked list. The poster uses the following figure to represent a circular linked list:

ModifyConstruction method:
function LinkedList(){
  this.head = new Node('head');//初始化
  this.head.next = this.head;//直接将头节点的next指向头节点形成循环链表
  this.find = find;
  this.frontNode = frontNode;
  this.insert = insert;
  this.remove = remove;
  this.show = show;
}这时需要注意链表的输出方法show()与find()方法,原来的方式在循环链表里会陷入死循环,while循环的循环条件需要修改为当循环到头节点时退出循环。
function find(item){
var currentNode = this.head;//从头结点开始
while(currentNode.element!=item&¤tNode.next.element!='head'){
currentNode = currentNode.next;
}
return currentNode;//找到返回结点数据,没找到返回null
}
function show(){
var currentNode = this.head,result = "";
while (currentNode.next != null && currentNode.next.element != "head") {
result += currentNode.next.element + " ";
currentNode = currentNode.next;
}
return result;
}测试程序:
var list = new LinkedList();
list.insert("a","head");
list.insert("b","a");
list.insert("c","b");
console.log(list.show());
list.remove("b");
console.log(list.show());
测试结果:

The above is the detailed content of Introduction to the implementation method of linked list of JavaScript data structure (picture and text). For more information, please follow other related articles on the PHP Chinese website!

 The Origins of JavaScript: Exploring Its Implementation LanguageApr 29, 2025 am 12:51 AM
JavaScript originated in 1995 and was created by Brandon Ike, and realized the language into C. 1.C language provides high performance and system-level programming capabilities for JavaScript. 2. JavaScript's memory management and performance optimization rely on C language. 3. The cross-platform feature of C language helps JavaScript run efficiently on different operating systems.
 Behind the Scenes: What Language Powers JavaScript?Apr 28, 2025 am 12:01 AM
JavaScript runs in browsers and Node.js environments and relies on the JavaScript engine to parse and execute code. 1) Generate abstract syntax tree (AST) in the parsing stage; 2) convert AST into bytecode or machine code in the compilation stage; 3) execute the compiled code in the execution stage.
 The Future of Python and JavaScript: Trends and PredictionsApr 27, 2025 am 12:21 AM
The future trends of Python and JavaScript include: 1. Python will consolidate its position in the fields of scientific computing and AI, 2. JavaScript will promote the development of web technology, 3. Cross-platform development will become a hot topic, and 4. Performance optimization will be the focus. Both will continue to expand application scenarios in their respective fields and make more breakthroughs in performance.
 Python vs. JavaScript: Development Environments and ToolsApr 26, 2025 am 12:09 AM
Both Python and JavaScript's choices in development environments are important. 1) Python's development environment includes PyCharm, JupyterNotebook and Anaconda, which are suitable for data science and rapid prototyping. 2) The development environment of JavaScript includes Node.js, VSCode and Webpack, which are suitable for front-end and back-end development. Choosing the right tools according to project needs can improve development efficiency and project success rate.
 Is JavaScript Written in C? Examining the EvidenceApr 25, 2025 am 12:15 AM
Yes, the engine core of JavaScript is written in C. 1) The C language provides efficient performance and underlying control, which is suitable for the development of JavaScript engine. 2) Taking the V8 engine as an example, its core is written in C, combining the efficiency and object-oriented characteristics of C. 3) The working principle of the JavaScript engine includes parsing, compiling and execution, and the C language plays a key role in these processes.
 JavaScript's Role: Making the Web Interactive and DynamicApr 24, 2025 am 12:12 AM
JavaScript is at the heart of modern websites because it enhances the interactivity and dynamicity of web pages. 1) It allows to change content without refreshing the page, 2) manipulate web pages through DOMAPI, 3) support complex interactive effects such as animation and drag-and-drop, 4) optimize performance and best practices to improve user experience.
 C and JavaScript: The Connection ExplainedApr 23, 2025 am 12:07 AM
C and JavaScript achieve interoperability through WebAssembly. 1) C code is compiled into WebAssembly module and introduced into JavaScript environment to enhance computing power. 2) In game development, C handles physics engines and graphics rendering, and JavaScript is responsible for game logic and user interface.
 From Websites to Apps: The Diverse Applications of JavaScriptApr 22, 2025 am 12:02 AM
JavaScript is widely used in websites, mobile applications, desktop applications and server-side programming. 1) In website development, JavaScript operates DOM together with HTML and CSS to achieve dynamic effects and supports frameworks such as jQuery and React. 2) Through ReactNative and Ionic, JavaScript is used to develop cross-platform mobile applications. 3) The Electron framework enables JavaScript to build desktop applications. 4) Node.js allows JavaScript to run on the server side and supports high concurrent requests.


Hot AI Tools

Undresser.AI Undress
AI-powered app for creating realistic nude photos

AI Clothes Remover
Online AI tool for removing clothes from photos.

Undress AI Tool
Undress images for free

Clothoff.io
AI clothes remover

Video Face Swap
Swap faces in any video effortlessly with our completely free AI face swap tool!

Hot Article
Hot Tools

Atom editor mac version download
The most popular open source editor

mPDF
mPDF is a PHP library that can generate PDF files from UTF-8 encoded HTML. The original author, Ian Back, wrote mPDF to output PDF files "on the fly" from his website and handle different languages. It is slower than original scripts like HTML2FPDF and produces larger files when using Unicode fonts, but supports CSS styles etc. and has a lot of enhancements. Supports almost all languages, including RTL (Arabic and Hebrew) and CJK (Chinese, Japanese and Korean). Supports nested block-level elements (such as P, DIV),

Dreamweaver Mac version
Visual web development tools

SublimeText3 Linux new version
SublimeText3 Linux latest version

Dreamweaver CS6
Visual web development tools

