Home >Backend Development >C#.Net Tutorial >Detailed explanation of .NET client implementation of PipeLine and Transactions in Redis
Detailed explanation of .NET client implementation of PipeLine and Transactions in Redis
- 高洛峰Original
- 2017-03-19 10:05:352421browse
This article mainly introduces the knowledge related to the .NET client's implementation of pipelines (PipeLine) and transactions (Transactions) in Redis. It has a very good reference value. Let’s take a look at it with the editor.
Preface
PipeLine features in Redis: To briefly describe, Redis How to send multiple commands at once from the client, and how to respond to multiple commands at once from the server to the client.
Redis uses the client-server model and the TCP server of the request/response protocol, which means that a request must have the following steps to complete: 1. The client sends it to the server Query the command and then wait for a response from the server, usually in a blocking manner. 2. The server processes the query command and sends the response back to the client. In this way, it will be connected through the network. If it is a local loopback interface, it can respond very quickly. However, if it goes to the external network, or even does a series of layer-by-layer forwarding on the external network, it will be particularly painful. No matter what the network delay is, it will take up the overall response time. In this way, if one command is sent at a time, the network delay is 100ms, and we have to do it. So if 1000 commands are sent at one time, the network delay of 100*1000ms will be difficult to tolerate.
In response to the above problems, Redis has provided the pipeline function since version 2.6. It allows the client to process new requests without reading the old response. This makes it possible to send multiple commands to the server without having to wait for a reply until the reply is read in the final step. This is called PipeLine and has been a widely used technology for decades. For example, many POP3 protocol implementations already support this feature, greatly speeding up the process of downloading new emails from the server.
The word "transaction" is often encountered, so there is no need to complain too much. The goal should be the same, that is, how to make a set of operations into atomic operations so that it cannot reach the end point and return to the starting point.
Brief introduction to the wireshark packet capture tool
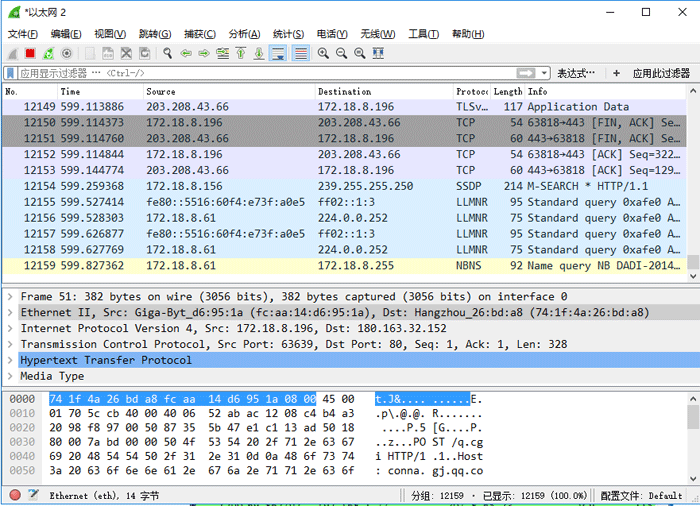
In order to give everyone a more vivid understanding of the pipeline, in this section we first talk about the Wireshark packet capture tool. It will let you see the process and details of the redis command sent from the client to the server through the tcp protocol.
Wireshark can capture every message sent and received by the system. We will only give a brief description of some filtering here. The picture below is what it looks like. After you open it, you can explore its usage.

Briefly describe several filtering rules:
1. IP filtering: target ip filtering: ip.dst==172.18.8.11, source ip address filtering :ip.src==192.168.1.12;
2. Port filtering: tcp.port==80. This rule filters out both the source port and the destination port of 80. Use tcp.dstport==80 to only filter packets with a destination port of 80, and tcp.srcport==80 to only filter packets with a source port of 80;
3. Protocol filtering: directly enter the protocol name in the fiter box. Can, such as: http, tcp, udp,...
4. http mode filtering: filter get packets, http.request.method=="GET", filter post packets, http.request.method= ="POST";
5. If you use multiple conditions to filter, you need to add the connection symbol, and. For example, ip.src==192.168.1.12 and http.request.method=="POST" and tcp.srcport==80
StackExchange.Redis implements Redis Pipeline
The pipeline in the above two pictures is clear at a glance.
If the client makes multiple requests to the redis server, the normal mode looks like this
If the client makes multiple requests to the redis server, the pipeline mode looks like this

In general mode, our code is:
public static void GetNoPipelining()
  {
   for (var i = 0; i < 3; i++)
   {
    var key = "name:" + i;
    db.StringAppend(key, "张龙豪");
   }
  }

这样你自己做的过程中,可以看到我圈起来的3个tcp请求的key分别为name:0,name:1,name:2这样子。
那么我们使用管道模式
public static void GetPipelining()
  {
   var batch = db.CreateBatch();
   for (int i = 0; i < 3; i++)
   {
    var key = "mename:" + i;
    batch.StringAppendAsync(key, "张龙豪");
   }
   batch.Execute();
  }
再来看下请求

这样很明显就能看出来是1个请求发送出来啦多个命令。那么我们不用createBatch()也是可以实现这样的效果的。
var a = db.StringAppendAsync("zlh:1", "zhanglonghao1");
   var b = db.StringAppendAsync("zlh:2", "zhanglonghao2");
   var c = db.StringAppendAsync("zlh:3", "zhanglonghao3");
   var aa = db.Wait(a);
   var bb = db.Wait(a);
   var cc = db.Wait(a);
在接下来我们做一个简单的性能比较。代码如下:
static void Main(string[] args)
  {
   Stopwatch watch = new Stopwatch();
   Stopwatch watch1 = new Stopwatch();
   watch.Start();
   GetNoPipelining();
   Console.WriteLine("一般循环耗时:" + watch.ElapsedMilliseconds);
   watch.Stop();
   watch1.Start();
   GetPipelining();
   Console.WriteLine("Pipelining插入耗时:" + watch1.ElapsedMilliseconds);
   watch1.Stop();
   Console.ReadLine();
  }
  public static void GetNoPipelining()
  {
   for (var i = 0; i < 5000; i++)
   {
    var key = "name:" + i;
    db.StringAppend(key, "张龙豪");
   }
  }
  public static void GetPipelining()
  {
   var batch = db.CreateBatch();
   for (int i = 0; i < 5000; i++)
   {
    var key = "mename:" + i;
    batch.StringAppendAsync(key, "张龙豪");
   }
   batch.Execute();
  }
结果如下:

到此我还要说一下StackExchange.Redis的三种命令模式,其中使用2和3的模式发送命令,会默认被封装在管道中,不信的话,你可以做个小demo测试下:
1、sync:同步模式,会直接阻塞调用者,但不会阻塞其他线程。
2、async:异步模式,使用task模型封装。
3、fire-and-forget:发送命令,然后完全不关心最终什么时候完成命令操作。在Fire-and-Forget模式下,所有命令都会立即得到返回值,该值都是该返回值类型的默认值,比如操作返回类型是bool将会立即得到false,因为false = default(bool)。
StackExchange.Redis实现Redis事务(Transactions)
这个看官方文档,我只能说实现的很奇怪吧。我先描述下我的环境,就是准备一个空redis库,然后一步一步往下走,我们写代码看结果,来搞一搞这个事务。
static void Main(string[] args)
  {
   var tran = db.CreateTransaction();
   tran.AddCondition(Condition.ListIndexNotEqual("zlh:1",0,"zhanglonghao"));
   tran.ListRightPushAsync("zlh:1", "zhanglonghao");
   bool committed = tran.Execute();
   Console.WriteLine(committed);
   Console.ReadLine();
  }
执行结果为:true。数据库中结果如下,说明我们插入成功。

即:如果key为:zlh:1的list集合在索引0初的value!=zhanglonghao的话,我们从链表右侧插入一条数据key为zlh:1value为zhanglonghao,成功。因为第一次操作为空库。0处确实不为张龙豪。
数据不清空,继续上代码。
static void Main(string[] args)
  {
   var tran = db.CreateTransaction();
   tran.AddCondition(Condition.ListIndexNotEqual("zlh:1",0,"zhanglonghao"));
   tran.ListRightPushAsync("zlh:1", "zhanglonghao1");
   bool committed = tran.Execute();
   Console.WriteLine(committed);
   Console.ReadLine();
  }
结果为false,数据库没有增减数据。已久与上图的数据保持一致。
原因分析:0处此时为zhanglonghao,所以ListIndexNotEqual("zlh:1",0,"zhanglonghao")为假命题,直接回滚,不执行下面的插入命令。
数据不清空,继续上代码:
static void Main(string[] args)
  {
   var tran = db.CreateTransaction();
   tran.AddCondition(Condition.ListIndexEqual("zlh:1",0,"zhanglonghao"));
   tran.ListRightPushAsync("zlh:1", "zhanglonghao1");
   bool committed = tran.Execute();
   Console.WriteLine(committed);
   Console.ReadLine();
  }
结果为true,数据结果如下,增长一条值为zhanglonghao1的数据:

原因分析:ListIndexEqual("zlh:1",0,"zhanglonghao")为真命题,执行下面的操作,提交事物。
数据不删继续上代码:
static void Main(string[] args)
  {
   var tran = db.CreateTransaction();
   tran.AddCondition(Condition.ListIndexEqual("zlh:1",0,"zhanglonghao"));
   tran.ListRightPushAsync("zlh:1", "zhanglonghao2");
   tran.AddCondition(Condition.ListIndexNotEqual("zlh:1", 0, "zhanglonghao"));
   tran.ListRightPushAsync("zlh:1", "zhanglonghao3");
   bool committed = tran.Execute();
   Console.WriteLine(committed);
   Console.ReadLine();
  }
结果为false,数据库数据已久与上面的保持一致,不增不减。
分析原因:Condition.ListIndexEqual("zlh:1",0,"zhanglonghao")为true,但是到下面的ListIndexNotEqual("zlh:1", 0, "zhanglonghao")为false。故整个事物的操作回滚,不予执行,故数据库没有变化。
到此,我就不写多余的代码啦,但我要说几个注意点:
1、执行命令的操作需为异步操作。
2、在事物中执行的命令,都不会直接看到结果,故此结果也不能用于下面代码做判断,因为当前的异步命令在Execute()之前是不会对数据库产生任何影响的。
The above is the detailed content of Detailed explanation of .NET client implementation of PipeLine and Transactions in Redis. For more information, please follow other related articles on the PHP Chinese website!

