Home >Java >javaTutorial >Graphical Java Junit entry case (code)
Graphical Java Junit entry case (code)
- 高洛峰Original
- 2017-03-12 09:29:461422browse
Detailed explanation of Java's Junit entry case (code)
Go directly to the code demonstration:
For example, you have written an ArrayList Class method:
public class ArrayList implements List {
    private int size = 0;

    private Object[] elementData = new Object[100];

    public void add(Object o){

    }
    public void add(int index, Object o){

    }

    public Object get(int index){
        return Object;
    }

    public Object remove(int index){
        return Object;
    }

    public int size(){
        return -1;
    }
}
What should I do if I want to test it now? At this time, the Junit tool can be used;
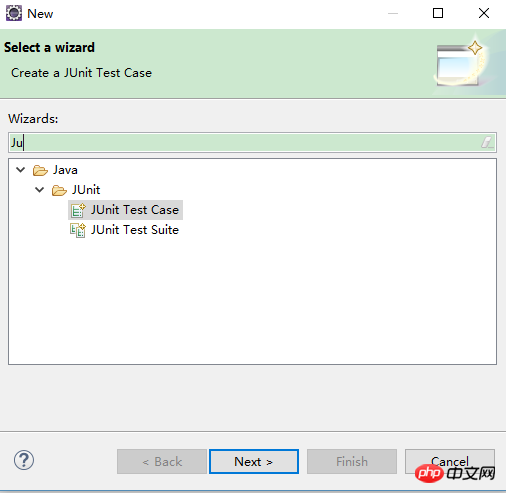
First we create a Junit class:

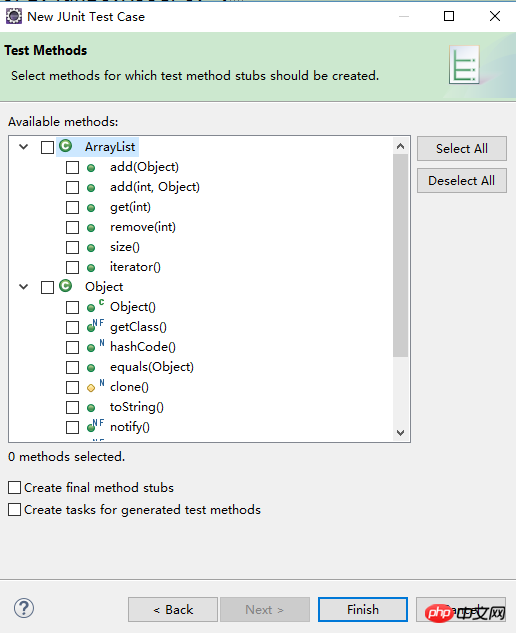
If you right-click directly on the class you want to test You can directly check the required test methods, such as:

Then you can start adding methods directly:
public class ArrayListTest {

   // 这里的@Test是必须的注释,就是告诉JUnit这里就是一个测试方法
    @Test
    public void testGet() {
        static Object[] Data = new Object[]{1,2,3,4,5,6,7,8};
            ArrayList test;
                // 添加数据到test中
                .........
                .........

                //测试test 这里要说一下,
                //出了要assertEqual 判断值是否相等的话,其实还有assertFalse,assertNull等方法判断
                assertEqual(Data[1],test.get(1));
    }
}
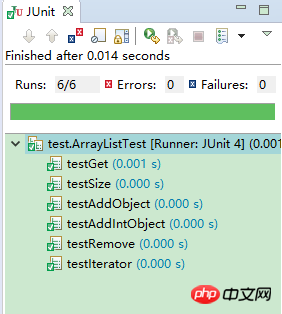
Yes, that’s right, it’s that simple. If there is no problem with your class, you should be able to return a picture like this:

However, have you found that if you are testing other methods, such as add and remove, It is necessary to have an ArrayList pre-populated with data. Do I need to do this every time I run a test?
This is too redundant. At this time, JUnit has its own clever trick:
public class ArrayListTest {

    static Object[] Data = new Object[]{1,2,3,4,5,6,7,8};
    ArrayList test;

    //这个before注释可以理解成:
    //在执行每个@Test修饰的方法前都先要执行这个setUp,等于前置条件一样
    @Before
    public void setUp() throws Exception{
        test = new ArrayList();
        for(Object data: Data){
            test.add(data);
        }
    }
        //test function ;

}
It seems to be almost OK now, but what should I do when there are multiple test classes, run them one by one? Isn't this similar to creating a main method test?
So Junit provides another test suite group:
//你现在有3个测试类
public class Test1{
    @Test
    public void test(){
        //...Test1
    }
}

public class Test2{
    @Test
    public void test(){
        //...Test2
    }
}
public class Test3{
    @Test
    public void test(){
        //...Test3
    }
}


//创建一个测试套件类(测试套件可以互相叠加的):
@RunWith(Suite.class)
@Suite.SuiteClasses({test1.class,test2.class,test3.class
                    })
public class SuitTest {
  //必须是public 修饰的,空类
}
In addition to the comments written above, there are actually quite a few, but I won’t go into them yet. (You are too scumbag to use these, run away...), I will post it for readers to take a look at:

That’s all, it’s just an introduction That’s all. There is no advanced technology or thinking. simple: -/.
I would like to share a sentence at the end:
Test cases are used to prove that you are not wrong, not to prove that you are right.
I personally feel that these words really speak to my heart.
The above is the detailed content of Graphical Java Junit entry case (code). For more information, please follow other related articles on the PHP Chinese website!

