Home >Backend Development >Python Tutorial >SQLAlchemy ORM example introduction to python
SQLAlchemy ORM example introduction to python
- 高洛峰Original
- 2017-03-06 14:53:223088browse
1. Introduction to ORM
ORM's full name in English is object relational mapping, which is an object mapping relationship program. Simply put, in our object-oriented programs like Python, everything is an object, but we use All databases are relational. In order to ensure consistent usage habits, the object model of the programming language and the relational model of the database are mapped through ORM, so that we can directly use the programming language when operating the database using the programming language. You can just operate the object model without using SQL language directly.
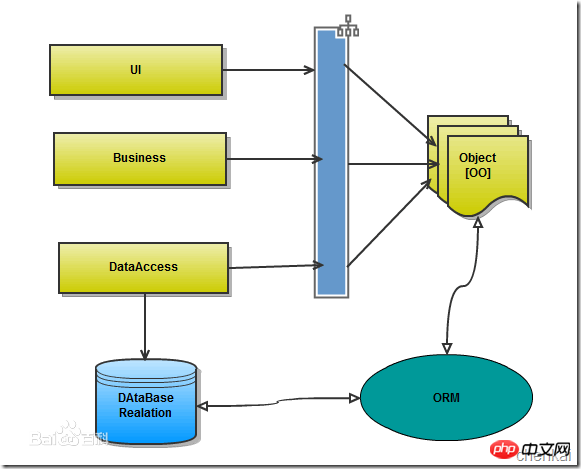
Advantages of ORM:
Hidden data access details, "closed" universal database interaction, the core of ORM. It makes our common database interactions simple and easy, without having to think about damn SQL statements at all. Rapid development comes from this.
ORM makes it simple and easy for us to construct a solidified data structure.
Disadvantages:
Inevitably, automation means mapping and association management at the expense of performance (in the early days, this was all What people like ORM have in common). Various current ORM frameworks are trying to use various methods to alleviate this problem (LazyLoad, Cache), and the effect is still very significant.
2. SQLAlchemy Framework and Database API
In Python, the most famous ORM framework is SQLAlchemy. Users include well-known companies or applications such as openstack\Dropbox. The main user list is http://www.php.cn/
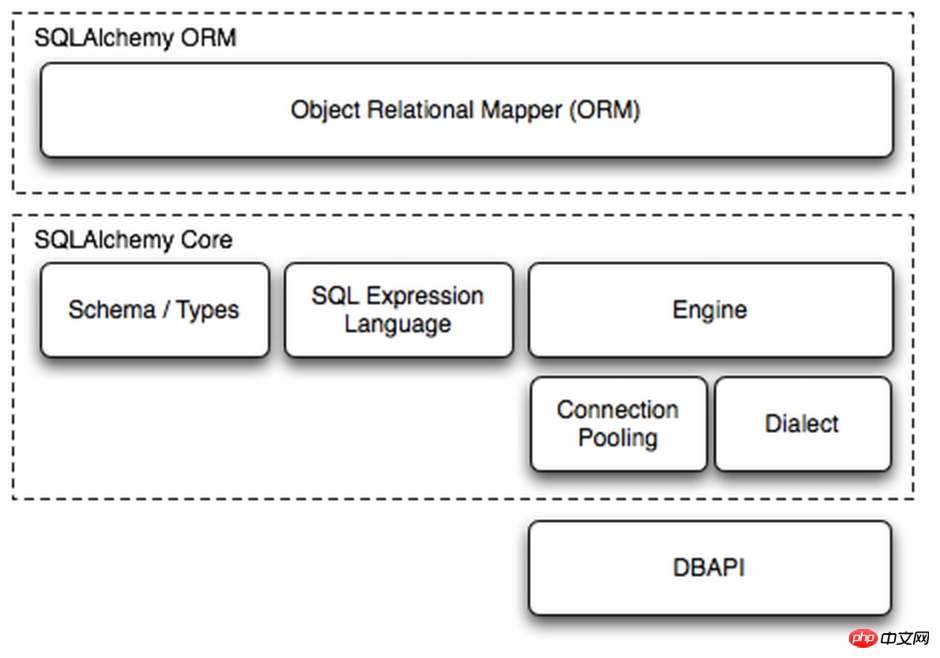
. You need to map the tables in the database into classes yourself. Then it can be called through the object. SQLAlchemy not only supports MYSQL, but also Oracle, etc.
Dialect is used to communicate with the data API and call different database APIs according to different configuration files to achieve operations on the database:
MySQL-Python
    mysql+mysqldb://<user>:<password>@<host>[:<port>]/<dbname>

pymysql
    mysql+pymysql://<username>:<password>@<host>/<dbname>[?<options>]

MySQL-Connector
    mysql+mysqlconnector://<user>:<password>@<host>[:<port>]/<dbname>

cx_Oracle
    oracle+cx_oracle://user:pass@host:port/dbname[?key=value&key=value...]
Install SQLAlchemy:
pip install SQLAlchemy
3. Connect to the database and query
from sqlalchemy import create_engine

#连接数据库,生成engine对象;最大连接数为5个
engine = create_engine("mysql+pymysql://root:root@127.0.0.1:3306/zcl", max_overflow=5)
print(engine)   #Engine(mysql+pymysql://root:***@127.0.0.1:3306/zcl)
result = engine.execute('select * from students') #不用commit(),会自动commit
print(result.fetchall())
Output:
Engine(mysql+pymysql://root:***@127.0.0.1:3306/zcl)[(1, 'zcl', 'man', 22, '15622341234', None), (2, 'alex', 'man', 30, '15622341235', None), (5, 'Jack', 'man', 25, '1351234', 'CN'), (6, 'Mary', 'female', 18, '1341234', 'USA'), (10, 'Jack', 'man', 25, '1351234', 'CN'), (11, 'Jack2', 'man', 25, '1351234', 'CN'), (12, 'Mary', 'female', 18, '1341234', 'USA'), (13, 'cjy', 'man', 18, '1562234', 'USA'), (14, 'cjy2', 'man', 18, '1562235', 'USA'), (15, 'cjy3', 'man', 18, '1562235', 'USA'), (16, 'cjy4', 'man', 18, '1562235', 'USA'), (17, 'cjy5', 'man', 18, '1562235', 'USA')]
4. Create tables
Create user and color tables: When creating tables, they need to be bound to instances of MetaData.
from sqlalchemy import create_engine, \
    Table, Column, Integer, String, MetaData, ForeignKey

metadata = MetaData()  #相当于实例一个父类

user = Table('user', metadata,      #相当于让Table继承metadata类
             Column('id', Integer, primary_key=True),
             Column('name', String(20)),
             )

color = Table('color', metadata,    #表名color
              Column('id', Integer, primary_key=True),
              Column('name', String(20)),
              )
engine = create_engine("mysql+pymysql://root:root@localhost:3306/zcl", max_overflow=5)

metadata.create_all(engine)  #table已经与metadate绑定
View the created table:
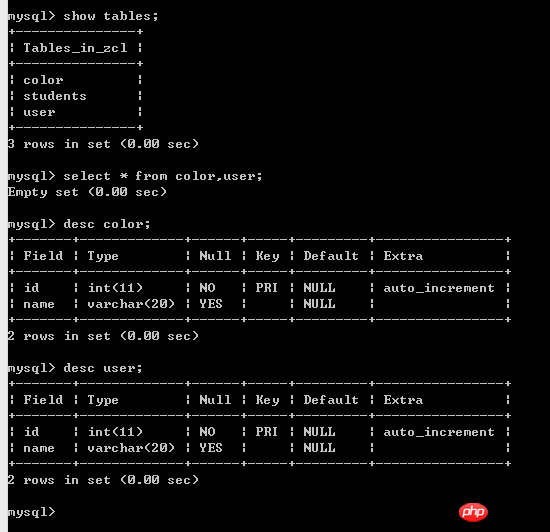
5. Add, delete, modify and check
1. Let’s understand it first Add, delete, and modify query of native sql statements:
from sqlalchemy import create_engine, Table, Column, Integer, String, MetaData, ForeignKey,select

metadata = MetaData()

user = Table('user', metadata,
             Column('id', Integer, primary_key=True),
             Column('name', String(20)),
             )

color = Table('color', metadata,
              Column('id', Integer, primary_key=True),
              Column('name', String(20)),
              )
engine = create_engine("mysql+pymysql://root:root@127.0.0.1:3306/zcl", max_overflow=5)

conn = engine.connect()  #创建游标,当前实例所处状态

# 创建SQL语句,INSERT INTO "user" (id, name) VALUES (:id, :name)
#id号可省略,默认是自增的
# conn.execute(user.insert(), {'id': 1, 'name': 'zcl'})
# conn.close()

# sql = user.insert().values(name='wu')  #插入
# conn.execute(sql)
# conn.close()

#删除id号大于1的行,也可以where(user.c.name=="zcl")
# sql = user.delete().where(user.c.id > 1)
# conn.execute(sql)
# conn.close()

# 将name=="wuu"更改为"name=="ed"
# sql = user.update().where(user.c.name == 'wuu').values(name='ed')
# conn.execute(sql)
# conn.close()

#查询  下面不能写 sql = user.select... 会曝错
#sql = select([user, ])  #[(1, 'zcl'), (9, 'ed'), (10, 'ed')]
# sql = select([user.c.id, ])   #[(1,), (9,), (10,)]
sql = select([user.c.name, color.c.name]).where(user.c.id==color.c.id)
# sql = select([user.c.name]).order_by(user.c.name)
# sql = user.select([user]).group_by(user.c.name)

result = conn.execute(sql)
print(result.fetchall())
conn.close()
2. Add, delete, and modify query through SQLAlchemy (important):
from sqlalchemy import create_engine
from sqlalchemy.ext.declarative import declarative_base
from sqlalchemy import Column,Integer,String
from sqlalchemy.orm import sessionmaker

Base = declarative_base()    #生成一个SqlORM基类(已经封装metadata)
#echo=True可以查看创建表的过程
engine = create_engine("mysql+pymysql://root:root@localhost:3306/zcl", echo=True)

class Host(Base):
    __tablename__ = 'hosts'   #表名为host
    id = Column(Integer, primary_key=True, autoincrement=True)
    hostname = Column(String(64), unique=True, nullable=False)
    ip_addr = Column(String(128), unique=True, nullable=False)
    port = Column(Integer, default=22)


Base.metadata.create_all(engine)   #创建所有表结构

if __name__ == '__main__':
    #创建与数据库的会话sessionclass,注意,这里返回给session的是个class类,不是实例
    SessionCls=sessionmaker(bind=engine)
    session=SessionCls()  #连接的实例
    #准备插入数据
    h1 = Host(hostname='localhost', ip_addr='127.0.0.1')    #实例化(未创建)
    h2 = Host(hostname='ubuntu', ip_addr='192.168.2.243', port=20000)

    #session.add(h1)   #也可以用下面的批量处理
    #session.add_all([h1,h2])
    #h2.hostname='ubuntu_test'  #只要没提交,此时修改也没问题

    #查询数据,返回一个对象
    obj = session.query(Host).filter(Host.hostname=="localhost").first()
    print("-->",obj)
    #[0255631d0cd3bd8030034003e6ba8089]如果上面为.all()
    #f8774803eaa8e8932442db37a173b2b9如果上面为.first()

    #如果用.all(),会曝错AttributeError:'list'objecthasnoattribute'hostname'
    #obj.hostname = "localhost_1"   #将主机名修改为localhost_1

    session.delete(obj) #删除行

    session.commit()#提交
Screenshot of operation results:
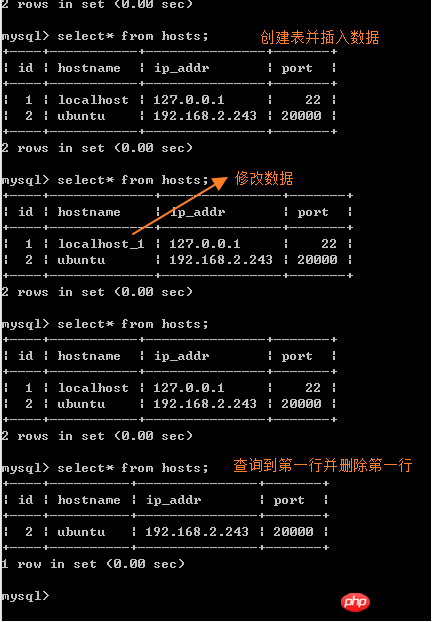
6. Foreign key association
1. Create the host table hosts and the grouping table group, and establish an association, that is, one group can correspond to multiple hosts:
from sqlalchemy import create_engine
from sqlalchemy.ext.declarative import declarative_base
from sqlalchemy import Column, Integer, String,ForeignKey
from sqlalchemy.orm import sessionmaker,relationship

Base = declarative_base()  # 生成一个SqlORM 基类(已经封闭metadata)
#echo=True可以查看创建表的过程
engine = create_engine("mysql+pymysql://root:root@localhost:3306/zcl", echo=True)

class Host(Base):
    __tablename__ = 'hosts'   #表名
    id = Column(Integer, primary_key=True, autoincrement=True) #默认自增
    hostname = Column(String(64), unique=True, nullable=False)
    ip_addr = Column(String(128), unique=True, nullable=False)
    port = Column(Integer, default=22)
    #外键关联,主机与组名关联,一个组对应多个主机
    group_id = Column(Integer, ForeignKey("group.id"))


class Group(Base):
    __tablename__ = "group"
    id = Column(Integer,primary_key=True)
    name = Column(String(64), unique=True, nullable=False)


Base.metadata.create_all(engine)  # 创建所有表结构

if __name__ == '__main__':
    # 创建与数据库的会话session class ,注意,这里返回给session的是个class,不是实例
    SessionCls = sessionmaker(bind=engine)
    session = SessionCls()  #连接的实例

    session.commit() #提交
View results:
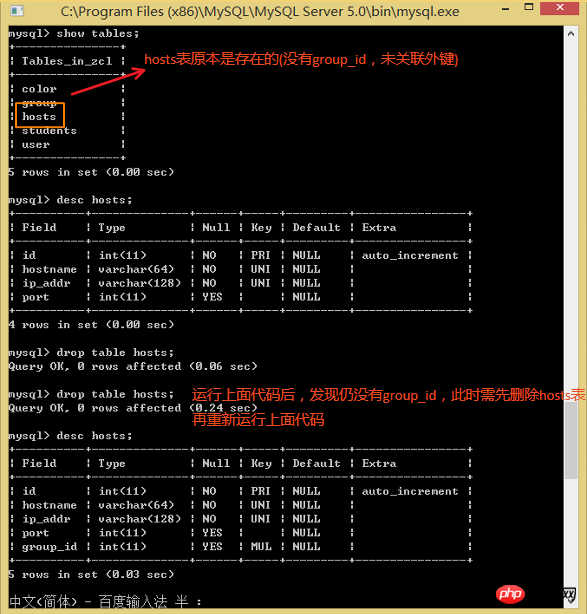
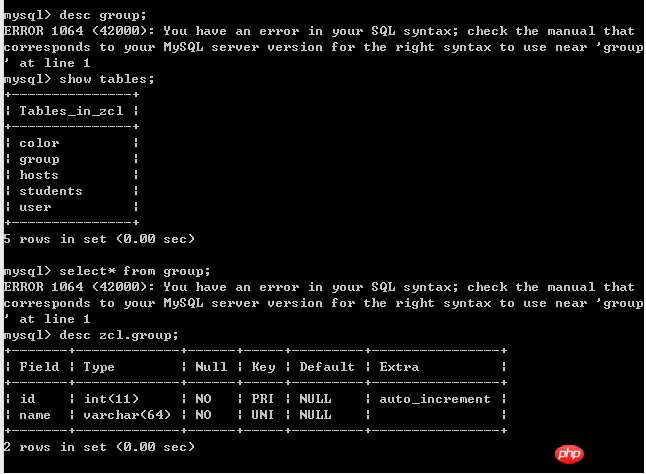
Problem: When viewing the newly created group table structure or querying from the group table, you will find that desc group; select * from group will expose errors. !!(Why this error occurs may be caused by some relationship between group and database, eg: group by... I guess)
Solution: Use desc zcl.group; select * from zcl.group; (zcl is the database name)
2. After creating the table, you need to create data in the table. Next, create data in the hosts table and group table:
from sqlalchemy import create_engine
from sqlalchemy.ext.declarative import declarative_base
from sqlalchemy import Column, Integer, String,ForeignKey
from sqlalchemy.orm import sessionmaker

Base = declarative_base()  # 生成一个SqlORM 基类(已经封闭metadata)
#echo=True可以查看创建表的过程
engine = create_engine("mysql+pymysql://root:root@localhost:3306/zcl", echo=True)

class Host(Base):
    __tablename__ = 'hosts'   #表名
    id = Column(Integer, primary_key=True, autoincrement=True) #默认自增
    hostname = Column(String(64), unique=True, nullable=False)
    ip_addr = Column(String(128), unique=True, nullable=False)
    port = Column(Integer, default=22)
    #外键关联,主机与组名关联
    group_id = Column(Integer, ForeignKey("group.id"))


class Group(Base):
    __tablename__ = "group"
    id = Column(Integer,primary_key=True)
    name = Column(String(64), unique=True, nullable=False)

Base.metadata.create_all(engine)  # 创建所有表结构

if __name__ == '__main__':
    # 创建与数据库的会话session class ,注意,这里返回给session的是个class,不是实例
    SessionCls = sessionmaker(bind=engine)
    session = SessionCls()  #连接的实例

    g1 = Group(name = "g1")
    g2 = Group(name = "g2")
    g3 = Group(name = "g3")
    g4 = Group(name = "g4")
    session.add_all([g1,g2,g3,g4])

    #此时上面的g1,g2,g3三条记录还未存在,因为程序运行到这一行时还未commit(),故g1.id也未存在,但是下面一行代码是用到g1.id的!!经过测试: 运行时虽然不曝错,但关联不成功,如下图
    h1 = Host(hostname='localhost', ip_addr='127.0.0.1',group_id=g1.id)
    session.add(h1)

    session.commit() #提交
After testing: Although no errors are exposed during runtime, the association is unsuccessful, as shown below:
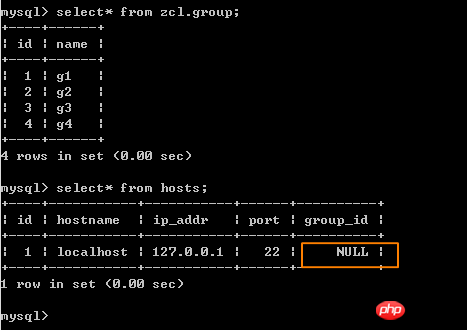
3. Now the problem comes again. The group_id in the hosts table is empty!! This is definitely not possible. Now how to make group_id not empty without deleting the hosts table data (eg: make group_id 4 and establish association with g4)?? The following code can be used:
g4 = session.query(Group).filter(Group.name=="g4").first()     #找到g4组的对象
h = session.query(Host).filter(Host.hostname=="localhost").update({"group_id":g4.id})  #更新(修改)
session.commit() #提交
4. Question: How to get the group_id associated with the host??
g4=session.query(Group).filter(Group.name=="g4").first()
h=session.query(Host).filter(Host.hostname=="localhost").first()
print("h1:",h.group_id)
Okay, I admit it The question is too simple. Through the above code, find the host object h, then h.group_id is the answer. The next question is the key point.
5. 此时可以获取已经关联的group_id,但如何获取已关联的组的组名??
print(h.group.name) #AttributeError:'Host'object has no attribute 'group'
嗯,你是初学者,你当然会说通过过h.group.name就可以找到与主机关联的组名! BUT,这是不行的,会曝错,因为Host类根本就没有group属性!!
解决方法:
first:
from sqlalchemy.orm import relationship #导入relationship
second:
在Host类中加入group = relationship("Group"):
class Host(Base):    __tablename__ = 'hosts'   #表名
    id = Column(Integer, primary_key=True, autoincrement=True) #默认自增
    hostname = Column(String(64), unique=True, nullable=False)
    ip_addr = Column(String(128), unique=True, nullable=False)
    port = Column(Integer, default=22)    #外键关联,主机与组名关联
    group_id = Column(Integer, ForeignKey("group.id"))    group = relationship("Group")
此时再用print(h.group.name)就不会曝错啦!!
6. 哈哈,问题还没完呢。 前面已经实现:通过主机可查看对应组名,那么如何实现通过组名查看对应的主机??
经过前面5个点的历练,你已成为小小的老司机了,于是你很自信地说: 和第5个点一样,在Group类中加入hosts = relationship("Host");
class Host(Base):
    __tablename__ = 'hosts'   #表名
    id = Column(Integer,primary_key=True, autoincrement=True)   #默认自增
    hostname = Column(String(64), unique=True, nullable=False)
    ip_addr = Column(String(128), unique=True, nullable=False)
    port = Column(Integer, default=22)
    #外键关联,主机与组名关联
    group_id = Column(Integer,ForeignKey("group.id"))
    group = relationship("Group")

class Group(Base):
    __tablename__ = "group"
    id = Column(Integer, primary_key=True)
    name = Column(String(64), unique=True, nullable=False)
    hosts = relationship("Host")

Base.metadata.create_all(engine)     #创建所有表结构

g4 = session.query(Group).filter(Group.name=="g4").first()
h = session.query(Host).filter(Host.hostname=="localhost").first()
print("h1:",h.group_id)       #h1: 4
#此时可以获取已经关联的group_id,但如何获取已关联的组的组名
print(h.group.name)          #g4
print("g4:",g4.hosts)        #g4:[<__main__.Hostobjectat0x0000000004303860>]
7. 通过上面的两句代码可实现双向关联。但必须在两个表都加上一句代码才行,有没有办法只用一句代码就实现双向关联?? 当然有,老司机会这么做:
在Host类中加入下面这句代码,即可实现双向关联:
group=relationship("Group",backref="host_list")
八、合并查询join
合并查询分为: inner join、left outer join、right outer join、full outer join
下面的例子可以让你完全理解join: http://stackoverflow.com/questions/38549/what-is-the-difference-between-inner-join-and-outer-join
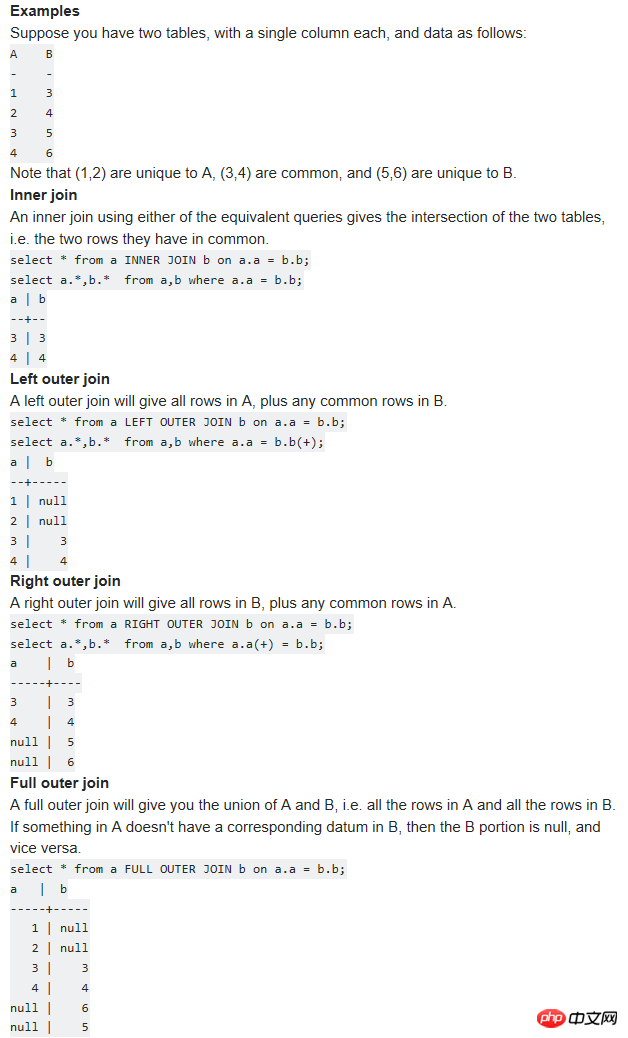
关于join的原生sql操作:
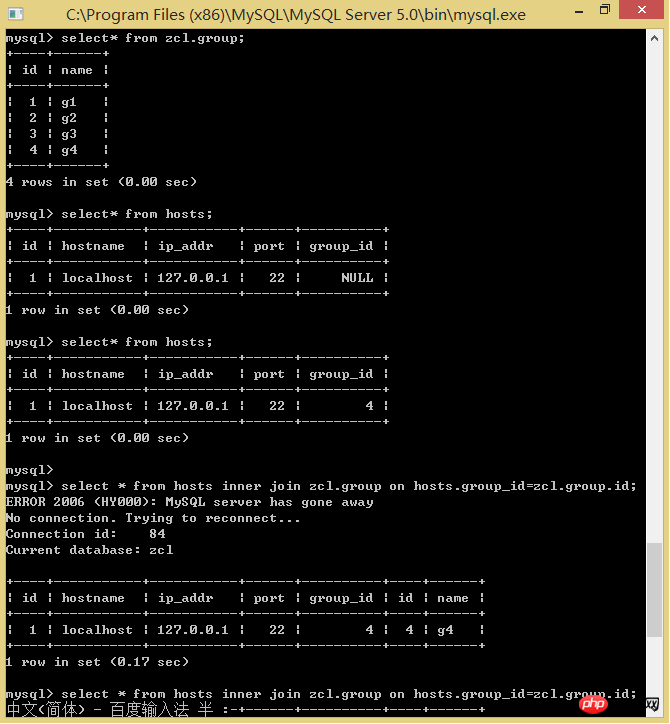
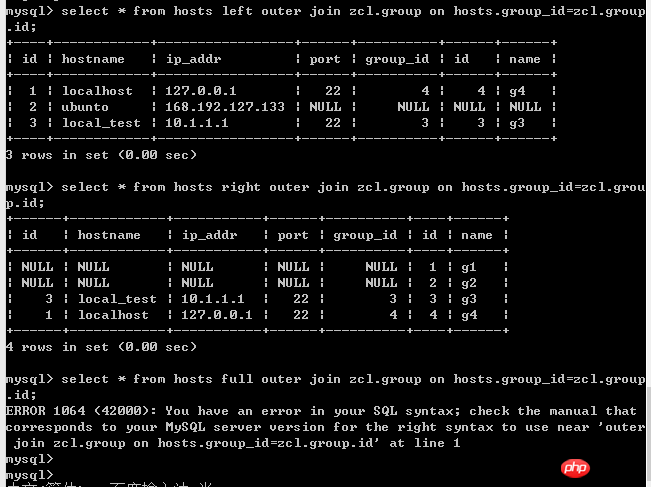
在SQLAlchemy实现sql.join:
obj = session.query(Host).join(Host.group).all()    #相当于inner join
print("-->obj:",obj)
九、分类聚合group by
group by是啥意思呢? 我说下我的理解吧,group即分组,by为通过;合起来即: 通过XX分组;
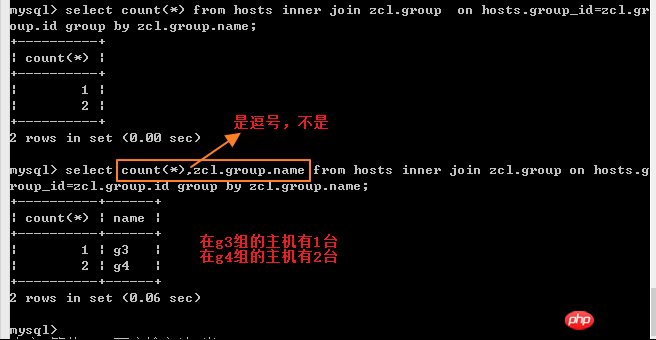
举个例子吧,现在有两张表,分别是主机表与分组表。两表已经通过group_id建立关联,分组表中有4个数据,分别为g1,g2,g3,g4; id分别为1,2,3,4; 而主机表有3个数据,group_id分别为4,3,4; id分别为1,2,4; 现在对hosts表执行group by命令,进行分类聚合。
具体请看下图:
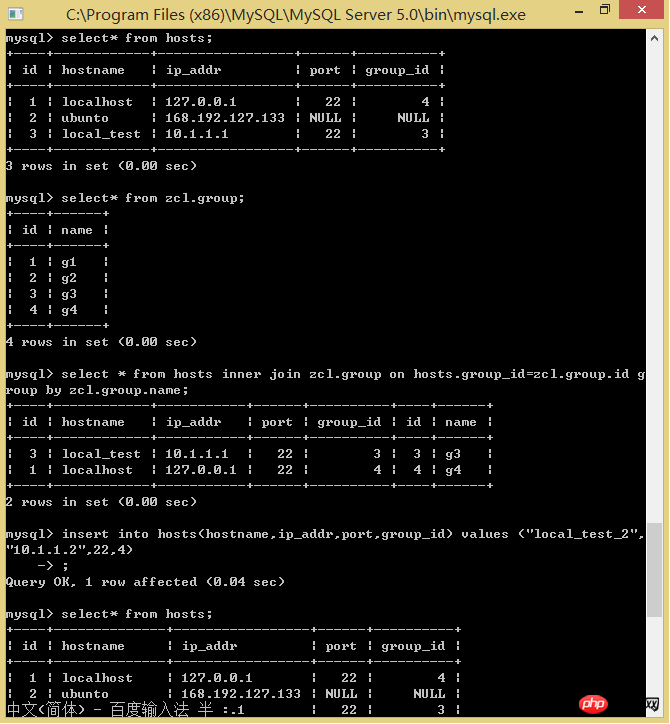
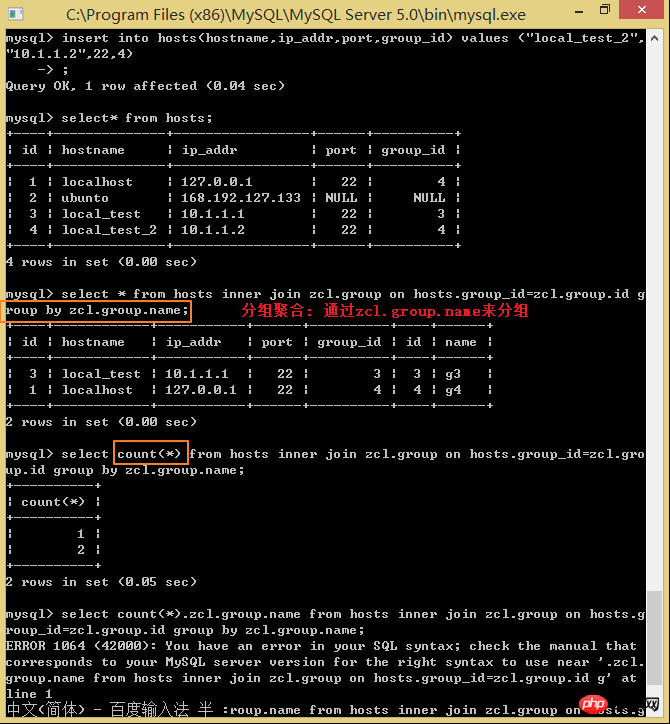
对应SQLAlchemy语句:
obj1 = session.query(Host).join(Host.group).group_by(Group.name).all()    #分类聚合
print("-->obj1:",obj1)
对应SQLAlchemy语句:
obj2 = session.query(Host,func.count(Group.name)).join(Host.group).group_by(Group.name).all()
print("-->obj2:",obj2)

输出:
-->obj2: [(eee7a277edacfa2db32c6af0fb3aa2a9, 1), (f4f7c97c04e3ddaa72fc606608f96c28, 2)]
十、多对多关联
多对多关联,即: 一个主机h1可对应在多个组(g1,g2),一个组(g1)可对应多个主机(h1,h2)
想实现如下的多对多关联,需要一张中间表。Eg:
 h1   g1
 h1   g2
 h2   g1

Host表
 h1
 h2
 h3
Group表
 g1
 g2
 g3

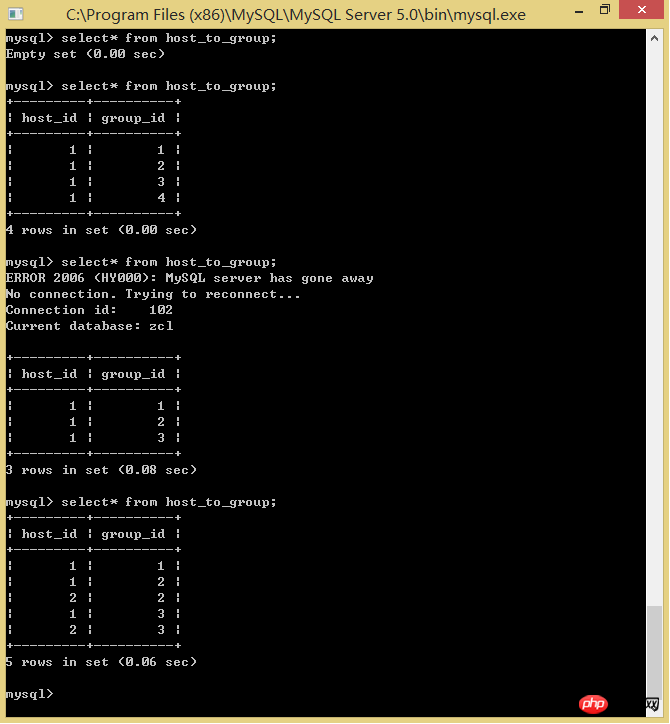
HostToGroup中间表(实现多对多关联,sqlalchemy也是这样实现的)
 id    host_id     group_id  1       1            1
  2       1            2
  3       2            1
虽然有了中间表,但如果想查看一个组对应的所有主机名或者一个主机对应的所有组,还是需要Group/Host与中间表进行一系列的关联操作(join~), 但SqlAlchemy简化了关联操作!!
调用下面命令便会自动关联中间表:
Host.groups()  #查看一个主机对应所有组
Group.hosts()
SQLAlchemy是如何实现多对多关联的??
1. 建立中间表,关联其它两个表
from sqlalchemy import create_engine,func,Table
from sqlalchemy.ext.declarative import declarative_base
from sqlalchemy import Column, Integer, String,ForeignKey
from sqlalchemy.orm import sessionmaker,relationship

Base = declarative_base()  # 生成一个SqlORM 基类(已经封闭metadata)
#echo=True可以查看创建表的过程
engine = create_engine("mysql+pymysql://root:root@localhost:3306/zcl", echo=True)


#直接创建表并返回表的实例  Host2Group主动关联Host与Group(被关联)
Host2Group = Table('host_to_group',Base.metadata,
    Column('host_id',ForeignKey('host.id'),primary_key=True),
    Column('group_id',ForeignKey('group.id'),primary_key=True),
    #一个表为什么能创建两个主键(其实是两个列同时作为主键,非空且唯一)
    #PRIMARY KEY (host_id, group_id),
)
2. 在Host表(或Group表)指定中间表的实例,加上backref就不用在Group表中指定
#声明表的映射关系
class Host(Base):
    __tablename__ = 'host'   #表名
    id = Column(Integer, primary_key=True, autoincrement=True) #默认自增
    hostname = Column(String(64), unique=True, nullable=False)
    ip_addr = Column(String(128), unique=True, nullable=False)
    port = Column(Integer, default=22)
    #外键关联,主机与组名关联
    #group_id = Column(Integer, ForeignKey("group.id"))
    groups = relationship("Group",                #关联Group表
                           secondary = Host2Group, #关联第三方表
                           backref = "host_list") #双向关联,不用在Group类中再加这句代码

    def __repr__(self):
        return "f629f4ea386063e8614098b37acef85e" % (self.id,
                                                        self.hostname,
                                                        self.ip_addr)
3. 创建组与主机
if __name__ == '__main__':
    SessionCls = sessionmaker(bind=engine)
    session = SessionCls()
    """
    g1 = Group(name = "g1")
    g2 = Group(name = "g2")
    g3 = Group(name = "g3")
    g4 = Group(name = "g4")
    session.add_all([g1,g2,g3,g4])
    """
    """
    h1 = Host(hostname="h1",ip_addr="10.1.1.1")
    h2 = Host(hostname="h2",ip_addr="10.1.1.2",port=10000)
    h3 = Host(hostname="h3",ip_addr="10.1.1.3",port=6666)
    session.add_all([h1,h2,h3])
    """
4. 建立关联与查询
"""
    groups = session.query(Group).all()
    h1 = session.query(Host).filter(Host.hostname=="h1").first()
    h1.groups = groups    #将h1关联到所有的组
    print("-->:",h1.groups)
    h1.groups.pop()   #删除一个关联
    """
    h2 = session.query(Host).filter(Host.hostname=="h2").first()
    #h2.groups = groups[1:-1]   #将h2关联到组(2和3)
    print("=======>h2.groups:",h2.groups)
    #=======>h2.groups: [6e2fcbe3155f6068e5e0552abc854817,
    #  f1a29f8066407730d73efbdfa1665798]
    #加上__repr__()后,变为=======>h2.groups: [fba807bf0ed0cd82abe904d49adf340d, a9d37a5fcbc886fdd4000cb295264863]

    g1 = session.query(Group).first()
    print("=======>g1:",g1.host_list)
    #=======>g1: [41662fd1e61c9cd77104e8515416c7e0]
    session.commit()
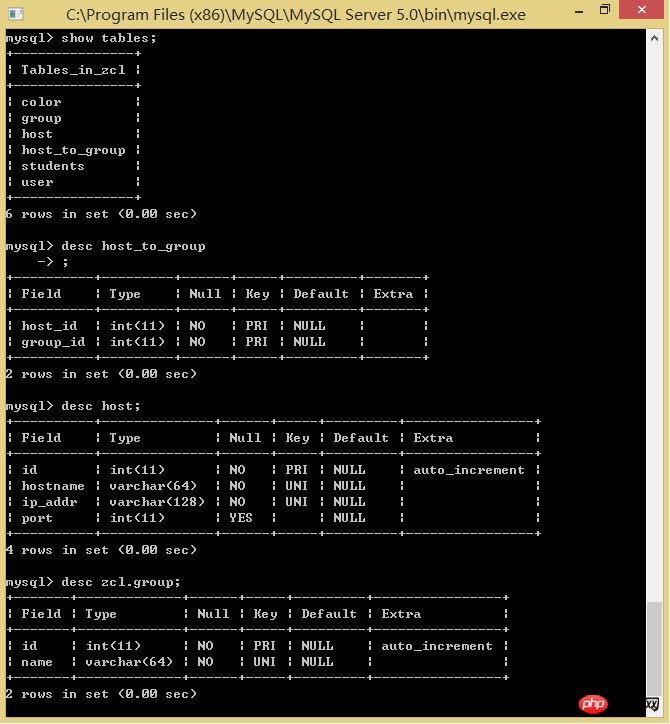
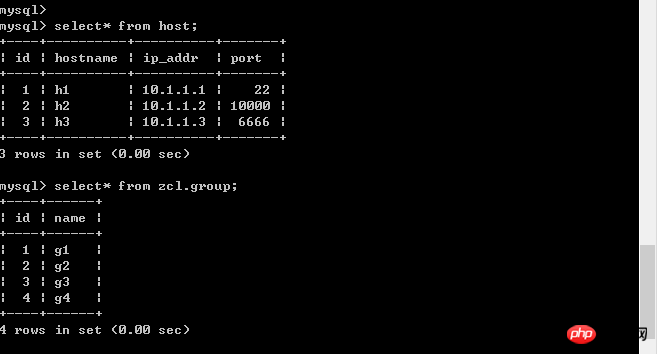
测试截图:
查看表结构:
查看表内容:
查看第三方表:
完整例子:
from sqlalchemy import create_engine,func,Table
from sqlalchemy.ext.declarative import declarative_base
from sqlalchemy import Column, Integer, String,ForeignKey
from sqlalchemy.orm import sessionmaker,relationship

Base = declarative_base()  # 生成一个SqlORM 基类(已经封闭metadata)
#echo=True可以查看创建表的过程
engine = create_engine("mysql+pymysql://root:root@localhost:3306/zcl", echo=True)


#直接创建表并返回表的实例  Host2Group主动关联Host与Group(被关联)
Host2Group = Table('host_to_group',Base.metadata,
    Column('host_id',ForeignKey('host.id'),primary_key=True),
    Column('group_id',ForeignKey('group.id'),primary_key=True),
    #一个表为什么能创建两个主键(其实是两个列同时作为主键,非空且唯一)
    #PRIMARY KEY (host_id, group_id),
)


#声明表的映射关系
class Host(Base):
    __tablename__ = 'host'   #表名
    id = Column(Integer, primary_key=True, autoincrement=True) #默认自增
    hostname = Column(String(64), unique=True, nullable=False)
    ip_addr = Column(String(128), unique=True, nullable=False)
    port = Column(Integer, default=22)
    #外键关联,主机与组名关联
    #group_id = Column(Integer, ForeignKey("group.id"))
    groups = relationship("Group",                #关联Group表
                           secondary = Host2Group, #关联第三方表
                           backref = "host_list")#双向关联,不用在Group类中再加这句代码

    def __repr__(self):
        return "f629f4ea386063e8614098b37acef85e" % (self.id,
                                                        self.hostname,
                                                        self.ip_addr)

class Group(Base):
    __tablename__ = "group"
    id = Column(Integer,primary_key=True)
    name = Column(String(64), unique=True, nullable=False)

    def __repr__(self):
        return "5c798f716970eed1a3e59cce8a955665" % (self.id, self.name)


Base.metadata.create_all(engine)  # 创建所有表结构

if __name__ == '__main__':
    SessionCls = sessionmaker(bind=engine)
    session = SessionCls()
    """
    g1 = Group(name = "g1")
    g2 = Group(name = "g2")
    g3 = Group(name = "g3")
    g4 = Group(name = "g4")
    session.add_all([g1,g2,g3,g4])
    """
    """
    h1 = Host(hostname="h1",ip_addr="10.1.1.1")
    h2 = Host(hostname="h2",ip_addr="10.1.1.2",port=10000)
    h3 = Host(hostname="h3",ip_addr="10.1.1.3",port=6666)
    session.add_all([h1,h2,h3])
    """
    """
    groups = session.query(Group).all()
    h1 = session.query(Host).filter(Host.hostname=="h1").first()
    h1.groups = groups  #将h1关联到所有的组
    print("-->:",h1.groups)
    h1.groups.pop()   #删除一个关联
    """
    h2 = session.query(Host).filter(Host.hostname=="h2").first()
    #h2.groups = groups[1:-1]
    print("=======>h2.groups:",h2.groups)
    #=======>h2.groups: [6e2fcbe3155f6068e5e0552abc854817,
    #  f1a29f8066407730d73efbdfa1665798]
    #加上__repr__()后,变为=======>h2.groups: [fba807bf0ed0cd82abe904d49adf340d, a9d37a5fcbc886fdd4000cb295264863]

    g1 = session.query(Group).first()
    print("=======>g1:",g1.host_list)
    #=======>g1: [41662fd1e61c9cd77104e8515416c7e0]
    session.commit()
更多python之SQLAlchemy ORM示例介绍相关文章请关注PHP中文网!

