Home >Java >javaTutorial >Java NIO buffer study notes
Java NIO buffer study notes
- 黄舟Original
- 2017-02-20 10:02:101505browse
Buffer is actually a container object, which contains some data to be written or just read. Adding the Buffer object to NIO reflects an important difference between the new library and the original I/O. In stream-oriented I/O, you write or read data directly into a Stream object.
In the NIO library, all data is processed using buffers. When reading data, it is read directly into the buffer. When data is written, it is written to a buffer. Any time you access data in NIO, you put it into a buffer.
The buffer is essentially an array. Usually it is a byte array, but other kinds of arrays can be used. But a buffer is more than just an array. Buffers provide structured access to data and can also track the system's read/write processes.
The most commonly used buffer type is ByteBuffer. A ByteBuffer can perform get/set operations (ie, byte acquisition and setting) on its underlying byte array.
ByteBuffer is not the only buffer type in NIO. In fact, there is a buffer type for every basic Java type (only the boolean type does not have a corresponding buffer class):
ByteBuffer
CharBuffer
ShortBuffer
IntBuffer
LongBuffer
FloatBuffer
DoubleBuffer
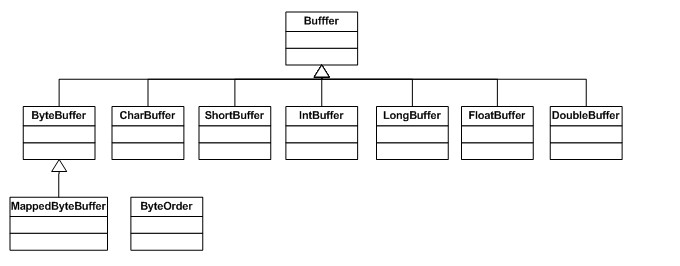
Each Buffer class is an instance of the Buffer interface. Except for ByteBuffer, each Buffer class has exactly the same operations, but the data types they handle are different. Because most standard I/O operations use ByteBuffer, it has all the shared buffer operations as well as some unique operations. Let’s take a look at the class hierarchy diagram of Buffer: 
##Each Buffer has the following attributes:
capacity
The maximum amount of data this Buffer can hold. Capacity is usually specified when the buffer is created.
limit
Read and write operations performed on the Buffer cannot exceed this subscript. When writing data to the buffer, limit is generally equal to capacity. When reading data, limit represents the length of valid data in the buffer.
position
The position variable tracks how much data is written to or read from the buffer.
More precisely, when you read data from the channel into the buffer, it indicates which element of the array the next data will be placed into. For example, if you read three bytes from the channel into a buffer, the buffer's position will be set to 3, pointing to the 4th element in the array. Conversely, when you get data from a buffer for a write channel, it indicates which element of the array the next data is coming from. For example, when you write 5 bytes from the buffer to the channel, the buffer's position will be set to 5, pointing to the sixth element of the array.
#mark
A temporary storage location index. Calling mark() will set mark to the value of the current position, and calling reset() later will set the position property to the value of mark. The value of mark is always less than or equal to the value of position. If the value of position is set smaller than mark, the current mark value will be discarded.
These properties always satisfy the following conditions:
0 <= mark <= position <= limit <= capacity
The internal implementation mechanism of the buffer:
Let’s take the example of copying data from an input channel to an output channel to analyze each variable in detail and explain them How they work together:
Initial variables:
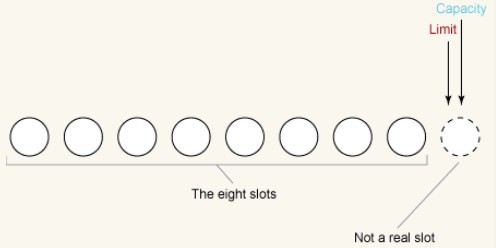
We first observe a newly created buffer, taking ByteBuffer as an example, assuming the size of the buffer is 8 bytes, the initial state of ByteBuffer As follows: 
#Recall that limit can never be greater than capacity, and both values are set to 8 in this example. We illustrate this by pointing them after the end of the array (slot 8). 
We set position to 0 again. Indicates that if we read some data into the buffer, the next data read will enter slot 0. If we write some data from the buffer, the next byte read from the buffer will come from slot 0. The position setting is as follows: 
#Since the maximum data capacity of the buffer will not change, we can ignore it in the following discussion.
First read:
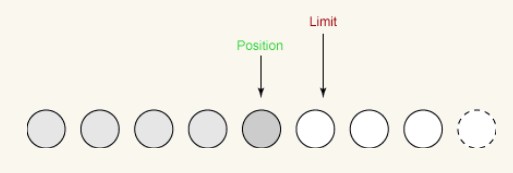
Now we can start reading/writing operations on the newly created buffer. First read some data from the input channel into the buffer. The first read gets three bytes. They are placed in the array starting at position, where position is set to 0. After reading, the position has increased to 3, as shown below, and the limit has not changed. 
Second read:
On the second read, we read another two bytes from the input channel into the buffer . These two bytes are stored at the location specified by position, position is thus increased by 2, and limit is unchanged. 
flip:
Now we want to write the data to the output channel. Before that, we must call the flip() method. The source code is as follows:
 public final Buffer flip()
    {
        limit = position;
        position = 0;
        mark = -1;
        return this;
    }
这个方法做两件非常重要的事:
i  它将limit设置为当前position。
ii 它将position设置为0。
The previous picture shows the situation of the buffer before flip. Here is the buffer after the flip: 
We can now write data from the buffer to the channel. position is set to 0, which means the next byte we get is the first byte. limit has been set to the original position, which means it includes all bytes previously read and not a single byte more.
First Write:
On the first write, we take four bytes from the buffer and write them to the output channel. This causes the position to increase to 4 while leaving the limit unchanged, as follows: 
Second write:
We only have one byte left Can be written. limit is set to 5 when we call flip(), and position cannot exceed limit. So the last write operation takes a byte from the buffer and writes it to the output channel. This increases the position to 5, leaving the limit unchanged, as follows: 
clear:
The last step is to call the clear() method of the buffer. This method resets the buffer to receive more bytes. The source code is as follows:
 public final Buffer clear()
    {
        osition = 0;
        limit = capacity;
        mark = -1;
        return this;
    }
clear does two very important things:
i It sets limit to the same as capacity.
ii It sets position to 0.
The following figure shows the status of the buffer after calling clear(). The buffer is now ready to receive new data. 
Up to this point, we have only used buffers to transfer data from one channel to another. However, programs often need to process data directly. For example, you may need to save user data to disk. In this case, you have to put this data directly into a buffer and then use a channel to write the buffer to disk. Alternatively, you may want to read user data from disk. In this case you are reading the data from the channel into a buffer and then checking the buffer for the data. In fact, each basic type of buffer provides us with a method to directly access the data in the buffer. Let's take ByteBuffer as an example to analyze how to use the get() and put() methods it provides to directly access the data in the buffer. data.
a) get()
There are four get() methods in the ByteBuffer class:
byte get();
ByteBuffer get( byte dst[] );
ByteBuffer get( byte dst[], int offset, int length );
byte get( int index );
第一个方法获取单个字节。第二和第三个方法将一组字节读到一个数组中。第四个方法从缓冲区中的特定位置获取字节。那些返回ByteBuffer的方法只是返回调用它们的缓冲区的this值。 此外,我们认为前三个get()方法是相对的,而最后一个方法是绝对的。“相对”意味着get()操作服从limit和position值,更明确地说, 字节是从当前position读取的,而position在get之后会增加。另一方面,一个“绝对”方法会忽略limit和position值,也不会 影响它们。事实上,它完全绕过了缓冲区的统计方法。 上面列出的方法对应于ByteBuffer类。其他类有等价的get()方法,这些方法除了不是处理字节外,其它方面是是完全一样的,它们处理的是与该缓冲区类相适应的类型。
注:这里我们着重看一下第二和第三这两个方法
ByteBuffer get( byte dst[] );
ByteBuffer get( byte dst[], int offset, int length );
这两个get()主要用来进行批量的移动数据,可供从缓冲区到数组进行的数据复制使用。第一种形式只将一个数组 作为参数,将一个缓冲区释放到给定的数组。第二种形式使用 offset 和 length 参数来指 定目标数组的子区间。这些批量移动的合成效果与前文所讨论的循环是相同的,但是这些方法 可能高效得多,因为这种缓冲区实现能够利用本地代码或其他的优化来移动数据。
buffer.get(myArray)
等价于:
buffer.get(myArray,0,myArray.length);
注:如果您所要求的数量的数据不能被传送,那么不会有数据被传递,缓冲区的状态保持不 变,同时抛出 BufferUnderflowException 异常。因此当您传入一个数组并且没有指定长度,您就相当于要求整个数组被填充。如果缓冲区中的数据不够完全填满数组,您会得到一个 异常。这意味着如果您想将一个小型缓冲区传入一个大数组,您需要明确地指定缓冲区中剩 余的数据长度。上面的第一个例子不会如您第一眼所推出的结论那样,将缓冲区内剩余的数据 元素复制到数组的底部。例如下面的代码:
String str = "com.xiaoluo.nio.MultipartTransfer";
        ByteBuffer buffer = ByteBuffer.allocate(50);
        for(int i = 0; i < str.length(); i++)
        {
            buffer.put(str.getBytes()[i]);
        }
        buffer.flip();byte[] buffer2 = new byte[100];
        buffer.get(buffer2);
        buffer.get(buffer2, 0, length);
        System.out.println(new String(buffer2));
这里就会抛出java.nio.BufferUnderflowException异常,因为数组希望缓存区的数据能将其填满,如果填不满,就会抛出异常,所以代码应该改成下面这样:
    //得到缓冲区未读数据的长度
        int length = buffer.remaining();
        byte[] buffer2 = new byte[100];
        buffer.get(buffer2, 0, length);
b)    put()
ByteBuffer类中有五个put()方法:
ByteBuffer put( byte b );
    ByteBuffer put( byte src[] );
    ByteBuffer put( byte src[], int offset, int length );
    ByteBuffer put( ByteBuffer src );
    ByteBuffer put( int index, byte b );
第一个方法 写入(put)单个字节。第二和第三个方法写入来自一个数组的一组字节。第四个方法将数据从一个给定的源ByteBuffer写入这个 ByteBuffer。第五个方法将字节写入缓冲区中特定的 位置 。那些返回ByteBuffer的方法只是返回调用它们的缓冲区的this值。 与get()方法一样,我们将把put()方法划分为“相对”或者“绝对”的。前四个方法是相对的,而第五个方法是绝对的。上面显示的方法对应于ByteBuffer类。其他类有等价的put()方法,这些方法除了不是处理字节之外,其它方面是完全一样的。它们处理的是与该缓冲区类相适应的类型。
c) 类型化的 get() 和 put() 方法
除了前些小节中描述的get()和put()方法, ByteBuffer还有用于读写不同类型的值的其他方法,如下所示:
getByte()
getChar()
getShort()
getInt()
getLong()
getFloat()
getDouble()
putByte()
putChar()
putShort()
putInt()
putLong()
putFloat()
putDouble()
事实上,这其中的每个方法都有两种类型:一种是相对的,另一种是绝对的。它们对于读取格式化的二进制数据(如图像文件的头部)很有用。
下面的内部循环概括了使用缓冲区将数据从输入通道拷贝到输出通道的过程。
while(true)
        {
            //clear方法重设缓冲区,可以读新内容到buffer里
            buffer.clear();
            int val = inChannel.read(buffer);
            if(val == -1)
            {
                break;
            }
            //flip方法让缓冲区的数据输出到新的通道里面
            buffer.flip();
            outChannel.write(buffer);
        }
read()和write()调用得到了极大的简化,因为许多工作细节都由缓冲区完成了。clear()和flip()方法用于让缓冲区在读和写之间切换。
好了,缓冲区的内容就暂且写到这里,下一篇我们将继续NIO的学习–通道(Channel).
以上就是Java NIO 缓冲区学习笔记 的内容,更多相关内容请关注PHP中文网(www.php.cn)!

