HTML5 CANVAS:绘制渐变色
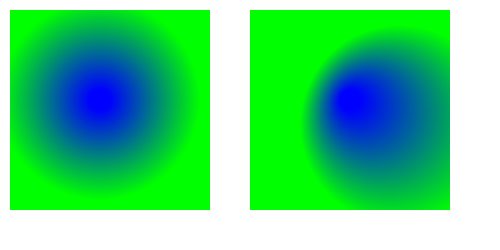
HTML5 Canvas渐变是一种用于填充或描边图形的颜色模式。渐变色是由不同的颜色进行过渡,而不是单一的颜色。先来看几个canvas渐变色的例子:

渐变按照类型来分可以分为两种类型:
线性渐变
径向渐变
线性渐变以线性的模式来改变颜色,也就是水平,垂直或对角方向。
径向渐变以圆形模式来改变颜色,颜色以圆形的中心向外辐射。
线性渐变
正如前面所说,线性渐变以线性的模式来改变颜色。我们可以通过2D上下文的createLinearGradient()方法来创建一个线性渐变。下面是一个例子:
var canvas  = document.getElementById("ex1");
var context = canvas.getContext("2d");
var x1 =   0;
var y1 =   0;
var x2 = 100;
var y2 =   0;
var linearGradient1 = context.createLinearGradient(x1,y1,x2,y2);
复制代码
createLinearGradient()函数有4个参数:x1,y1,x2和y2。这4个参数决定渐变的方向和距离。线性渐变会从第一个点(x1,y1)扩展到第二个点(x2,y2)。
水平的线性渐变仅仅是水平方向的参数值(x1和x2)不同,例如:
var x1 =   0;
var y1 =   0;
var x2 = 100;
var y2 =   0;
var linearGradient1 = context.createLinearGradient(x1,y1,x2,y2);
复制代码
垂直的线性渐变仅仅是垂直方向的参数值(y1和y2)不同,例如:
var x1 =   0;
var y1 =   0;
var x2 =   0;
var y2 = 100;
var linearGradient1 = context.createLinearGradient(x1,y1,x2,y2);
复制代码
一个对角线的线性渐变水平和垂直方向上的参数都不相同,例如:
var x1 =   0;
var y1 =   0;
var x2 = 100;
var y2 = 100;
var linearGradient1 = context.createLinearGradient(x1,y1,x2,y2);
复制代码
颜色停止点(Color Stops)
在上面的例子中,并没有指明线性渐变使用什么颜色。为了指明使用什么渐变颜色,可以在渐变对象上使用addColorStop()方法来指定。例如:
var linearGradient1 = context.createLinearGradient(0,0,100,0);
linearGradient1.addColorStop(0, 'rgb(255, 0, 0)');
linearGradient1.addColorStop(1, 'rgb(  0, 0, 0)');
复制代码
addColorStop()方法有两个参数。第一个参数是0-1之间的一个数值,这个数值指定该颜色进入渐变多长的距离,第二个参数是颜色值,例子中使用的是rgb()颜色值。
在上面的例子中为渐变添加了两种颜色。第一种颜色是红色,设置在渐变的开始处。第二种颜色是黑色,设置在渐变的结束处。
你可以添加通过addColorStop()函数来添加更多的颜色。例如下面的例子添加了三种颜色:
var linearGradient1 = context.createLinearGradient(0,0,100,0);
linearGradient1.addColorStop(0  , 'rgb(255, 0, 0)');
linearGradient1.addColorStop(0.5, 'rgb(  0, 0, 255);
linearGradient1.addColorStop(1  , 'rgb(  0, 0, 0)');
复制代码
上面的代码在渐变的中间添加了一个蓝色。整个渐变将平滑的从红色过渡到蓝色,在过渡到黑色。
使用渐变来填充和描边图形
你可以使用渐变来填充或描边图形。要填充或描边图形可以通过2D上下文的fillStyle或strokeStyle属性来完成。下面是一个示例代码:
var linearGradient1 = context.createLinearGradient(0,0,100,0);
linearGradient1.addColorStop(0  , 'rgb(255, 0, 0)');
linearGradient1.addColorStop(0.5, 'rgb(  0, 0, 255);
linearGradient1.addColorStop(1  , 'rgb(  0, 0, 0)');
context.fillStyle   = linearGradient1;
context.strokeStyle = linearGradient1;
通过fillStyle或strokeStyle属性来指向渐变对象即可完成渐变的填充或描边。
现在我们可以为图形填充渐变色或描边渐变色。下面是一个例子,一个矩形的填充渐变色和一个矩形的描边渐变色。
var canvas  = document.getElementById("ex2");
var context = canvas.getContext("2d");
var linearGradient1 = context.createLinearGradient(0,0,100,0);
linearGradient1.addColorStop(0  , 'rgb(246, 36, 89)');
linearGradient1.addColorStop(0.5, 'rgb( 31, 58, 147)');
linearGradient1.addColorStop(1  , 'rgb( 34, 49,  63)');
context.fillStyle = linearGradient1;
context.fillRect(10,10,100, 100);
var linearGradient2 = context.createLinearGradient(125,0, 225,0);
linearGradient2.addColorStop(0  , 'rgb(255, 0,   0)');
linearGradient2.addColorStop(0.5, 'rgb(  0, 0, 255)');
linearGradient2.addColorStop(1  , 'rgb(  0, 0,   0)');
context.strokeStyle = linearGradient2;
context.strokeRect(125, 10, 100, 100);
复制代码
渐变的长度
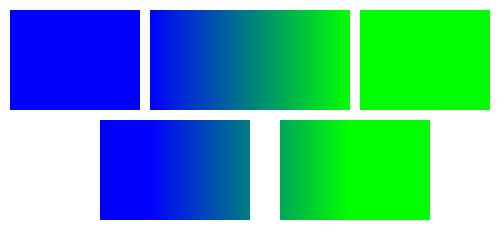
我们在使用渐变的时候要非常明白的知道渐变的长度的概念。如果我们设置渐变从x=10扩展到x=110的距离,那么渐变只会作用在水平方向上从10到110的距离的范围内。超出这个范围的图形将任然受渐变色的影响,但是在这个范围之外的颜色只会是渐变的开始或结束颜色。
距离来说,加入有一个水平线性渐变,x1=150,x2=350。渐变从蓝色过渡到绿色。那么所有水平方向定位x值小于150的图形都会使用蓝色蓝填充。所有水平方向定位x值大于350的图形都会使用绿色来填充。只有那些在水平方向定位x值在150到350之间的图形会使用蓝绿渐变色来填充。
具体来看下面的代码,这里绘制了5个矩形,并用上面所说的渐变来填充它们,让我们来看看效果:
var linearGradient1 = context.createLinearGradient(150, 0, 350,0);
linearGradient1.addColorStop(0, 'rgb(0,   0, 255)');
linearGradient1.addColorStop(1, 'rgb(0, 255, 0)');
context.fillStyle = linearGradient1;
context.fillRect(10,10,130, 100);
context.fillRect(150,10, 200, 100);
context.fillRect(360,10, 130, 100);
context.fillRect(100,120, 150, 100);
context.fillRect(280,120, 150, 100);
复制代码

从上面的结果可以看出,在渐变区域之外的图形仅会使用开始或结束颜色来填充。
渐变长度是非常重要的概念,需要大家仔细体会。只有掌握它才能在使用渐变是获得正确的结果。
径向渐变
径向渐变是一种圆形的颜色扩展模式,颜色从圆心位置开始向外辐射。下面是一个例子:
一个径向渐变于两个圆形来定义。每一个圆都有一个圆心和一条半径。下面是示例代码:
var x1 = 100;   // 第一个圆圆心的X坐标
var y1 = 100;   // 第一个圆圆心的Y坐标
var r1 = 30;    // 第一个圆的半径
var x2 = 100;   // 第二个圆圆心的X坐标
var y2 = 100;   // 第二个圆圆心的Y坐标
var r2 = 100;   // 第二个圆的半径
var radialGradient1 =
    context.createRadialGradient(x1, y1, r1, x2, y2, r2);
radialGradient1.addColorStop(0, 'rgb(0,   0, 255)');
radialGradient1.addColorStop(1, 'rgb(0, 255,   0)');
context.fillStyle = radialGradient1;
context.fillRect(10,10, 200, 200);
复制代码
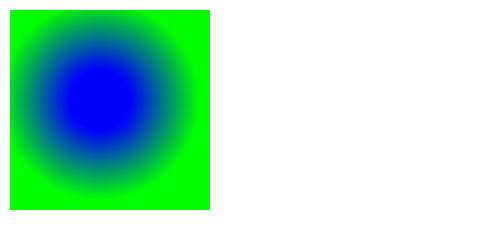
如上面的代码所示,这里有两个圆,圆心分别为x1,y1和x2,y2,它们的半径分别为r1和r2,这些值将作为参数传入到2D上下文的createRadialGradient()方法中。
这两个圆必须设置不同的半径,形成一个内圆和一个外圆。这样渐变色就从一个圆形辐射到另一个圆形。
颜色停止点会被添加到这两个圆形之间,例如上面的代码中,第一个颜色停止点中的参数0表示该颜色从第一个圆形开始,第二个颜色停止点中的参数1表示第二种颜色从第二个圆形开始。
下面是上面代码的返回结果:

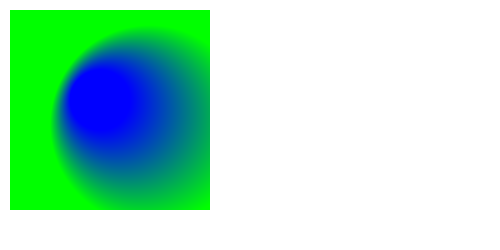
如果两个圆形的圆心位置相同,那么径向渐变将是一个完整的圆形。如果两个圆的圆心位置不相同,那么径向渐变看起来就像是一个探照灯发出的光线。例如下面的样子:
var x1 = 100;
var y1 = 100;
var r1 = 30;
var x2 = 150;
var y2 = 125;
var r2 = 100;
var radialGradient1 = context.createRadialGradient(x1, y1, r1, x2, y2, r2);
radialGradient1.addColorStop(0, 'rgb(0,   0, 255)');
radialGradient1.addColorStop(1, 'rgb(0, 255,   0)');
context.fillStyle = radialGradient1;
context.fillRect(10,10, 200, 200);
复制代码
得到的结构如下所示:

以上就是HTML5 Canvas:绘制渐变色的内容,更多相关内容请关注PHP中文网(www.php.cn)!
相关文章:
 H5: New Features and Capabilities for Web DevelopmentApr 29, 2025 am 12:07 AM
H5 brings a number of new functions and capabilities, greatly improving the interactivity and development efficiency of web pages. 1. Semantic tags such as enhance SEO. 2. Multimedia support simplifies audio and video playback through and tags. 3. Canvas drawing provides dynamic graphics drawing tools. 4. Local storage simplifies data storage through localStorage and sessionStorage. 5. The geolocation API facilitates the development of location-based services.
 H5: Key Improvements in HTML5Apr 28, 2025 am 12:26 AM
HTML5 brings five key improvements: 1. Semantic tags improve code clarity and SEO effects; 2. Multimedia support simplifies video and audio embedding; 3. Form enhancement simplifies verification; 4. Offline and local storage improves user experience; 5. Canvas and graphics functions enhance the visualization of web pages.
 HTML5: The Standard and its Impact on Web DevelopmentApr 27, 2025 am 12:12 AM
The core features of HTML5 include semantic tags, multimedia support, offline storage and local storage, and form enhancement. 1. Semantic tags such as, etc. to improve code readability and SEO effect. 2. Simplify multimedia embedding with labels. 3. Offline storage and local storage such as ApplicationCache and LocalStorage support network-free operation and data storage. 4. Form enhancement introduces new input types and verification properties to simplify processing and verification.
 H5 Code Examples: Practical Applications and TutorialsApr 25, 2025 am 12:10 AM
H5 provides a variety of new features and functions, greatly enhancing the capabilities of front-end development. 1. Multimedia support: embed media through and elements, no plug-ins are required. 2. Canvas: Use elements to dynamically render 2D graphics and animations. 3. Local storage: implement persistent data storage through localStorage and sessionStorage to improve user experience.
 The Connection Between H5 and HTML5: Similarities and DifferencesApr 24, 2025 am 12:01 AM
H5 and HTML5 are different concepts: HTML5 is a version of HTML, containing new elements and APIs; H5 is a mobile application development framework based on HTML5. HTML5 parses and renders code through the browser, while H5 applications need to run containers and interact with native code through JavaScript.
 The Building Blocks of H5 Code: Key Elements and Their PurposeApr 23, 2025 am 12:09 AM
Key elements of HTML5 include,,,,,, etc., which are used to build modern web pages. 1. Define the head content, 2. Used to navigate the link, 3. Represent the content of independent articles, 4. Organize the page content, 5. Display the sidebar content, 6. Define the footer, these elements enhance the structure and functionality of the web page.
 HTML5 and H5: Understanding the Common UsageApr 22, 2025 am 12:01 AM
There is no difference between HTML5 and H5, which is the abbreviation of HTML5. 1.HTML5 is the fifth version of HTML, which enhances the multimedia and interactive functions of web pages. 2.H5 is often used to refer to HTML5-based mobile web pages or applications, and is suitable for various mobile devices.
 HTML5: The Building Blocks of the Modern Web (H5)Apr 21, 2025 am 12:05 AM
HTML5 is the latest version of the Hypertext Markup Language, standardized by W3C. HTML5 introduces new semantic tags, multimedia support and form enhancements, improving web structure, user experience and SEO effects. HTML5 introduces new semantic tags, such as, ,, etc., to make the web page structure clearer and the SEO effect better. HTML5 supports multimedia elements and no third-party plug-ins are required, improving user experience and loading speed. HTML5 enhances form functions and introduces new input types such as, etc., which improves user experience and form verification efficiency.


Hot AI Tools

Undresser.AI Undress
AI-powered app for creating realistic nude photos

AI Clothes Remover
Online AI tool for removing clothes from photos.

Undress AI Tool
Undress images for free

Clothoff.io
AI clothes remover

Video Face Swap
Swap faces in any video effortlessly with our completely free AI face swap tool!

Hot Article

Hot Tools

SAP NetWeaver Server Adapter for Eclipse
Integrate Eclipse with SAP NetWeaver application server.

Zend Studio 13.0.1
Powerful PHP integrated development environment

Atom editor mac version download
The most popular open source editor

ZendStudio 13.5.1 Mac
Powerful PHP integrated development environment

mPDF
mPDF is a PHP library that can generate PDF files from UTF-8 encoded HTML. The original author, Ian Back, wrote mPDF to output PDF files "on the fly" from his website and handle different languages. It is slower than original scripts like HTML2FPDF and produces larger files when using Unicode fonts, but supports CSS styles etc. and has a lot of enhancements. Supports almost all languages, including RTL (Arabic and Hebrew) and CJK (Chinese, Japanese and Korean). Supports nested block-level elements (such as P, DIV),


