SVG的描边属性stroke用于定义图形的描边样式。stroke是一个基本的SVG CSS属性,你可以为任何SVG图形设置描边样式。
STYLE属性
我们可以在SVG图形中使用style属性来为图形设置描边和填充等样式。下面是一个例子:
<circle cx="50" cy="50" r="50"
        style="stroke: #000066; fill: 3333ff;" />
上面的例子定义了一个圆形,并带有深蓝色的描边和浅蓝色的填充色。
描边示例
使用stroke属性可以为图形设置描边效果。看下面的例子:
<circle cx="50" cy="50" r="25"
      style="stroke: #000000; fill:none;" />
上面的代码为圆形设置描边颜色为黑色。得到的结果如下:

描边宽度
我们可以使用stroke-width CSS属性来为图形的描边设置宽度。下面是一个设置描边宽度的例子:
stroke-width: 3px;
这个例子设置描边宽度为3像素。除了使用像素为单位,你还可以使用其它的CSS单位来设置描边宽度。可用的单位有:
em:默认的字体大小,通常一个字符的高度
ex:字符x的高度
px:像素
pt:点数,1/72英寸
pc:Picas,1/6英寸
cm:厘米
mm:毫秒
in:英寸
下面是一个使用不同尺寸描边宽度的例子:
<circle cx="50" cy="50" r="25"
        style="stroke: #000066; fill: none;
               stroke-width: 1px;" />
<circle cx="150" cy="50" r="25"
        style="stroke: #000066; fill: none;
               stroke-width: 3px;" />
<circle cx="250" cy="50" r="25"
        style="stroke: #000066; fill: none;
               stroke-width: 6px;" />
<circle cx="350" cy="50" r="25"
        style="stroke: #000066; fill: none;
               stroke-width: 12px;" />
下面是上面代码的返回结果:
描边的线头(STROKE-LINECAP)
stroke-linecap CSS属性用于定义图形描边中线条头部的渲染样式。有3种可能的stroke-linecap样式:
butt
square
round
butt属性指定线条的头部从线条的结束处被精确的切断。square属性和butt类似,但是它会在线条的两端留下一些空间。round属性指定线条使用圆形的线头。
下面的图形显示了分别使用三种stroke-linecap时的线条样式,从上到下分别是:butt,square和round。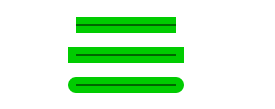
上面的例子定义了三条stroke-width为10像素的绿色线条,它们分别带有不同的stroke-linecap CSS属性。在绿色线条中,分别定义了三条和绿色线条坐标相同的直线,但是它们没有定义stroke-linecap属性,这样你可以很明显的看出三种不同stroke-linecap属性的区别。
描边的连线(STROKE-LINEJOIN)
stroke-linejoin CSS属性定义图形在渲染时两条相连的线如何连接。stroke-linejoin CSS属性有三种取值:
miter
round
bevel
下面是一个使用三种不同stroke-linejoin CSS属性绘制的图形连线额例子:
<path d="M20,100 l20,-50 l20,50"
      style="stroke: #000000;    fill:none;
             stroke-width:16px;
             stroke-linejoin: miter;" />
<path d="M120,100 l20,-50 l20,50"
      style="stroke: #000000;    fill:none;
             stroke-width:16px;
             stroke-linejoin: round;" />
<path d="M220,100 l20,-50 l20,50"
      style="stroke: #000000;    fill:none;
             stroke-width:16px;
             stroke-linejoin: bevel;" />
下面是返回结果: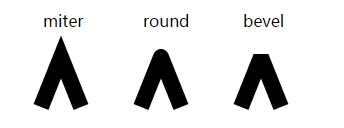
描边的斜线限制(STROKE-MITERLIMIT)
stroke-miterlimit CSS属性通常和stroke-linejoin属性一起使用。假如你设置了stroke-linejoin为miter,那么stroke-miterlimit可以用来限制两条线的相交点的距离。
下面是一个使用stroke-linejoin CSS属性的例子:
<path d="M20,100 l20,-50 l20,50"
      style="stroke: #000000;    fill:none;
             stroke-width:16px;
             stroke-linejoin: miter;
             stroke-miterlimit: 1.0;
             " />
<path d="M120,100 l20,-50 l20,50"
      style="stroke: #000000;    fill:none;
             stroke-width:16px;
             stroke-linejoin: miter;
             stroke-miterlimit: 2.0;
             " />
<path d="M220,100 l20,-50 l20,50"
      style="stroke: #000000;    fill:none;
             stroke-width:16px;
             stroke-linejoin: miter;
             stroke-miterlimit: 4.0;
             " />
注意观察使用不同的stroke-linejoin CSS属性时三条路径的连线情况,下面是返回结果: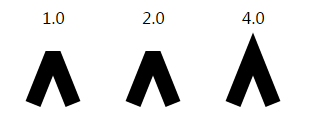
连线的长度被称为miter(斜线)长度。斜线长度是从连线的内角定点到连线的外角的距离。看下面的图示:
可以想象,描边的宽度越宽,两条连线的角度越尖,miter长度就越长。
stroke-miterlimit实际上是设置斜线长度和描边宽度之间的比例。例如,stroke-miterlimit设置为1.0表示miter长度和描边宽度相同(1 X 描边宽度),超过这个长度的部分会被剪切掉。1.0是stroke-miterlimit属性的最小取值,不能再小。
下面是一些使用stroke-miterlimit取值为1.0的例子,但是连线的角度各不相同:

注意观察,角度越大的时候,连线被切掉的部分越多。
STROKE-DASHARRAY
SVG stroke-dasharray CSS属性用于绘制图形的虚线描边。之所以会被称之为“dash array”,是因为我们要为它提供一组数值。这组数值定义虚线的长度和间距。因此,这组数值的个数应该是偶数个。
下面是一个SVG stroke-dasharray的例子:
<line x1="20" y1="20" x2="120" y2="20"
      style="stroke: #000000; fill:none;
      stroke-width: 6px;
      stroke-dasharray: 10 5"  />
这个例子定义了一条每个虚线段长度为10像素的虚线,两段虚线之间的间距为5像素。下面是返回结果:
下面是一些其它虚线的例子。
<line x1="20" y1="20" x2="120" y2="20"
      style="stroke: #000000; fill:none;
      stroke-width: 6px;
      stroke-dasharray: 10 5 5 5"  />
<line x1="20" y1="40" x2="120" y2="40"
      style="stroke: #000000; fill:none;
      stroke-width: 6px;
      stroke-dasharray: 10 5 5 10"  />
第一条虚线以10像素虚线段开始,接着是5像素的间距,然后是5像素的虚线段,再接着是5像素的间距,然后按照这个模式一直延伸下去。
第二条虚线是以10像素虚线段开始,接着是5像素的间距,然后是5像素的虚线段,再接着是10像素的间距,然后按照这个模式一直延伸下去。
下面是它们的返回结果:

STROKE-DASHOFFSET
stroke-dashoffset CSS属性用于指定从多远开始执行指定的虚线模式。使用这个属性你可以指定从任何地方开始指定的虚线模式,例如从一半开始,然后重复虚线模式。下面是一个stroke-dashoffset的例子:
<line x1="20" y1="20" x2="170" y2="20"
      style="stroke: #000000; fill:none;
      stroke-width: 6px;
      stroke-dasharray: 10 5;
      stroke-dashoffset: 5;
      "  />
这个例子设置dash-offset为5个像素,意思是将从虚线模式往后5个像素开始渲染虚线。注意不是所有的浏览器都支持这个属性。下面是上面代码的返回结果:

描边透明度(STROKE-OPACITY)
SVG stroke-opacity CSS属性用于定义图形描边的透明度。stroke-opacity属性的取值在0-1之间。越接近0,描边越透明。越接近1,描边越不透明。默认的stroke-opacity取值为1,也就是完全不透明。
下面是一个使用不同的 SVG stroke-opacity属性的例子。
<path d="M20,40 l50,0"
      style="stroke: #00ff00;    fill:none;
             stroke-width:16px;
             stroke-opacity: 0.3;
             " />
<path d="M80,40 l50,0"
      style="stroke: #00ff00;    fill:none;
             stroke-width:16px;
             stroke-opacity: 0.7;
             " />
<path d="M140,40 l50,0"
      style="stroke: #00ff00;    fill:none;
             stroke-width:16px;
             stroke-opacity: 1;
             " />
下面是返回结果:

以上就是SVG基础|SVG图形描边的内容,更多相关内容请关注PHP中文网(www.php.cn)!
 How do I use viewport meta tags to control page scaling on mobile devices?Mar 13, 2025 pm 08:00 PM
The article discusses using viewport meta tags to control page scaling on mobile devices, focusing on settings like width and initial-scale for optimal responsiveness and performance.Character count: 159
 How to Create Interactive Games with HTML5 and JavaScript?Mar 10, 2025 pm 06:34 PM
This article details creating interactive HTML5 games using JavaScript. It covers game design, HTML structure, CSS styling, JavaScript logic (including event handling and animation), and audio integration. Essential JavaScript libraries (Phaser, Pi
 How to Add Audio to My HTML5 Website?Mar 10, 2025 pm 03:01 PM
This article explains how to embed audio in HTML5 using the <audio> element, including best practices for format selection (MP3, Ogg Vorbis), file optimization, and JavaScript control for playback. It emphasizes using multiple audio f
 How do I use the HTML5 Page Visibility API to detect when a page is visible?Mar 13, 2025 pm 07:51 PM
The article discusses using the HTML5 Page Visibility API to detect page visibility, improve user experience, and optimize resource usage. Key aspects include pausing media, reducing CPU load, and managing analytics based on visibility changes.
 How do I handle user location privacy and permissions with the Geolocation API?Mar 18, 2025 pm 02:16 PM
The article discusses managing user location privacy and permissions using the Geolocation API, emphasizing best practices for requesting permissions, ensuring data security, and complying with privacy laws.
 How to Use HTML5 Forms for User Input?Mar 10, 2025 pm 02:59 PM
This article explains how to create and validate HTML5 forms. It details the <form> element, input types (text, email, number, etc.), and attributes (required, pattern, min, max). The advantages of HTML5 forms over older methods, incl
 How do I use the HTML5 Drag and Drop API for interactive user interfaces?Mar 18, 2025 pm 02:17 PM
The article explains how to use the HTML5 Drag and Drop API to create interactive user interfaces, detailing steps to make elements draggable, handle key events, and enhance user experience with custom feedback. It also discusses common pitfalls to a
 How do I use the HTML5 WebSockets API for bidirectional communication between client and server?Mar 12, 2025 pm 03:20 PM
This article explains the HTML5 WebSockets API for real-time, bidirectional client-server communication. It details client-side (JavaScript) and server-side (Python/Flask) implementations, addressing challenges like scalability, state management, an


Hot AI Tools

Undresser.AI Undress
AI-powered app for creating realistic nude photos

AI Clothes Remover
Online AI tool for removing clothes from photos.

Undress AI Tool
Undress images for free

Clothoff.io
AI clothes remover

AI Hentai Generator
Generate AI Hentai for free.

Hot Article

Hot Tools

SublimeText3 Chinese version
Chinese version, very easy to use

SublimeText3 English version
Recommended: Win version, supports code prompts!

MantisBT
Mantis is an easy-to-deploy web-based defect tracking tool designed to aid in product defect tracking. It requires PHP, MySQL and a web server. Check out our demo and hosting services.

Dreamweaver CS6
Visual web development tools

WebStorm Mac version
Useful JavaScript development tools


