ps+p+css creates a blue background
Be compatible with mainstream browsers
How to design a page?
How to achieve better slicing?
How to consider compatibility?
How to use p+css to make the percentage layout of the background?
Login page design
First design in photoshop
1, open ps, create a new 1200px*768px; Open the layers panel, unlock, double-click the background layer, unlock, and name it: Background layer
2, create a new folder: name it color system, create a new layer in it, and confirm the page The color to be used. As shown in the picture:


Left: Gradient: Click foreground color: #2366fe Background color: # ffffff, select the gradient tool from top to bottom
Right: Same as above, foreground color: #009cff Background color: #ffffff
ps: I chose the color system on the right.
3, create website background.
3-1: First pull the page baseline: because the website is generally 960*768, and when it is newly created, it is: 1200*768, so there will be: (1200-960)/2=120px on the left and right sides blank.
Specific method: ctrl+R, the ruler will appear, from the ruler position on the left, click and hold the left mouse button and drag right without releasing it.

Pull out two lines, respectively at: 120px and 1080px


The final picture:


 ##4-4: Check: Projection, parameters as shown in the picture
 4-5: Check: Stroke, the parameters are as shown
 Confirm
4-6: Select "Text Tool"-->"Enter text_MT"-->Adjust color: "#cbe5f7"-->Adjust size_80px-->Adjust position-->Set font.
4-7: Open "Layer Style"-->Inner Shadow, the parameters are as shown in the figure:
 The final figure is as follows:
 5: System title
5-1: Select "Text Tool"->"Enter text_XXX Management System"-->Adjust color: "# e7f5fd"-->Adjust size_50px-->Adjust position-->Set font.
5-2: Set style:

##5-3-1: Add reflection-->First In the "XXX Management System" layer --> Press: ctrl+J, copy one layer; --> Get "XXX Management System Copy" --> Right-click "XXX Management System Copy" --> Select "Rasterize text"-->Get the layer "XXX Management System Copy"-->Create a new layer 3 and place it under "XXX Management System Copy"-->Select the layer "XXX Management System Copy" -->ctrl+E Merge layers downward to get "Layer 3"
Before rasterization:
After rasterization:

Before merging with layer 3:

After merging with layer 3:

ps: Pay attention to the red part, otherwise the merge will not achieve the effect
5-3-2: Select layer 3: ctrl+T, move the position to the "XXX Management System" position Directly below, invert and tilt, the result is as shown in the figure, OK


 ##6-2-1: Get the shape "Layer 2" --> Double-click --> Open "Layer Style" --> Check "Gradient Overlay", parameters: #09649e, #449cd5.
6-2-2: Check "Projection", the parameters are as shown in the figure:
 6-2-3: Check "Stroke", The parameters are as shown in the figure:
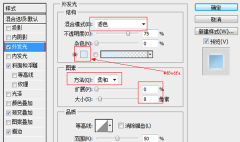
 6-2-4: Check the "Inner Glow" parameter as shown in the figure:
 6-3: Adjust the position as needed.
6-4: Follow step 5-3 to make a background for "Shape 2". After it is done, the final effect is as follows:
 6- 5-1: There are two icons used here. The processing method is as follows:
ctrl+T-->Adjust size-->Add "Layer Style"-->Check "Gradient Fill", parameters "#80aed1, #c9e0f3"-- >Check the "Shadow" parameters: distance: 1px, size: 2px, opacity: 30%, the effect is as follows:

6-5-2: To create a text box, select the "Distance Tool" parameters as follows


 ##The effect is as follows:
 Make another text box with focus:
ctrl+JCopy one layer, double-click to modify" Layer Style", the parameters are as follows:

 The focus effect is as follows:
 6-4: Password box, verification code input box, copy one and adjust the position:
 The effect is as follows:
 7: Login button creation.
7-1: Follow steps: 6-5-2 to draw a rounded corner shape, the size is customized, the rounded corner radius is recommended: 4px; adjust the position,
7-2: Open "Layer Style", the parameters are as follows:


# #Effect: 
7-3: Make a button that gets focus, modify the style as shown: 
Effect:

The design is now complete.
Look at the final file structure:

The final rendering:

Please indicate the source for reprinting: http:/ /www.php.cn/
For more ps+div+css to create a blue background--login page design related articles, please pay attention to the PHP Chinese website!
 How to copy and paste layer styles in PS?May 16, 2025 am 06:00 AM
Copying and pasting layer styles in Photoshop is a key trick to improve productivity. Let's dive into how to do it, and the various details and techniques you may encounter in the process. When we talk about copying and pasting layer styles in Photoshop, the first thing we need to understand is that layer styles refer to effects applied to layers, such as shadows, glows, bevels, and reliefs. Mastering this feature not only saves time, but also ensures consistent design. To copy the style of a layer, right-click the layer you want to copy and select Copy Layer Style. This will copy all the styles of the layer into the clipboard. Next, select the target layer you want to apply these styles, right-click it, and select Paste
 How to use PS to synthesize two pictures seamlessly?May 15, 2025 pm 11:57 PM
The steps to synthesize two pictures and achieve seamless connection in Photoshop include: 1. Adjust the brightness and contrast to make the tones of the two pictures consistent; 2. Use masks and blending mode to erase the edges to achieve a natural transition. This method requires repeated adjustments and trial and error, paying attention to detail processing and color consistency to achieve the best results.
 How to use PS to adjust the insufficient exposure of photos?May 15, 2025 pm 11:54 PM
Adjusting photos with underexposed photos in Photoshop can use the "Exposure", "Brightness/Contrast" and "Curve" adjustment tools: 1. The "Exposure" adjustment is used to initially improve the overall exposure; 2. The "Brightness/Contrast" adjustment can improve the brightness and contrast at the same time; 3. The "Curve" adjustment allows precise control of different brightness ranges, which is suitable for refinement adjustments.
 How to color black and white photos on PS?May 15, 2025 pm 11:51 PM
Coloring black and white photos in Adobe Photoshop can use layer masks, color tuning tools, and brush tools. The specific steps include: 1. Open a black and white photo and create a new layer; 2. Use "Hue/Saturation" to adjust the layer to add colors, and accurately control the application area of the color through the layer mask; 3. Use the brush tool to draw on the layer mask to further adjust the color; 4. Keep the original image details and add new colors by setting the layer's blending mode to "Color".
 How to design a simple style poster with PS?May 15, 2025 pm 11:48 PM
The key to designing a minimalist style poster is to convey the message through simple elements and tones. The steps are as follows: 1. Select the A3 size (297x420mm), and the resolution is 300dpi. 2. Use monochromatic or complementary tones, cool tones such as blue and white. 3. Add simple sans serif fonts and geometric figures, pay attention to white space and golden point typesetting. 4. Optimize details, such as text size, spacing and layer style effects.
 How to use PS to create Glitch Effect?May 15, 2025 pm 11:45 PM
Making GlitchEffect in Photoshop can be achieved through the following steps: 1. Open and copy the picture. 2. Use the channel mixer to disrupt color balance. 3. Add perturbation filters to increase randomness, adjust transparency or use masks to control the effect. 4. Create a digital stripe effect through the threshold adjustment layer and overlay multiple threshold layers to adjust transparency. 5. Use color balance to adjust the overall tone and add personalized colors. The art of making failures is full of experimental and randomness, and moderate and orderly management of layers is key.
 How to create a double exposure effect on PS?May 15, 2025 pm 11:42 PM
Making a double exposure effect is a very cool trick in Photoshop. Let's explore how to achieve this effect, as well as the problems and solutions you may encounter in the process. To create a double exposure effect in Photoshop, you first need to select two or more images, and the elements of these images will be fused together in the final effect. When selecting pictures, it is recommended to choose pictures with high contrast and rich details, so that the effect after fusion will be more obvious and attractive. Let's start with a simple example, suppose we have two pictures: one is a portrait and the other is a night view of the city. Our goal is to blend the night view of the city with portraits to create a dreamy double exposure effect. First, we need to import both images
 How to create 3D three-dimensional text effects on PS?May 15, 2025 pm 11:39 PM
There are three main ways to create 3D three-dimensional text effects in Photoshop: 1) Use 3D tools, 2) Layer styles, and 3) Manual drawing. First, when using the 3D tool, create a new document and enter text, select the text layer and select "New 3D Highlight Effect from Selection", and then adjust the rotation, zoom, and position. Secondly, adjust the Depth, Size, and Softening parameters through the Bevel and Emboss options in the layer style to simulate the 3D effect. Finally, manual drawing methods require more skill and time, but with complete control over the effects.


Hot AI Tools

Undresser.AI Undress
AI-powered app for creating realistic nude photos

AI Clothes Remover
Online AI tool for removing clothes from photos.

Undress AI Tool
Undress images for free

Clothoff.io
AI clothes remover

Video Face Swap
Swap faces in any video effortlessly with our completely free AI face swap tool!

Hot Article

Hot Tools

MinGW - Minimalist GNU for Windows
This project is in the process of being migrated to osdn.net/projects/mingw, you can continue to follow us there. MinGW: A native Windows port of the GNU Compiler Collection (GCC), freely distributable import libraries and header files for building native Windows applications; includes extensions to the MSVC runtime to support C99 functionality. All MinGW software can run on 64-bit Windows platforms.
SublimeText3 Mac version
God-level code editing software (SublimeText3)

SublimeText3 Linux new version
SublimeText3 Linux latest version

EditPlus Chinese cracked version
Small size, syntax highlighting, does not support code prompt function

DVWA
Damn Vulnerable Web App (DVWA) is a PHP/MySQL web application that is very vulnerable. Its main goals are to be an aid for security professionals to test their skills and tools in a legal environment, to help web developers better understand the process of securing web applications, and to help teachers/students teach/learn in a classroom environment Web application security. The goal of DVWA is to practice some of the most common web vulnerabilities through a simple and straightforward interface, with varying degrees of difficulty. Please note that this software


