SVG过滤器可以为SVG图形添加一些非常酷的效果,如阴影、模糊和高光等效果。
SVG过滤器的例子
先来看一个简单的SVG过滤器的例子,直观的感受一些它的效果:
<defs>
  <filter id="blurFilter" y="-5" height="40"
      <feGaussianBlur in="SourceGraphic" stdDeviation="3" y="-"/>
  </filter>
</defs>

<ellipse cx="55" cy="60" rx="25" ry="15"
  style="stroke: none; fill: #663399; " />

<ellipse cx="155" cy="60" rx="25" ry="15"
  style="stroke: none; fill: #663399; filter: url(#blurFilter);" />
在这个例子中,对一个SVG椭圆形应用了模糊滤镜,得到的结果如下:
SVG过滤器的输入和输出
SVG过滤器在应用过滤效果的时候需要一个输入源。这个输入源可以是一个图形,或图形的alpha通道,或另一个过滤器的输出值。
SVG过滤器可以从输入源中产生一个输出图像。一个过滤器的输出可以是另一个过滤器的输入,这样,过滤器可以被链接起来使用。
下面是一张SVG过滤器输入和输出的说明图片:

SVG过滤器的输入通常在SVG滤镜的in属性中指定,例如:
<feGaussianBlur stdDeviation="3" in="SourceGraphic" />
如果你需要将一个SVG过滤器的输出作为另一个过滤器的输入,需要在输出元素上添加一个result属性:
<feGaussianBlur stdDeviation="3" in="SourceGraphic" result="blur"/>
这样,在另一个过滤器中,可以通过在in属性中设置值为blur来使用它作为输入源。
过滤器的尺寸
一个SVG过滤器的尺寸由x、y、width和height属性来决定。
x和y属性是相对于输入源图形的x和y属性来设定。由于过滤器的输出图形通常会比输入图形大(例如对图形添加模糊效果),因此,我们通常需要将x和y属性设置为负值来剪切掉多出的部分。
width和height属性指定过滤器的宽度和高度,大多数时候你需要指定宽度和高度大于输出图像的尺寸,以便于在剪切后尺寸和原来的图形基本相等。
多重过滤器
你可以通过f44581c4ff918450f05f7d367fc9e950元素来同时使用多个SVG过滤器。看下面的例子:
<defs>
    <filter id="blurFilter2" y="-10" height="40" x="-10" width="150">
        <feOffset in="SourceAlpha" dx="3" dy="3" result="offset2" />
        <feGaussianBlur in="offset2" stdDeviation="3"  result="blur2"/>

        <feMerge>
            <feMergeNode in="blur2" />
            <feMergeNode in="SourceGraphic" />
        </feMerge>
    </filter>
</defs>

<ellipse cx="55" cy="60" rx="25" ry="15"
         style="stroke: none; fill: #0000ff; filter: url(#blurFilter2);" />
这个例子中创建了一个SVG过滤器,它包括两个滤镜元素:c18c6935688fb13afbb9319b9b72a56e和ad11e455a1398b09cace1648f731f602。偏移滤镜的输入源是椭圆图形的alpha通道,高斯模糊滤镜的输入源是偏移滤镜的输出。
f44581c4ff918450f05f7d367fc9e950元素将原始图像和高斯模糊滤镜的输出相结合。在f44581c4ff918450f05f7d367fc9e950元素中的结合顺序决定了它们的显示顺序,后输入的元素会显示在先输入元素的上面。
上面的代码得到的结果类似于一个drop阴影效果,下面是输出的结果:

高斯模糊滤镜
SVG高斯模糊滤镜可以将图像进行模糊处理。要使用高斯模糊滤镜,可以使用元素。下面是一个例子:
<defs>
    <filter id="blurFilter4" x="-20" y="-20" width="200" height="200">
        <feGaussianBlur in="SourceGraphic" stdDeviation="10" />
    </filter>
</defs>
<rect x="20" y="20" width="90" height="90"
      style="stroke: none; fill: #00ff00; filter: url(#blurFilter4);" />
这个例子中,在1d24e586ca31f4bd05eca427459d98c7元素中使用了ad11e455a1398b09cace1648f731f602滤镜。在矩形元素中的style属性中使用filter来指向这个SVG过滤器,得到的结果如下面图像所示:

模糊的尺寸
ad11e455a1398b09cace1648f731f602元素的stdDeviation属性决定图像的模糊尺寸大小。它的数值越大,图像的模糊尺寸越大。在下面的例子中分别设置了三个不同的stdDeviation值。
<defs>
    <filter id="blurFilter5" x="-20" y="-20" width="200" height="200">
        <feGaussianBlur in="SourceGraphic" stdDeviation="2" />
    </filter>
    <filter id="blurFilter6" x="-20" y="-20" width="200" height="200">
        <feGaussianBlur in="SourceGraphic" stdDeviation="6" />
    </filter>
    <filter id="blurFilter7" x="-20" y="-20" width="200" height="200">
        <feGaussianBlur in="SourceGraphic" stdDeviation="12" />
    </filter>
</defs>

<rect x="20" y="24" width="90" height="90"
      style="stroke: none; fill: #00ff00; filter: url(#blurFilter5);" />
<rect x="150" y="24" width="90" height="90"
      style="stroke: none; fill: #00ff00; filter: url(#blurFilter6);" />
<rect x="300" y="24" width="90" height="90"
      style="stroke: none; fill: #00ff00; filter: url(#blurFilter7);" />
得到的返回结果如下:

通过ALPHA通道进行模糊
在上面的例子中,过滤器的输入源是SourceGraphic,意思是使用图形的RGB颜色来作为输入源。你也可以使用图形的alpha通道来作为输入源,只需要将ad11e455a1398b09cace1648f731f602元素的in属性设置为SourceAlpha即可。下面是一个例子:
<defs>
    <filter id="blurFilter8" x="-20" y="-20" width="200" height="200">
        <feGaussianBlur <b>in="SourceAlpha"</b> stdDeviation="10" />
    </filter>
</defs>
<rect x="20" y="20" width="90" height="90"
      style="stroke: none; fill: #00ff00; filter: url(#blurFilter8);" />
得到的返回结果如下:
注意观察,矩形的填充色是绿色的,但是通过alpha通道来进行模糊之后,得到的结果是黑白色的图像。
偏移滤镜
偏移滤镜会将输入图形进行移动之后作为结果输出。你可以使用它来上下左右移动图形。通常偏移滤镜都是用于制作drop阴影效果。下面是一个例子:
<defs>
    <filter id="offsetFilter1" x="-20" y="-20" width="200" height="200">
        <feOffset in="SourceGraphic" dx="80" dy="20" />
    </filter>
</defs>
<rect x="20" y="20" width="90" height="90"
      style="stroke: #9a12b3; fill: none; filter: url(#offsetFilter1);" />
<rect x="20" y="20" width="90" height="90"
      style="stroke: #1f3a93; fill: none; " />
得到的结果如下所示:
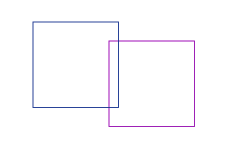
这个例子中定义了两个矩形,它们的尺寸和位置都相同。紫色描边的矩形被应用了偏移滤镜,使它相对于原来的位置向右移动了80个单位,向下移动了20各单位。
颜色矩阵滤镜
颜色矩阵滤镜用来在图形的颜色中应用矩阵变换。下面是一个例子:
<defs>
    <filter id="colorMatrixFilter1" x="-20" y="-20" width="200" height="200">
        <feColorMatrix in="SourceGraphic" type="matrix"
                values="0 0 0 1 0
                        0 0 0 1 0
                        0 0 0 1 0
                        0 0 0 1 0
                "/>
    </filter>
</defs>
<rect x="20" y="20" width="90" height="90"
      style="stroke: none; fill: #049372; filter: url(#colorMatrixFilter1);" />
<rect x="150" y="20" width="90" height="90"
          style="stroke: #049372; fill: #049372;" />
矩阵的值有06ee419339fcea58566d1018aac4be83元素中的values属性提供。这里共有4X5=20个值。在原始图像中它们的值类似下面的样子:
0 0 0 red   0
0 0 0 green 0
0 0 0 blue  0
0 0 0 1     0
上面的代码得到的返回结果如下:

注意观察,左边的图形应用了颜色矩阵滤镜,它原来有一个绿色的填充颜色,在使用了颜色矩阵之后只剩下描边了。右边是没有使用颜色矩阵的图形。
混合(BLEND)滤镜
混合滤镜可以将多个输入滤镜混合为一个。下面是一个例子:
<svg width="500" height="100">
  <defs>
    <filter id="blurFilter3" y="-10" height="40" x="-10" width="150">
      <feOffset in="SourceAlpha" dx="3" dy="3" result="offset3" />
      <feGaussianBlur in="offset3" stdDeviation="3"  result="blur3"/>

      <feBlend  in="SourceGraphic" in2="blur3" x="-10" width="160"/>

    </filter>
  </defs>

  <ellipse cx="55" cy="60" rx="25" ry="15"
         style="stroke: none; fill: #1f3a93;
                filter: url(#blurFilter3);" />

</svg>
这个例子声明了三个滤镜。第一个偏移滤镜,第二个是高斯模糊滤镜。高斯模糊滤镜的输入是偏移滤镜的输出。第三个4a2de5b5de45a23b60781a758be85295滤镜有两个输入,它将这两个输入进行了混合:
上面代码得到的结果如下: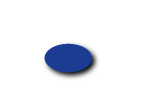
以上就是SVG进阶|SVG过滤器(SVG Filters)的内容,更多相关内容请关注PHP中文网(www.php.cn)!
 H5: The Future of Web Content and DesignMay 01, 2025 am 12:12 AM
H5 (HTML5) will improve web content and design through new elements and APIs. 1) H5 enhances semantic tagging and multimedia support. 2) It introduces Canvas and SVG, enriching web design. 3) H5 works by extending HTML functionality through new tags and APIs. 4) Basic usage includes creating graphics using it, and advanced usage involves WebStorageAPI. 5) Developers need to pay attention to browser compatibility and performance optimization.
 H5: New Features and Capabilities for Web DevelopmentApr 29, 2025 am 12:07 AM
H5 brings a number of new functions and capabilities, greatly improving the interactivity and development efficiency of web pages. 1. Semantic tags such as enhance SEO. 2. Multimedia support simplifies audio and video playback through and tags. 3. Canvas drawing provides dynamic graphics drawing tools. 4. Local storage simplifies data storage through localStorage and sessionStorage. 5. The geolocation API facilitates the development of location-based services.
 H5: Key Improvements in HTML5Apr 28, 2025 am 12:26 AM
HTML5 brings five key improvements: 1. Semantic tags improve code clarity and SEO effects; 2. Multimedia support simplifies video and audio embedding; 3. Form enhancement simplifies verification; 4. Offline and local storage improves user experience; 5. Canvas and graphics functions enhance the visualization of web pages.
 HTML5: The Standard and its Impact on Web DevelopmentApr 27, 2025 am 12:12 AM
The core features of HTML5 include semantic tags, multimedia support, offline storage and local storage, and form enhancement. 1. Semantic tags such as, etc. to improve code readability and SEO effect. 2. Simplify multimedia embedding with labels. 3. Offline storage and local storage such as ApplicationCache and LocalStorage support network-free operation and data storage. 4. Form enhancement introduces new input types and verification properties to simplify processing and verification.
 H5 Code Examples: Practical Applications and TutorialsApr 25, 2025 am 12:10 AM
H5 provides a variety of new features and functions, greatly enhancing the capabilities of front-end development. 1. Multimedia support: embed media through and elements, no plug-ins are required. 2. Canvas: Use elements to dynamically render 2D graphics and animations. 3. Local storage: implement persistent data storage through localStorage and sessionStorage to improve user experience.
 The Connection Between H5 and HTML5: Similarities and DifferencesApr 24, 2025 am 12:01 AM
H5 and HTML5 are different concepts: HTML5 is a version of HTML, containing new elements and APIs; H5 is a mobile application development framework based on HTML5. HTML5 parses and renders code through the browser, while H5 applications need to run containers and interact with native code through JavaScript.
 The Building Blocks of H5 Code: Key Elements and Their PurposeApr 23, 2025 am 12:09 AM
Key elements of HTML5 include,,,,,, etc., which are used to build modern web pages. 1. Define the head content, 2. Used to navigate the link, 3. Represent the content of independent articles, 4. Organize the page content, 5. Display the sidebar content, 6. Define the footer, these elements enhance the structure and functionality of the web page.
 HTML5 and H5: Understanding the Common UsageApr 22, 2025 am 12:01 AM
There is no difference between HTML5 and H5, which is the abbreviation of HTML5. 1.HTML5 is the fifth version of HTML, which enhances the multimedia and interactive functions of web pages. 2.H5 is often used to refer to HTML5-based mobile web pages or applications, and is suitable for various mobile devices.


Hot AI Tools

Undresser.AI Undress
AI-powered app for creating realistic nude photos

AI Clothes Remover
Online AI tool for removing clothes from photos.

Undress AI Tool
Undress images for free

Clothoff.io
AI clothes remover

Video Face Swap
Swap faces in any video effortlessly with our completely free AI face swap tool!

Hot Article

Hot Tools

SecLists
SecLists is the ultimate security tester's companion. It is a collection of various types of lists that are frequently used during security assessments, all in one place. SecLists helps make security testing more efficient and productive by conveniently providing all the lists a security tester might need. List types include usernames, passwords, URLs, fuzzing payloads, sensitive data patterns, web shells, and more. The tester can simply pull this repository onto a new test machine and he will have access to every type of list he needs.

SublimeText3 Mac version
God-level code editing software (SublimeText3)

EditPlus Chinese cracked version
Small size, syntax highlighting, does not support code prompt function

SublimeText3 Linux new version
SublimeText3 Linux latest version

Zend Studio 13.0.1
Powerful PHP integrated development environment


