Home >Backend Development >PHP Tutorial >rsync+inotify realizes real-time file synchronization between servers in Linux system
rsync+inotify realizes real-time file synchronization between servers in Linux system
- 高洛峰Original
- 2017-02-07 16:40:491565browse
I have previously made a technical document on "SSH Trust and SCP Automatic Transfer Script". This solution is used as a backup method in the company, but in actual operation, because the main server is transmitting to the backup server, our main server The files that the server needs to back up are generated in real time and continuously. As a result, we don’t know how many files the main server has transferred to the backup server. The disk space is so large. The reasons for doing backup are: one is to keep the files, and the other is to solve the problem of the main server. The disk is full, but because we don’t know how many files the backup server has received, we dare not delete the files in the main server (if we delete them without backup, the problem will be serious. This is a government project, and the files in the server The files are all important. If you delete the wrong one, you will leave~~~~(>_The following is the backup technical document I made for the company's operation and maintenance. I share it with you. I hope it will be helpful to everyone.
Let’s first introduce rsync and inotify, both of which are information found online. Let me first declare that the following introduction to rsync and inotify was not written by me.
1. rsync
Compared with traditional cp and tar backup methods, rsync has the advantages of high security, fast backup, and supports incremental backup. rsync can solve the real-time requirements Moderate data backup requirements, such as regular backup of file server data to remote servers, regular data mirroring of local disks, etc.
As the scale of application systems continues to expand, better requirements for data security and reliability are also put forward. rsync has gradually exposed many shortcomings in high-end business systems. First, when rsync synchronizes data, it needs All files are scanned and compared for differential transmission. If the number of files reaches millions or even tens of millions, scanning all files will be very time-consuming. And what is changing is often a very small part of it, which is a very inefficient way. Secondly, rsync cannot monitor and synchronize data in real time. Although it can trigger synchronization through the Linux daemon, there will be a time difference between the two triggering actions. This will lead to possible inconsistencies in server and client data, making it impossible to Complete data recovery in the event of application failure. Based on the above reasons, the rsync+inotify combination appeared!
2. inotify
Inotify is a powerful, fine-grained, asynchronous file system event monitoring mechanism. Starting from 2.6.13, the Linux kernel has added Inotify support. Through Inotify, you can monitor file system additions, Deletion, modification, movement and other subtle events, using this kernel interface, third-party software can monitor various changes in files under the file system, and inotify-tools is such a third-party software.
In the above chapter, we mentioned that rsync can achieve triggered file synchronization, but if it is triggered through the crontab daemon, the synchronized data will be different from the actual data, and inotify can monitor various changes in the file system. , when there is any change in the file, rsync synchronization is triggered, which just solves the problem of real-time synchronization of data.
Let’s start the installation, configuration and testing of rsync and inotify.
The following is the structure of the two servers, which are host name, ip, status, kernel, number of bits, synchronized directory, and both servers are redhat5.4 release version.

1. Main server (server side, here is nginx)
The main server needs to install rsync and inotify, and the main server serves as the server to the backup Server client transfers files
1. Install rsync
[root@nginx ~]# cd /usr/src/
[root@nginx src]# ll
total 16
drwxr-xr-x 2 root root 4096 Jan 26 2010 debug
drwxr-xr-x 2 root root 4096 Jan 26 2010 kernels
[root@nginx src]# wget http://rsync.samba.org/ftp/rsync/src/rsync-3.0.9.tar.gz
[root@nginx src]# tar zxvf rsync-3.0.9.tar.gz
[root@nginx src]# cd rsync-3.0.9
[root@nginx rsync-3.0.9]# ./configure --prefix=/usr/local/rsync
[root@nginx rsync-3.0.9]# make
[root@nginx rsync-3.0.9]# make install
2. Create password authentication file
[root@nginx rsync-3.0.9]# cd /usr/local/rsync/
[root@nginx rsync]# echo "rsync-pwd" >/usr/local/rsync/rsync.passwd
Among them, rsync-pwd can set its own password, rsync The .passwd name can also be set by yourself
[root@nginx rsync]# chmod 600 rsync.passwd
Whether it is for security or to avoid the following errors, the password file needs to be given 600 permissions
password file must not be other-accessible
continuing without password file
3. Install inotify
[root@nginx rsync]# cd /usr/src/
[root@nginx src]# wget http://cloud.github.com/downloads/rvoicilas/inotify-tools/inotify-tools-3.14.tar.gz
[root@nginx src]# tar zxvf inotify-tools-3.14.tar.gz
[root@nginx src]# cd inotify-tools-3.14
[root@nginx inotify-tools-3.14]# ./configure --prefix=/usr/local/inotify
[root@nginx inotify-tools-3.14]# make
[root@nginx inotify-tools-3.14]# make install
4. Create rsync copy script
This function is mainly to copy the contents of the directory /tmp on the server side. If it is modified (whether adding, modifying or deleting files), it can be used through inotify It is monitored and synchronized to the client's /tmp in real time through rsync. The following is implemented through a shell script.
#!/bin/bash
host=192.168.10.221
src=/tmp/
des=web
user=webuser
/usr/local/inotify/bin/inotifywait -mrq --timefmt '%d/%m/%y %H:%M' --format '%T %w%f%e' -e modify,delete,create,attrib $src \
| while read files
do
/usr/bin/rsync -vzrtopg --delete --progress --password-file=/usr/local/rsync/rsync.passwd $src $user@$host::$des
echo "${files} was rsynced" >>/tmp/rsync.log 2>&1
done
Note: After the prompts on the 1st floor, I found that if you put rsync.log into tmp (backup directory) or send copies, I suggest you use rsync. The logs are placed in other directories (not backup directories).
Where host is the IP address of the client, src is the directory to be monitored in real time on the server side, des is the module name for authentication, which needs to be consistent with the client, and user is the authenticated user in the password file created.
Name this script rsync.sh and put it in the monitored directory. For example, I put it under /tmp and give it 764 permissions
[root@nginx tmp]# chmod 764 rsync. sh
Then run this script
[root@nginx tmp]# sh /tmp/rsync.sh &
请记住,只有在备份服务器client端的rsync安装并启动rsync之后,在启动rsync.sh脚本,否则有时候会满屏出现:
rsync: failed to connect to 192.168.10.221: Connection refused (111)
rsync error: error in socket IO (code 10) at clientserver.c(107) [sender=2.6.8]
我们还可以把rsync.sh脚本加入到开机启动项里
[root@nginx tmp]# echo "/tmp/rsync.sh" >> /etc/rc.local 二、备份服务器(client,我这里为nginx-backup)
1、安装rsync(备份服务器只安装rsync)
[root@nginx-backup ~]# cd /usr/src/
[root@nginx-backup src]# ll
total 16
drwxr-xr-x 2 root root 4096 Jan 26 2010 debug
drwxr-xr-x 2 root root 4096 Jan 26 2010 kernels
[root@nginx-backup src]# wget http://rsync.samba.org/ftp/rsync/src/rsync-3.0.9.tar.gz
[root@nginx-backup src]# tar zxvf rsync-3.0.9.tar.gz
[root@nginx-backup src]# cd rsync-3.0.9
[root@nginx-backup rsync-3.0.9]# ./configure --prefix=/usr/local/rsync
[root@nginx-backup rsync-3.0.9]# make
[root@nginx-backup rsync-3.0.9]# make install
2、建立用户与密码认证文件
[root@nginx-backup rsync-3.0.9]# echo "webuser:rsync-pwd" > /usr/local/rsync/rsync.passwd
请记住,在server端建立的密码文件,只有密码,没有用户名;而在备份服务端client里建立的密码文件,用户名与密码都有。
[root@nginx-backup rsync]# chmod 600 rsync.passwd 需要给密码文件600权限
3、建立rsync配置文件
uid = root
gid = root
use chroot = no
max connections = 10
strict modes = yes
pid file = /var/run/rsyncd.pid
lock file = /var/run/rsync.lock
log file = /var/log/rsyncd.log
[web]
path = /tmp/
comment = web file
ignore errors
read only = no
write only = no
hosts allow = 192.168.10.220
hosts deny = *
list = false
uid = root
gid = root
auth users = webuser
secrets file = /usr/local/rsync/rsync.passwd
其中web是server服务端里的认证模块名称,需要与主服务器里的一致,以上的配置我的自己服务器里的配置,以供参考。
把配置文件命名为rsync.conf,放到/usr/local/rsync/目录里
启动rsync
[root@nginx-backup rsync]# /usr/local/rsync/bin/rsync --daemon --config=/usr/local/rsync/rsync.conf
如果出现以下问题:
/usr/local/rsync/bin/rsync: error while loading shared libraries: libiconv.so.2: cannot open shared object file: No such file or directory,
可以采用下面方法解决
[root@nginx-backup rsync]# whereis libiconv.so.2
libiconv.so: /usr/local/lib/libiconv.so.2 /usr/local/lib/libiconv.so
找到所需模块所在的目录,然后把此目录添加到/etc/ld.so.conf里,并更新库文件
[root@nginx-backup rsync]# echo "/usr/local/lib/" >> /etc/ld.so.conf
 [root@nginx-backup rsync]# ldconfig
我们可以把rsync脚本加入到开机启动项里
[root@nginx-backup rsync]# echo "/usr/local/rsync/bin/rsync --daemon --config=/usr/local/rsync/rsync.conf" >> /etc/rc.local
现在rsync与inotify在server端安装完成,rsync在备份服务器client端也安装完成
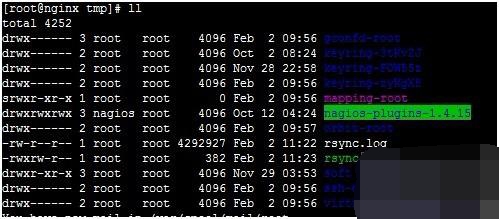
下面是server端的tmp文件情况

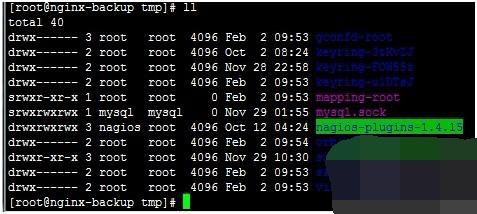
下面是client端tmp的文件情况

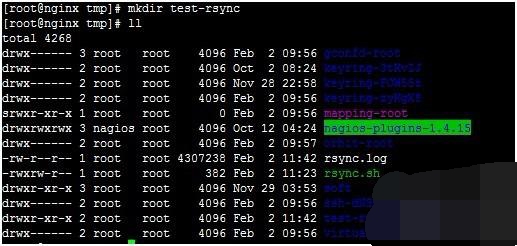
接下来我们来做一下测试,在server里创建个test-rsync文件,看看client是否能收到

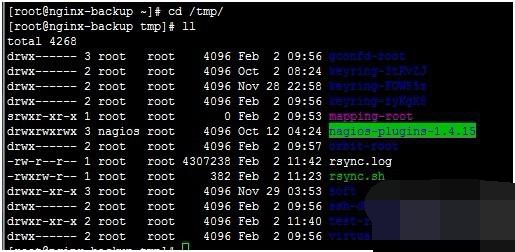
在看client端是否有test-rsync文件,同时client端的tmp目录文件是否与server端的文件完全一致

可以看到在client端,已经收到了test-rsync文件,而且client的tmp里的文件与server里tmp的文件完全相同、文件数目一致。
现在rsync与inotify的搭建与配置完成了,并实现了服务器直接数据的实时同步;大家可以根据自己的需要来进行相应的配置。
BTW:在rsync+inotify这种备份方法的时候,我公司遇到了一个问题,那就是主服务已经给备用服务同步完数据了,但主服务器磁盘看见满了,需要把已经备份的文件删除,但同时在备份服务器里保留主服务器里的文件,也就是说主服务器里删除文件的时候,备份服务器里不跟着删除文件,我查看了很多英文文档,测试了很多遍,最后找到了一个解决方法,那就是在主服务器里,把rsync.sh这个脚本里第9行的--delete参数给去掉,就可以解决这个问题。
更多rsync+inotify realizes real-time file synchronization between servers in Linux system相关文章请关注PHP中文网!

