Home >Java >javaTutorial >First introduction to Java design pattern Adapter pattern
First introduction to Java design pattern Adapter pattern
- 高洛峰Original
- 2017-01-19 16:12:381599browse
[Text]
We know that the most important and most difficult to use UI control in Android is the ListView list control, and if you want to use it flexibly, you must use an adapter, so , I think it is still necessary to learn the adapter pattern in Java (regardless of whether it can be used in the future). After all, the Java language is a very important foundation for Android development.
Completely understand the adapter pattern, there is a lot of knowledge to learn, for example: the adapter pattern has two different forms: class adapter pattern and object adapter pattern. But as a beginner, I will simply learn the introductory knowledge of orchestration mode, and I will continue to improve it in the future. I hope that the children who are struggling on the road of coding will not complain →_→
1. Adapter introduction
•Convert the interface of a class into another interface that the customer wants. The Adapter pattern enables classes to work together that would otherwise not work together due to incompatible interfaces.
•The adapter pattern is very commonly used in modern Java frameworks. This mode is suitable for the following scenarios: you want to use an existing class, but the class does not meet the interface requirements; or you need to create a reusable class that adapts to other classes that do not provide a suitable interface.
2. Examples of Apples and Oranges
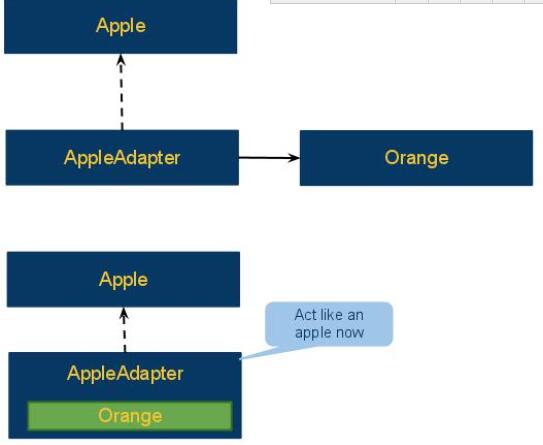
The idea of an adapter can be illustrated through the following simple example. This example wants an orange to be "fitted" into an apple. As shown in the figure below:

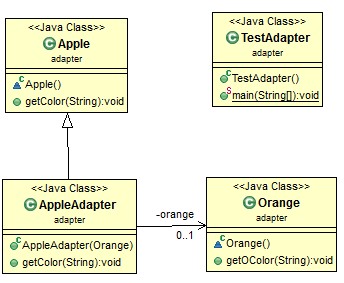
#As you can see in the lower half of the figure above, the adapter contains an Orange instance and inherits the Apple class. The orange object is placed in the adapter, so the orange behaves like an apple. The corresponding logic diagram is as follows:

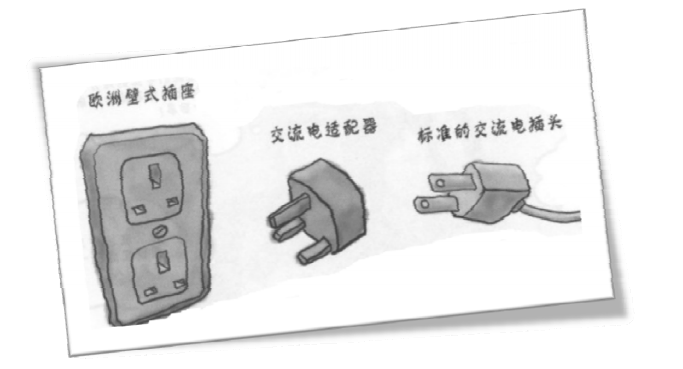
3. Example of socket box plug

In the above figure, we can pass The adapter in the middle allows the plug on the right to connect successfully to the socket on the left.
4. Code implementation of plug adapter
/**
  适配器模式( Adapter ):将一个类的接口转换成客户希望的另外一个接口。
  适配器模式使得原本由于接口不兼容而不能一起工作的那些类可以一起工作。
*/
class AdapterDemo{
  public static void main(String[] args){
    //电源A开始工作
    PowerA powerA = new PowerAImpl();
    start(powerA);
    PowerB powerB = new PowerBImpl();
    PowerAAdapter pa = new PowerAAdapter(powerB);
    start(pa);
  }
  //定义方法:电源A工作
  public static void start(PowerA powerA){
    System.out.println("....一些重复的代码.....");
    powerA.insert();
    System.out.println("....一些重复的代码.....\n");
  }

  /**
  public static void start(PowerB powerB){
    System.out.println("....一些重复的代码.....");
    powerB.connect();
    System.out.println("....一些重复的代码.....");
  }
  */
}
//定义适配器类
class PowerAAdapter implements PowerA{
  private PowerB powerB;//要进行适配的接口

  public PowerAAdapter(PowerB powerB){
    this.powerB = powerB;
  }
  //实现接口PowerA,则必然要实现PowerA里面的方法
  public void insert(){
    powerB.connect();
  }
}
/**
  电源A接口
*/
interface PowerA{
  public void insert();
}
class PowerAImpl implements PowerA{
  public void insert(){
    System.out.println("电源A接口插入,开始工作");
  }
}
/**
  电源B接口
*/
interface PowerB{
  public void connect();
}
class PowerBImpl implements PowerB{
  public void connect(){
    System.out.println("电源B接口已连接,开始工作");
  }
}
In this example, we want PowerB to call the code in the Start() method in PowerA; of course, we don’t want to write it repeatedly Lines 23 and 25 of code that were commented out. At this time, you can use the adapter mode.
Explanation of the above code:
Line 30: Start defining the adapter, which is also the beginning of the core code;
Lines 33 and 34 : Pass PowerB in through the construction method;
Line 37: Since the interface PowerA is implemented, the method insert() in PowerA must be implemented;
Line 38 of code: We call PowerB's connect() method in PowerA's insert() method;
Then, the 10th, 11th, and 12th lines of code mean: in new When a PowerB is generated, we pass it to the adapter PowerAAdapter, start the adapter, and then PowerB will execute the code on lines 16, 24, and 18.
Note: The order of 16, 24, and 18 is not wrong, because we have replaced the 24th line of code with the 17th line of code in the adapter.
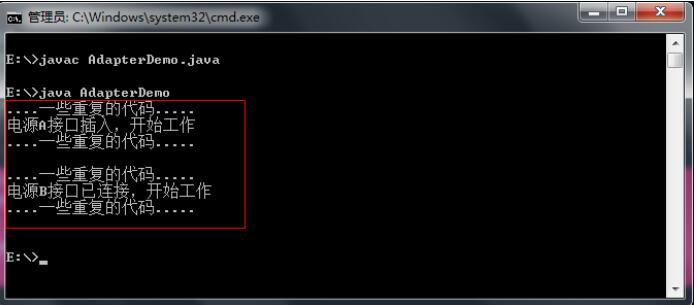
The operation effect is as follows:

#Similarly, if I also want to use PowerA as PowerB, I can define another adapter PowerBAdapter to achieve Bidirectional adapter.
5. Summary
The commented out lines 23 and 25 above indicate a lot of repeated code, which does not conform to the object-oriented way of thinking. Let's now imagine an example: Our project has been online and is being used by customers, but then some new requirements have been added. There is an OO principle for object-oriented: closed to modification (try not to modify the code after it goes online, otherwise a chain reaction may occur, causing problems in other codes that call the method here), and open to extension (new code defined by yourself) The method has not been called by others, of course we can modify it). At this point, we can reduce these repeated codes through adapters.
6. OO design principles
•Interface-oriented programming (abstraction-oriented programming)
•Encapsulation changes
•Use more combination and less inheritance
•Close for modifications and open for extensions
Personally feel that these design principles need to be continuously deepened in practice, so I won’t describe them too much here~
The above is the entire content of this article. I hope it will be helpful to everyone's learning. I also hope that everyone will support the PHP Chinese website.
For more articles related to the Java design pattern adapter pattern, please pay attention to the PHP Chinese website!
Related articles
See more- How to Draw Persistent Rectangles in a JPanel Without Performance Degradation?
- How to set margins for buttons inside a LinearLayout programmatically?
- Are Checked Exceptions Worth the Trouble?
- How to Avoid \'Xerces Hell\' in Java/Maven?
- How do you Handle Hibernate Proxy Objects When Communicating with GWT Clients via RPC?

