Home >Backend Development >PHP Tutorial >Android UI control series: RelativeLayout (relative layout)
Android UI control series: RelativeLayout (relative layout)
- 黄舟Original
- 2017-01-19 09:59:551464browse
RelativeLayout is a VeiwGroup that displays child View elements in a relative position. The position of a view can be specified relative to a sibling element (such as the left or bottom of a given one) or the favorite one for the RelativeLayout area. Position (e.g. aligned with bottom, center of remainder)
A RelativeLayout is a very powerful use for setting the layout of user interfaces, because it can eliminate nested view groups ViewGroup, as you have found that you use There are several nested LinearLayout groups, you can replace it with a single RelativeLayout
1. Start a new project named HelloRelativeLayout
2. Open res/layout/main.xml file and insert the following information
<?xml version="1.0" encoding="utf-8"?>
<RelativeLayout xmlns:android="http://schemas.android.com/apk/res/android"
    android:orientation="vertical"
    android:layout_width="fill_parent"
    android:layout_height="fill_parent"
    >
        <TextView
                android:id="@+id/label"
            android:layout_width="fill_parent"
            android:layout_height="wrap_content"
            android:text="Type here:"
    />
           <EditText
                   android:id="@+id/entry"
                   android:layout_width="fill_parent"
                   android:layout_height="wrap_content"
                   android:background="@android:drawable/editbox_background"
                   android:layout_below="@id/label"
    />
    <Button
            android:id="@+id/ok"
            android:layout_width="wrap_content"
            android:layout_height="wrap_content"
            android:layout_below="@id/entry"
            android:layout_alignParentRight="true"
            android:layout_marginLeft="10dip"
            android:text="OK"
    />
    <Button
            android:layout_width="wrap_content"
            android:layout_height="wrap_content"
            android:layout_toLeftOf="@id/ok"
            android:layout_alignTop="@id/ok"
            android:text="Cancel"
    />
</RelativeLayout>
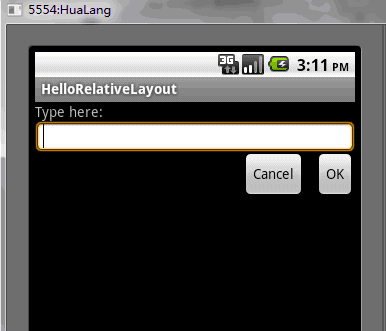
3. Pay attention to each android:layout_* attribute, such as layout_below, layout_alignParentRightRight, and layout_toLeftOf. When using a RelativeLayout, you can use these attributes to describe what you want. The position of each view. Each of these attributes defines a relative position of unknown type. Some attributes use the resource ID of the same level view to define their own relative position. For example, the last Button is defined to be aligned to the left and top of the view defined with ID ok, and all layout attributes are defined in RelativeLayout.LayoutParams
4. Now open HelloLinearLayout.java and confirm It has loaded the res/layout/main.xml layout file in the onCreate() method
public void onCreate(Bundle savedInstanceState) {
        super.onCreate(savedInstanceState);
        setContentView(R.layout.main);
5. You can see the following layout

The above is the content of the Android UI control series: RelativeLayout (relative layout). For more related content, please pay attention to the PHP Chinese website (www.php.cn)!

