Home >Java >javaTutorial >Tutorial on customizing ViewGroup view containers in Android application development
Tutorial on customizing ViewGroup view containers in Android application development
- 高洛峰Original
- 2017-01-16 17:14:022186browse
1. Overview
Before writing code, I must ask a few questions:
1. What are the responsibilities of ViewGroup?
ViewGroup is equivalent to a container for placing View, and when we write the layout xml, we will tell the container (all attributes starting with layout are used to tell the container), our width (layout_width), Height (layout_height), alignment (layout_gravity), etc.; of course, margin, etc.; therefore, the functions of ViewGroup are: calculate the recommended width, height and measurement mode for childView; determine the position of childView; why is it only the recommended width and height? Height, instead of determining it directly, don't forget that the childView width and height can be set to wrap_content, so that only the childView can calculate its own width and height.
2. What are the responsibilities of View?
The responsibility of View is to calculate its own width and height based on the measurement mode and the recommended width and height given by ViewGroup; at the same time, there is a more important responsibility: draw its own within the area designated by ViewGroup. form.
3. What is the relationship between ViewGroup and LayoutParams?
You can recall that when writing childView in LinearLayout, you can write layout_gravity and layout_weight attributes; the childView in RelativeLayout has layout_centerInParent attributes, but does not have layout_gravity and layout_weight. Why is this? This is because each ViewGroup needs to specify a LayoutParams to determine which properties the childView supports. For example, LinearLayout specifies LinearLayout.LayoutParams, etc. If you look at the source code of LinearLayout, you will find that LinearLayout.LayoutParams is defined internally. In this class, you can find weight and gravity.
2. Three measurement modes of View
As mentioned above, ViewGroup will specify the measurement mode for childView. The following is a brief introduction to the three measurement modes:
EXACTLY: Indicates that an accurate value is set, generally When childView sets its width and height to exact values and match_parent, ViewGroup will set it to EXACTLY;
AT_MOST: indicates that the sublayout is limited to a maximum value. Generally, when childView sets its width and height to wrap_content, ViewGroup will set it to AT_MOST;
UNSPECIFIED: Indicates that the sublayout can be as large as it wants. It usually appears in the heightMode of the item of AdapterView and the heightMode of childView of ScrollView; this mode is relatively rare.
Note: Each line above has a general, which means that the above is not absolute. The setting of childView's mode will also have a certain relationship with the measurement mode of ViewGroup; of course, this is the first article to customize ViewGroup. And most of the cases are based on the above rules, so for the sake of simplicity, we will not discuss other contents in depth for the time being.
3. Brief analysis from the API perspective
The responsibilities of ViewGroup and View are described above, and the following is a brief analysis from the API perspective.
View determines its width and height based on the measurement values and modes passed by ViewGroup (completed in onMeasure), and then completes its drawing in onDraw.
ViewGroup needs to pass the measurement value and mode of the view to the View (completed in onMeasure), and for the parent layout of this ViewGroup, it also needs to complete the determination of its own width and height in onMeasure. In addition, specifying the position of its childView needs to be completed in onLayout.
4. Complete example
Requirements: We define a ViewGroup, which can pass in 0 to 4 childViews, which are displayed in the upper left corner, upper right corner, lower left corner, and lower right corner respectively.
1. Determine the LayoutParams of the ViewGroup
For our example, we only need the ViewGroup to support margin, then we directly use the system's MarginLayoutParams
@Override
 public ViewGroup.LayoutParams generateLayoutParams(AttributeSet attrs)
 {
  return new MarginLayoutParams(getContext(), attrs);
 }
to override the method of the parent class, Return an instance of MarginLayoutParams, thus specifying its LayoutParams as MarginLayoutParams for our ViewGroup.
2. onMeasure
Calculate the measurement value and mode of childView in onMeasure, and set its own width and height:
/**
  * 计算所有ChildView的宽度和高度 然后根据ChildView的计算结果,设置自己的宽和高
  */
 @Override
 protected void onMeasure(int widthMeasureSpec, int heightMeasureSpec)
 {
  /**
   * 获得此ViewGroup上级容器为其推荐的宽和高,以及计算模式
   */
  int widthMode = MeasureSpec.getMode(widthMeasureSpec);
  int heightMode = MeasureSpec.getMode(heightMeasureSpec);
  int sizeWidth = MeasureSpec.getSize(widthMeasureSpec);
  int sizeHeight = MeasureSpec.getSize(heightMeasureSpec);


  // 计算出所有的childView的宽和高
  measureChildren(widthMeasureSpec, heightMeasureSpec);
  /**
   * 记录如果是wrap_content是设置的宽和高
   */
  int width = 0;
  int height = 0;

  int cCount = getChildCount();

  int cWidth = 0;
  int cHeight = 0;
  MarginLayoutParams cParams = null;

  // 用于计算左边两个childView的高度
  int lHeight = 0;
  // 用于计算右边两个childView的高度,最终高度取二者之间大值
  int rHeight = 0;

  // 用于计算上边两个childView的宽度
  int tWidth = 0;
  // 用于计算下面两个childiew的宽度,最终宽度取二者之间大值
  int bWidth = 0;

  /**
   * 根据childView计算的出的宽和高,以及设置的margin计算容器的宽和高,主要用于容器是warp_content时
   */
  for (int i = 0; i < cCount; i++)
  {
   View childView = getChildAt(i);
   cWidth = childView.getMeasuredWidth();
   cHeight = childView.getMeasuredHeight();
   cParams = (MarginLayoutParams) childView.getLayoutParams();

   // 上面两个childView
   if (i == 0 || i == 1)
   {
    tWidth += cWidth + cParams.leftMargin + cParams.rightMargin;
   }

   if (i == 2 || i == 3)
   {
    bWidth += cWidth + cParams.leftMargin + cParams.rightMargin;
   }

   if (i == 0 || i == 2)
   {
    lHeight += cHeight + cParams.topMargin + cParams.bottomMargin;
   }

   if (i == 1 || i == 3)
   {
    rHeight += cHeight + cParams.topMargin + cParams.bottomMargin;
   }

  }

  width = Math.max(tWidth, bWidth);
  height = Math.max(lHeight, rHeight);

  /**
   * 如果是wrap_content设置为我们计算的值
   * 否则:直接设置为父容器计算的值
   */
  setMeasuredDimension((widthMode == MeasureSpec.EXACTLY) ? sizeWidth
    : width, (heightMode == MeasureSpec.EXACTLY) ? sizeHeight
    : height);
 }
10-14 lines, get the calculation set by the ViewGroup parent container Mode and size, in most cases, as long as it is not wrap_content, the parent container can calculate its size correctly. So we need to calculate the width and height ourselves if set to wrap_content. How to calculate it? That is calculated by the width and height of its childView.
Line 17, set the width and height of all its children through the ViewGroup's measureChildren method. After this line is executed, the width and height of the childView have been correctly calculated.
Lines 43-71, according to the childView Width and height, as well as margin, calculate the width and height of ViewGroup when wrap_content.
Lines 80-82, if the width and height attribute value is wrap_content, it is set to the value calculated in lines 43-71, otherwise it is the width and height passed in by the parent container.
3. onLayout positions all its childViews (sets the drawing area of the childView)
// abstract method in viewgroup
 @Override
 protected void onLayout(boolean changed, int l, int t, int r, int b)
 {
  int cCount = getChildCount();
  int cWidth = 0;
  int cHeight = 0;
  MarginLayoutParams cParams = null;
  /**
   * 遍历所有childView根据其宽和高,以及margin进行布局
   */
  for (int i = 0; i < cCount; i++)
  {
   View childView = getChildAt(i);
   cWidth = childView.getMeasuredWidth();
   cHeight = childView.getMeasuredHeight();
   cParams = (MarginLayoutParams) childView.getLayoutParams();

   int cl = 0, ct = 0, cr = 0, cb = 0;

   switch (i)
   {
   case 0:
    cl = cParams.leftMargin;
    ct = cParams.topMargin;
    break;
   case 1:
    cl = getWidth() - cWidth - cParams.leftMargin
      - cParams.rightMargin;
    ct = cParams.topMargin;

    break;
   case 2:
    cl = cParams.leftMargin;
    ct = getHeight() - cHeight - cParams.bottomMargin;
    break;
   case 3:
    cl = getWidth() - cWidth - cParams.leftMargin
      - cParams.rightMargin;
    ct = getHeight() - cHeight - cParams.bottomMargin;
    break;

   }
   cr = cl + cWidth;
   cb = cHeight + ct;
   childView.layout(cl, ct, cr, cb);
  }

 }
代码比较容易懂:遍历所有的childView,根据childView的宽和高以及margin,然后分别将0,1,2,3位置的childView依次设置到左上、右上、左下、右下的位置。
如果是第一个View(index=0) :则childView.layout(cl, ct, cr, cb); cl为childView的leftMargin , ct 为topMargin , cr 为cl+ cWidth , cb为 ct + cHeight
如果是第二个View(index=1) :则childView.layout(cl, ct, cr, cb);
cl为getWidth() - cWidth - cParams.leftMargin- cParams.rightMargin;
ct 为topMargin , cr 为cl+ cWidth , cb为 ct + cHeight
剩下两个类似~
这样就完成了,我们的ViewGroup代码的编写,下面我们进行测试,分别设置宽高为固定值,wrap_content,match_parent
4、测试结果
布局1:
<com.example.zhy_custom_viewgroup.CustomImgContainer xmlns:android="http://schemas.android.com/apk/res/android"
 xmlns:tools="http://schemas.android.com/tools"
 android:layout_width="200dp"
 android:layout_height="200dp"
 android:background="#AA333333" >

 <TextView
  android:layout_width="50dp"
  android:layout_height="50dp"
  android:background="#FF4444"
  android:gravity="center"
  android:text="0"
  android:textColor="#FFFFFF"
  android:textSize="22sp"
  android:textStyle="bold" />

 <TextView
  android:layout_width="50dp"
  android:layout_height="50dp"
  android:background="#00ff00"
  android:gravity="center"
  android:text="1"
  android:textColor="#FFFFFF"
  android:textSize="22sp"
  android:textStyle="bold" />

 <TextView
  android:layout_width="50dp"
  android:layout_height="50dp"
  android:background="#ff0000"
  android:gravity="center"
  android:text="2"
  android:textColor="#FFFFFF"
  android:textSize="22sp"
  android:textStyle="bold" />

 <TextView
  android:layout_width="50dp"
  android:layout_height="50dp"
  android:background="#0000ff"
  android:gravity="center"
  android:text="3"
  android:textColor="#FFFFFF"
  android:textSize="22sp"
  android:textStyle="bold" />

</com.example.zhy_custom_viewgroup.CustomImgContainer>
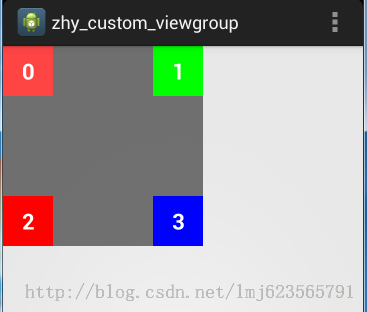
ViewGroup宽和高设置为固定值
效果图:

布局2:
<com.example.zhy_custom_viewgroup.CustomImgContainer xmlns:android="http://schemas.android.com/apk/res/android"
  xmlns:tools="http://schemas.android.com/tools"
  android:layout_width="wrap_content"
  android:layout_height="wrap_content"
  android:background="#AA333333" >

  <TextView
    android:layout_width="150dp"
    android:layout_height="150dp"
    android:background="#E5ED05"
    android:gravity="center"
    android:text="0"
    android:textColor="#FFFFFF"
    android:textSize="22sp"
    android:textStyle="bold" />

  <TextView
    android:layout_width="50dp"
    android:layout_height="50dp"
    android:background="#00ff00"
    android:gravity="center"
    android:text="1"
    android:textColor="#FFFFFF"
    android:textSize="22sp"
    android:textStyle="bold" />

  <TextView
    android:layout_width="50dp"
    android:layout_height="50dp"
    android:background="#ff0000"
    android:gravity="center"
    android:text="2"
    android:textColor="#FFFFFF"
    android:textSize="22sp"
    android:textStyle="bold" />

  <TextView
    android:layout_width="50dp"
    android:layout_height="50dp"
    android:background="#0000ff"
    android:gravity="center"
    android:text="3"
    android:textColor="#FFFFFF"
    android:textSize="22sp"
    android:textStyle="bold" />

</com.example.zhy_custom_viewgroup.CustomImgContainer>
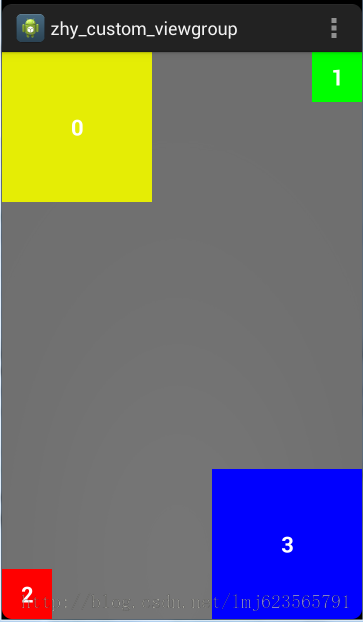
ViewGroup的宽和高设置为wrap_content
<com.example.zhy_custom_viewgroup.CustomImgContainer xmlns:android="http://schemas.android.com/apk/res/android"
  xmlns:tools="http://schemas.android.com/tools"
  android:layout_width="match_parent"
  android:layout_height="match_parent"
  android:background="#AA333333" >

  <TextView
    android:layout_width="150dp"
    android:layout_height="150dp"
    android:background="#E5ED05"
    android:gravity="center"
    android:text="0"
    android:textColor="#FFFFFF"
    android:textSize="22sp"
    android:textStyle="bold" />

  <TextView
    android:layout_width="50dp"
    android:layout_height="50dp"
    android:background="#00ff00"
    android:gravity="center"
    android:text="1"
    android:textColor="#FFFFFF"
    android:textSize="22sp"
    android:textStyle="bold" />

  <TextView
    android:layout_width="50dp"
    android:layout_height="50dp"
    android:background="#ff0000"
    android:gravity="center"
    android:text="2"
    android:textColor="#FFFFFF"
    android:textSize="22sp"
    android:textStyle="bold" />

  <TextView
    android:layout_width="150dp"
    android:layout_height="150dp"
    android:background="#0000ff"
    android:gravity="center"
    android:text="3"
    android:textColor="#FFFFFF"
    android:textSize="22sp"
    android:textStyle="bold" />

</com.example.zhy_custom_viewgroup.CustomImgContainer>
ViewGroup的宽和高设置为match_parent

可以看到无论ViewGroup的宽和高的值如何定义,我们的需求都实现了预期的效果~~
四、使用ViewDragHelper自定义ViewGroup
1、概述
在自定义ViewGroup中,很多效果都包含用户手指去拖动其内部的某个View(eg:侧滑菜单等),针对具体的需要去写好onInterceptTouchEvent和onTouchEvent这两个方法是一件很不容易的事,需要自己去处理:多手指的处理、加速度检测等等。
好在官方在v4的支持包中提供了ViewDragHelper这样一个类来帮助我们方便的编写自定义ViewGroup。简单看一下它的注释:
ViewDragHelper is a utility class for writing custom ViewGroups. It offers a number
of useful operations and state tracking for allowing a user to drag and reposition
views within their parent ViewGroup.
下面将重点介绍ViewDragHelper的使用,并且最终去实现一个类似DrawerLayout的一个自定义的ViewGroup。(ps:官方的DrawerLayout就是用此类实现)
2、入门小示例
首先我们通过一个简单的例子来看看其快捷的用法,分为以下几个步骤:
A、创建实例
B、触摸相关的方法的调用
C、ViewDragHelper.Callback实例的编写
(1) 自定义ViewGroup
package com.zhy.learn.view;

import android.content.Context;
import android.support.v4.widget.ViewDragHelper;
import android.util.AttributeSet;
import android.view.MotionEvent;
import android.view.View;
import android.widget.LinearLayout;

/**
 * Created by zhy on 15/6/3.
 */
public class VDHLayout extends LinearLayout
{
 private ViewDragHelper mDragger;

 public VDHLayout(Context context, AttributeSet attrs)
 {
  super(context, attrs);
  mDragger = ViewDragHelper.create(this, 1.0f, new ViewDragHelper.Callback()
  {
   @Override
   public boolean tryCaptureView(View child, int pointerId)
   {
    return true;
   }

   @Override
   public int clampViewPositionHorizontal(View child, int left, int dx)
   {
    return left;
   }

   @Override
   public int clampViewPositionVertical(View child, int top, int dy)
   {
    return top;
   }
  });
 }

 @Override
 public boolean onInterceptTouchEvent(MotionEvent event)
 {
  return mDragger.shouldInterceptTouchEvent(event);
 }

 @Override
 public boolean onTouchEvent(MotionEvent event)
 {
  mDragger.processTouchEvent(event);
  return true;
 }
}
可以看到,上面整个自定义ViewGroup的代码非常简洁,遵循上述3个步骤:
A、创建实例
mDragger = ViewDragHelper.create(this, 1.0f, new ViewDragHelper.Callback()
  {
  });
创建实例需要3个参数,第一个就是当前的ViewGroup,第二个sensitivity,主要用于设置touchSlop:
helper.mTouchSlop = (int) (helper.mTouchSlop * (1 / sensitivity));
可见传入越大,mTouchSlop的值就会越小。第三个参数就是Callback,在用户的触摸过程中会回调相关方法,后面会细说。
B、触摸相关方法
@Override
public boolean onInterceptTouchEvent(MotionEvent event)
{
 return mDragger.shouldInterceptTouchEvent(event);
}

@Override
public boolean onTouchEvent(MotionEvent event)
{
 mDragger.processTouchEvent(event);
 return true;
}
onInterceptTouchEvent中通过使用mDragger.shouldInterceptTouchEvent(event)来决定我们是否应该拦截当前的事件。onTouchEvent中通过mDragger.processTouchEvent(event)处理事件。
C、实现ViewDragHelper.CallCack相关方法
new ViewDragHelper.Callback()
  {
   @Override
   public boolean tryCaptureView(View child, int pointerId)
   {
    return true;
   }

   @Override
   public int clampViewPositionHorizontal(View child, int left, int dx)
   {
    return left;
   }

   @Override
   public int clampViewPositionVertical(View child, int top, int dy)
   {
    return top;
   }
  }
ViewDragHelper中拦截和处理事件时,需要会回调CallBack中的很多方法来决定一些事,比如:哪些子View可以移动、对个移动的View的边界的控制等等。
上面复写的3个方法:
tryCaptureView如何返回ture则表示可以捕获该view,你可以根据传入的第一个view参数决定哪些可以捕获
clampViewPositionHorizontal,clampViewPositionVertical可以在该方法中对child移动的边界进行控制,left , top 分别为即将移动到的位置,比如横向的情况下,我希望只在ViewGroup的内部移动,即:最小>=paddingleft,最大
@Override
  public int clampViewPositionHorizontal(View child, int left, int dx)
  {
   final int leftBound = getPaddingLeft();
   final int rightBound = getWidth() - mDragView.getWidth() - leftBound;

   final int newLeft = Math.min(Math.max(left, leftBound), rightBound);

   return newLeft;
  }
经过上述3个步骤,我们就完成了一个简单的自定义ViewGroup,可以自由的拖动子View。
简单看一下布局文件
(2) 布局文件
<com.zhy.learn.view.VDHLayout xmlns:android="http://schemas.android.com/apk/res/android"
        xmlns:tools="http://schemas.android.com/tools"
        android:layout_width="match_parent"
        android:orientation="vertical"
        android:layout_height="match_parent"
 >

 <TextView
  android:layout_margin="10dp"
  android:gravity="center"
  android:layout_gravity="center"
  android:background="#44ff0000"
  android:text="I can be dragged !"
  android:layout_width="100dp"
  android:layout_height="100dp"/>

 <TextView
  android:layout_margin="10dp"
  android:layout_gravity="center"
  android:gravity="center"
  android:background="#44ff0000"
  android:text="I can be dragged !"
  android:layout_width="100dp"
  android:layout_height="100dp"/>

 <TextView
  android:layout_margin="10dp"
  android:layout_gravity="center"
  android:gravity="center"
  android:background="#44ff0000"
  android:text="I can be dragged !"
  android:layout_width="100dp"
  android:layout_height="100dp"/>

</com.zhy.learn.view.VDHLayout>
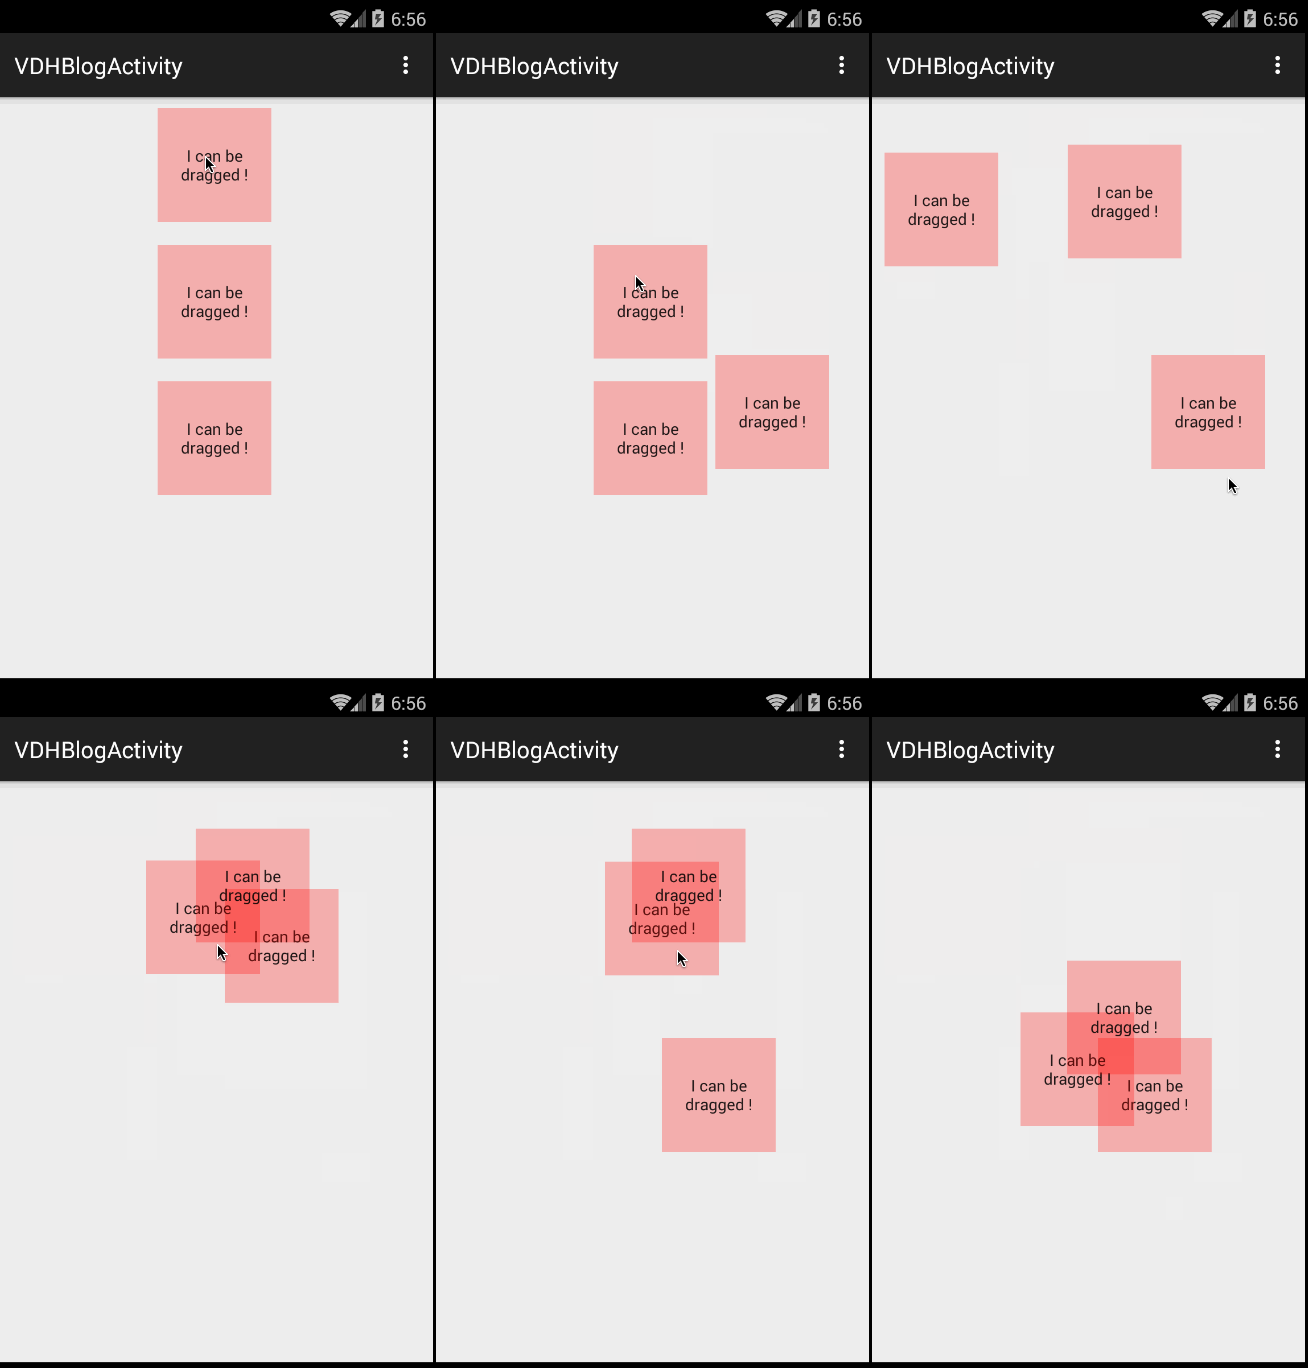
我们的自定义ViewGroup中有三个TextView。
当前效果:

可以看到短短数行代码就可以玩起来了~~~
有了直观的认识以后,我们还需要对ViewDragHelper.CallBack里面的方法做下深入的理解。首先我们需要考虑的是:我们的ViewDragHelper不仅仅说只能够去让子View去跟随我们手指移动,我们继续往下学习其他的功能。
3、功能展示
ViewDragHelper还能做以下的一些操作:
边界检测、加速度检测(eg:DrawerLayout边界触发拉出)
回调Drag Release(eg:DrawerLayout部分,手指抬起,自动展开/收缩)
移动到某个指定的位置(eg:点击Button,展开/关闭Drawerlayout)
那么我们接下来对我们最基本的例子进行改造,包含上述的几个操作。
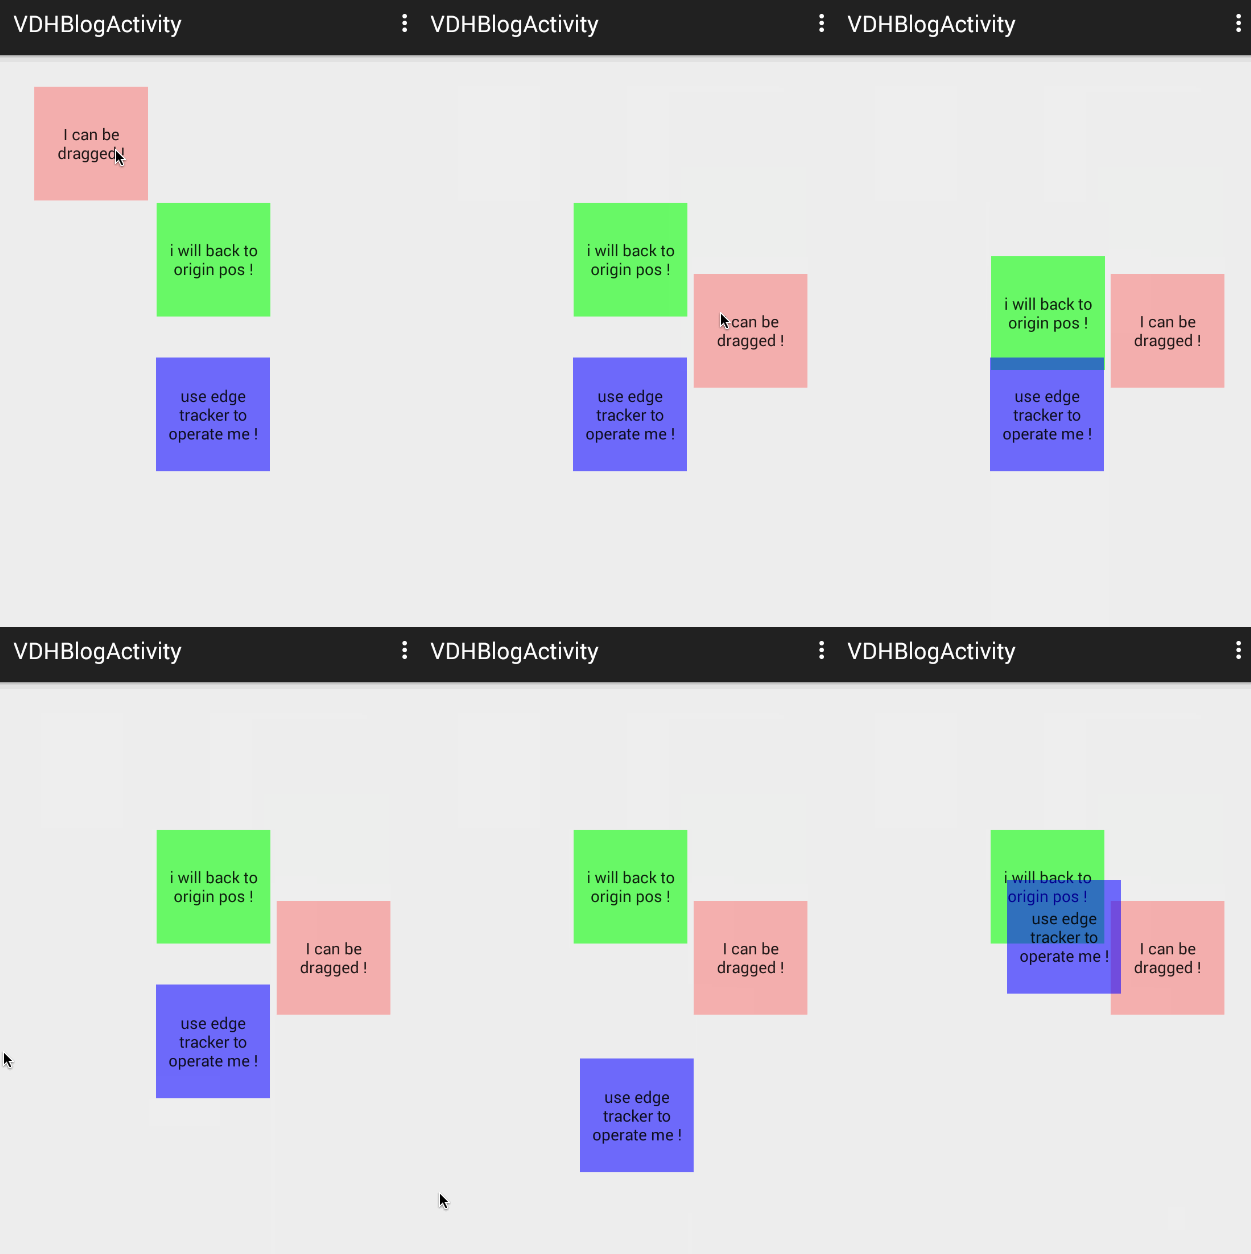
首先看一下我们修改后的效果:

简单的为每个子View添加了不同的操作:
第一个View,就是演示简单的移动
第二个View,演示除了移动后,松手自动返回到原本的位置。(注意你拖动的越快,返回的越快)
第三个View,边界移动时对View进行捕获。
好了,看完效果图,来看下代码的修改:
修改后的代码
package com.zhy.learn.view;

import android.content.Context;
import android.graphics.Point;
import android.support.v4.widget.ViewDragHelper;
import android.util.AttributeSet;
import android.view.MotionEvent;
import android.view.View;
import android.widget.LinearLayout;

/**
 * Created by zhy on 15/6/3.
 */
public class VDHLayout extends LinearLayout
{
 private ViewDragHelper mDragger;

 private View mDragView;
 private View mAutoBackView;
 private View mEdgeTrackerView;

 private Point mAutoBackOriginPos = new Point();

 public VDHLayout(Context context, AttributeSet attrs)
 {
  super(context, attrs);
  mDragger = ViewDragHelper.create(this, 1.0f, new ViewDragHelper.Callback()
  {
   @Override
   public boolean tryCaptureView(View child, int pointerId)
   {
    //mEdgeTrackerView禁止直接移动
    return child == mDragView || child == mAutoBackView;
   }

   @Override
   public int clampViewPositionHorizontal(View child, int left, int dx)
   {
    return left;
   }

   @Override
   public int clampViewPositionVertical(View child, int top, int dy)
   {
    return top;
   }


   //手指释放的时候回调
   @Override
   public void onViewReleased(View releasedChild, float xvel, float yvel)
   {
    //mAutoBackView手指释放时可以自动回去
    if (releasedChild == mAutoBackView)
    {
     mDragger.settleCapturedViewAt(mAutoBackOriginPos.x, mAutoBackOriginPos.y);
     invalidate();
    }
   }

   //在边界拖动时回调
   @Override
   public void onEdgeDragStarted(int edgeFlags, int pointerId)
   {
    mDragger.captureChildView(mEdgeTrackerView, pointerId);
   }
  });
  mDragger.setEdgeTrackingEnabled(ViewDragHelper.EDGE_LEFT);
 }


 @Override
 public boolean onInterceptTouchEvent(MotionEvent event)
 {
  return mDragger.shouldInterceptTouchEvent(event);
 }

 @Override
 public boolean onTouchEvent(MotionEvent event)
 {
  mDragger.processTouchEvent(event);
  return true;
 }

 @Override
 public void computeScroll()
 {
  if(mDragger.continueSettling(true))
  {
   invalidate();
  }
 }

 @Override
 protected void onLayout(boolean changed, int l, int t, int r, int b)
 {
  super.onLayout(changed, l, t, r, b);

  mAutoBackOriginPos.x = mAutoBackView.getLeft();
  mAutoBackOriginPos.y = mAutoBackView.getTop();
 }

 @Override
 protected void onFinishInflate()
 {
  super.onFinishInflate();

  mDragView = getChildAt(0);
  mAutoBackView = getChildAt(1);
  mEdgeTrackerView = getChildAt(2);
 }
}
布局文件我们仅仅是换了下文本和背景色就不重复贴了。
第一个View基本没做任何修改。
第二个View,我们在onLayout之后保存了最开启的位置信息,最主要还是重写了Callback中的onViewReleased,我们在onViewReleased中判断如果是mAutoBackView则调用settleCapturedViewAt回到初始的位置。大家可以看到紧随其后的代码是invalidate();因为其内部使用的是mScroller.startScroll,所以别忘了需要invalidate()以及结合computeScroll方法一起。
第三个View,我们在onEdgeDragStarted回调方法中,主动通过captureChildView对其进行捕获,该方法可以绕过tryCaptureView,所以我们的tryCaptureView虽然并为返回true,但却不影响。注意如果需要使用边界检测需要添加上mDragger.setEdgeTrackingEnabled(ViewDragHelper.EDGE_LEFT);。
到此,我们已经介绍了Callback中常用的回调方法了,当然还有一些方法没有介绍,接下来我们修改下我们的布局文件,我们把我们的TextView全部加上clickable=true,意思就是子View可以消耗事件。再次运行,你会发现本来可以拖动的View不动了,(如果有拿Button测试的兄弟应该已经发现这个问题了,我希望你看到这了,而不是已经提问了,哈~)。
原因是什么呢?主要是因为,如果子View不消耗事件,那么整个手势(DOWN-MOVE*-UP)都是直接进入onTouchEvent,在onTouchEvent的DOWN的时候就确定了captureView。如果消耗事件,那么就会先走onInterceptTouchEvent方法,判断是否可以捕获,而在判断的过程中会去判断另外两个回调的方法:getViewHorizontalDragRange和getViewVerticalDragRange,只有这两个方法返回大于0的值才能正常的捕获。
所以,如果你用Button测试,或者给TextView添加了clickable = true ,都记得重写下面这两个方法:
@Override
public int getViewHorizontalDragRange(View child)
{
  return getMeasuredWidth()-child.getMeasuredWidth();
}

@Override
public int getViewVerticalDragRange(View child)
{
  return getMeasuredHeight()-child.getMeasuredHeight();
}
方法的返回值应当是该childView横向或者纵向的移动的范围,当前如果只需要一个方向移动,可以只复写一个。
到此,我们列一下所有的Callback方法,看看还有哪些没用过的:
onViewDragStateChanged
当ViewDragHelper状态发生变化时回调(IDLE,DRAGGING,SETTING[自动滚动时]):
onViewPositionChanged
当captureview的位置发生改变时回调:
onViewCaptured
当captureview被捕获时回调:
onViewReleased 已用
onEdgeTouched
当触摸到边界时回调:
onEdgeLock
true的时候会锁住当前的边界,false则unLock。
onEdgeDragStarted 已用
getOrderedChildIndex
改变同一个坐标(x,y)去寻找captureView位置的方法。(具体在:findTopChildUnder方法中)
getViewHorizontalDragRange 已用
getViewVerticalDragRange 已用
tryCaptureView 已用
clampViewPositionHorizontal 已用
clampViewPositionVertical 已用
ok,至此所有的回调方法都有了一定的认识。
总结下,方法的大致的回调顺序:
shouldInterceptTouchEvent:

DOWN:
 getOrderedChildIndex(findTopChildUnder)
 ->onEdgeTouched

MOVE:
 getOrderedChildIndex(findTopChildUnder)
 ->getViewHorizontalDragRange &
  getViewVerticalDragRange(checkTouchSlop)(MOVE中可能不止一次)
 ->clampViewPositionHorizontal&
  clampViewPositionVertical
 ->onEdgeDragStarted
 ->tryCaptureView
 ->onViewCaptured
 ->onViewDragStateChanged

processTouchEvent:

DOWN:
 getOrderedChildIndex(findTopChildUnder)
 ->tryCaptureView
 ->onViewCaptured
 ->onViewDragStateChanged
 ->onEdgeTouched
MOVE:
 ->STATE==DRAGGING:dragTo
 ->STATE!=DRAGGING:
  onEdgeDragStarted
  ->getOrderedChildIndex(findTopChildUnder)
  ->getViewHorizontalDragRange&
   getViewVerticalDragRange(checkTouchSlop)
  ->tryCaptureView
  ->onViewCaptured
  ->onViewDragStateChanged
ok,上述是正常情况下大致的流程,当然整个过程可能会存在很多判断不成立的情况。
It can also be explained from the above that in the previous case of TextView (clickable=false), it can be moved without writing the getViewHorizontalDragRange method. Because it directly enters the DOWN of processTouchEvent, then onViewCaptured, onViewDragStateChanged (enters the DRAGGING state), and then MOVE directly dragTo.
When the child View consumes events, it needs to go to shouldInterceptTouchEvent. After a series of judgments during MOVE (getViewHorizontalDragRange, clampViewPositionVertical, etc.), it can go to tryCaptureView.
ok, this is the end of the introductory usage of ViewDragHelper. In the next article, we will use ViewDragHelper to implement a DrawerLayout ourselves.
Those who are interested can also implement it based on this article and the source code of DrawerLayout~
For more tutorials and related articles on customizing ViewGroup view containers in Android application development, please pay attention to the PHP Chinese website!
Related articles
See more- Why and How Should You Synchronize on String Objects in Java?
- Why is SimpleDateFormat Assigning All Dates to January When Parsing Active Directory Dates?
- Why Is Java SimpleDateFormat Consistently Returning January for Month?
- How Can AtomicInteger Enhance Concurrent Programming in Java?
- How to Convert Java Timestamps to Different Time Zones?

