Home >Java >javaTutorial >Implementation method of Android custom ViewGroup
Implementation method of Android custom ViewGroup
- 高洛峰Original
- 2017-01-16 16:59:271496browse
Several common ViewGroup implementations are provided in android, including LinearLayout, Relativeayout, FrameLayout, etc. These ViewGroups can meet our general development needs, but for complex interface requirements, these layouts are insufficient. Therefore, custom ViewGroups abound in the applications we have come into contact with.
To implement a customized ViewGroup, the first step is to learn custom attributes. These custom attributes will make us more flexible when configuring the layout file. Custom attributes are declared in an attrs.xml file in the value directory.
<?xml version="1.0" encoding="utf-8"?>
<resources>
 <declare-styleable name="CascadeViewGroup">
  <attr name="verticalspacing" format="dimension"/>
  <attr name="horizontalspacing" format="dimension"/>
 </declare-styleable>

 <declare-styleable name="CascadeViewGroup_LayoutParams">
  <attr name="layout_paddingleft" format="dimension"/>
  <attr name="layout_paddinTop" format="dimension"/>
 </declare-styleable>
</resources>
Here we declare two custom property sets. The properties in CascadeViewGroup are set for our custom CascadeViewGroup component, which can be used in the
Before writing the code, we also set a default width and height for CascadeLayout to use. These two properties are defined in dimens.xml.
<?xml version="1.0" encoding="utf-8"?>
<resources>
  <dimen name="default_horizontal_spacing">10dp</dimen>
 <dimen name="default_vertical_spacing">10dp</dimen>
</resources>
Let’s start writing the custom component CascadeLayout.
package com.app.CustomViewMotion;

import android.content.Context;
import android.content.res.TypedArray;
import android.util.AttributeSet;
import android.view.View;
import android.view.ViewGroup;

/**
 * Created by charles on 2015/8/13.
 */
public class CascadeViewGroup extends ViewGroup {

 //自定义布局中设置的宽度和高度
 private int mHoriztonalSpacing;
 private int mVerticalSpacing;

 public CascadeViewGroup(Context context) {
  this(context, null);
 }

 public CascadeViewGroup(Context context, AttributeSet attrs) {
  this(context, attrs, 0);
 }

 public CascadeViewGroup(Context context, AttributeSet attrs, int defStyle) {
  super(context, attrs, defStyle);
  TypedArray a = context.obtainStyledAttributes(attrs, R.styleable.CascadeViewGroup);
  try {
   //获取设置的宽度
   mHoriztonalSpacing = a.getDimensionPixelSize(R.styleable.CascadeViewGroup_horizontalspacing,
     this.getResources().getDimensionPixelSize(R.dimen.default_horizontal_spacing));
   //获取设置的高度
   mVerticalSpacing = a.getDimensionPixelSize(R.styleable.CascadeViewGroup_verticalspacing,
     this.getResources().getDimensionPixelSize(R.dimen.default_vertical_spacing));

  } catch (Exception e) {
   e.printStackTrace();

  } finally {
   a.recycle();
  }
 }

 @Override
 protected void onMeasure(int widthMeasureSpec, int heightMeasureSpec) {
  final int count = this.getChildCount();
  int width = this.getPaddingLeft();
  int height = this.getPaddingTop();
  for (int i = 0; i < count; i++) {
   final View currentView = this.getChildAt(i);
   this.measureChild(currentView, widthMeasureSpec, heightMeasureSpec);
   CascadeViewGroup.LayoutParams lp = (CascadeViewGroup.LayoutParams) currentView.getLayoutParams();
   if(lp.mSettingPaddingLeft != 0){
    width +=lp.mSettingPaddingLeft;
   }
   if(lp.mSettingPaddingTop != 0){
    height +=lp.mSettingPaddingTop;
   }
   lp.x = width;
   lp.y = height;
   width += mHoriztonalSpacing;
   height += mVerticalSpacing;
  }
  width +=getChildAt(this.getChildCount() - 1).getMeasuredWidth() + this.getPaddingRight();
  height += getChildAt(this.getChildCount() - 1).getMeasuredHeight() + this.getPaddingBottom();
  this.setMeasuredDimension(resolveSize(width, widthMeasureSpec), resolveSize(height, heightMeasureSpec));

 }

 @Override
 protected void onLayout(boolean b, int l, int i1, int i2, int i3) {
  final int count = this.getChildCount();
  for (int i = 0; i < count; i++) {
   final View currentView = this.getChildAt(i);
   CascadeViewGroup.LayoutParams lp = (CascadeViewGroup.LayoutParams) currentView.getLayoutParams();
   currentView.layout(lp.x, lp.y, lp.x + currentView.getMeasuredWidth(),
     lp.y + currentView.getMeasuredHeight());
  }


 }

 public static class LayoutParams extends ViewGroup.LayoutParams {
  int x;
  int y;
  int mSettingPaddingLeft;
  int mSettingPaddingTop;

  public LayoutParams(Context c, AttributeSet attrs) {
   super(c, attrs);
   TypedArray a = c.obtainStyledAttributes(attrs, R.styleable.CascadeViewGroup_LayoutParams);
   mSettingPaddingLeft = a.getDimensionPixelSize(R.styleable.CascadeViewGroup_LayoutParams_layout_paddingleft, 0);
   mSettingPaddingTop = a.getDimensionPixelSize(R.styleable.CascadeViewGroup_LayoutParams_layout_paddinTop, 0);
   a.recycle();
  }

  public LayoutParams(int width, int height) {
   super(width, height);
  }

  public LayoutParams(ViewGroup.LayoutParams source) {
   super(source);
  }
 }

 @Override
 protected ViewGroup.LayoutParams generateDefaultLayoutParams() {
  return new LayoutParams(LayoutParams.WRAP_CONTENT, LayoutParams.WRAP_CONTENT);
 }

 @Override
 protected ViewGroup.LayoutParams generateLayoutParams(ViewGroup.LayoutParams p) {
  return new LayoutParams(p);
 }

 @Override
 public ViewGroup.LayoutParams generateLayoutParams(AttributeSet attrs) {
  return new LayoutParams(this.getContext(), attrs);
 }
}
The code is slightly longer, but the structure is still very clear.
1) The value of the configuration attribute in the constructor or XML file. Get the properties we set in the layout through the methods in TypedArray and save them in member variables.
2) Construct a custom internal class LayoutParams. Constructing this internal class allows us to save their attribute values when measuring our sub-Views for layout in the Layout stage.
3) generateLayoutParams(), generateDefaultParams() and other methods. Return our custom layoutParams in these methods. As for why these methods need to be overridden, it will be clear by looking at the addView() method of the ViewGroup class.
4) measure stage. In the measure phase, we will measure our own size, as well as the size of the sub-View, and save the sub-View information in LayoutParams.
5) layout stage. Lay out their positions based on the information of each sub-View.
Finally add the layout file.
<?xml version="1.0" encoding="utf-8"?>
<!--添加自定义属性给viewGroup-->
<!--新添加的命名空间的后缀必须保持和.xml中声明的包名一致-->
<com.app.CustomViewMotion.CascadeViewGroup
  xmlns:android="http://schemas.android.com/apk/res/android"
  xmlns:ts="http://schemas.android.com/apk/res/com.app.CustomViewMotion"
  android:layout_width="match_parent"
  android:layout_height="match_parent"
  ts:horizontalspacing="15dp"
  ts:verticalspacing="15dp">

 <TextView android:layout_width="100dp"
    android:layout_height="100dp"
    android:gravity="center"
    android:text="text1"
    android:background="#668B8B"/>

 <TextView android:layout_width="100dp"
    android:layout_height="100dp"
    android:gravity="center"
    android:text="text2"
    android:background="#FFDAB9"/>

 <TextView android:layout_width="100dp"
    android:layout_height="100dp"
    android:gravity="center"
    android:text="text3"
    android:background="#43CD80"/>

<!--这个子view中添加自定义子view属性-->
 <TextView android:layout_width="100dp"
    android:layout_height="100dp"
    android:gravity="center"
    android:text="text4"
    ts:layout_paddingleft="100dp"
    ts:layout_paddinTop="100dp"
    android:background="#00CED1"/>
</com.app.CustomViewMotion.CascadeViewGroup>
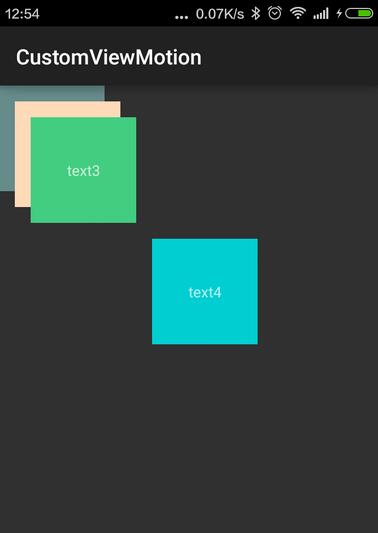
The effect achieved is as follows:

#The above is all the content. I hope it can give everyone a reference, and I also hope everyone will support the PHP Chinese website.
For more articles related to implementation methods of Android custom ViewGroup, please pay attention to the PHP Chinese website!
Related articles
See more- How to set margins for buttons inside a LinearLayout programmatically?
- Why and How Should You Synchronize on String Objects in Java?
- How Can I Customize Input Tokenization in Java Using `Scanner.useDelimiter()`?
- How Can Java's Varargs Simplify Handling an Indeterminate Number of Arguments?
- How to implement breakpoint download server and client in Java

