Home >Java >javaTutorial >Android custom editable and deleteable side-sliding LisitView
Android custom editable and deleteable side-sliding LisitView
- 高洛峰Original
- 2017-01-13 10:09:161396browse
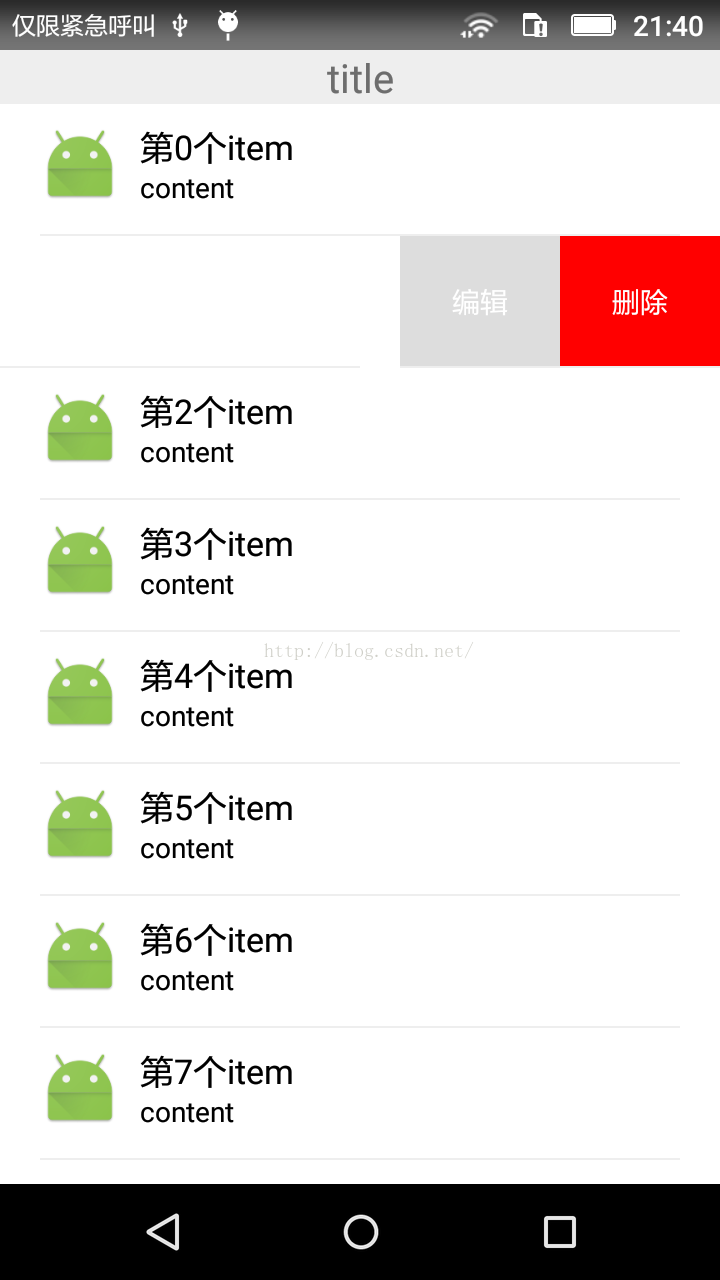
Recently, due to the needs of the project, I customized a listview with side sliding function. After sliding side, you can click to edit and delete. Okay, let’s take a look at the renderings first. After all, this is a world of looks.

Okay, I want to talk about my ideas first. It is difficult to perfect in one edit. If there are any problems, I will make up for them later. Welcome all experts to comment:
1. Let’s talk about the item first: the LinearLayout layout used by the item. Deleting and editing are TextViews with hard-coded widths. On the left is a match_parent RelativeLayout. The content can be modified by yourself.
2. Swipe up and down and slide left and right. Processing: When the user's finger slides, the coordinates can be judged. If the Y-axis movement distance is large, the listview slides up and down; otherwise, when the X-axis movement distance reaches or exceeds the width of a TextView, the marginLeft of the dynamically controlled item is negative. Double the width of the TextView to achieve the sliding effect
3. Edit and delete clicks: Edit and delete to monitor in the adapter, and then define a monitoring interface in the adapter to facilitate the user. Use the listview activity to monitor
Attached below is the layout file of the item:
<?xml version="1.0" encoding="utf-8"?>
<LinearLayout xmlns:android="http://schemas.android.com/apk/res/android"
 android:layout_width="match_parent"
 android:layout_height="wrap_content"
 android:orientation="horizontal" >

 <RelativeLayout
  android:layout_width="match_parent"
  android:layout_height="wrap_content"
  android:background="#ffffff"
  android:orientation="horizontal">

  <RelativeLayout
   android:id="@+id/rlTop"
   android:layout_width="match_parent"
   android:layout_height="65dp"
   android:padding="10dp">
   <ImageView
    android:id="@+id/imgLamp"
    android:layout_alignParentLeft="true"
    android:layout_marginLeft="10dp"
    android:src="@mipmap/ic_launcher"
    android:layout_width="40dp"
    android:layout_height="40dp"/>
   <TextView
    android:id="@+id/tvName"
    android:layout_width="wrap_content"
    android:layout_height="22dp"
    android:layout_toRightOf="@+id/imgLamp"
    android:layout_marginLeft="10dp"
    android:gravity="center"
    android:textSize="17sp"
    android:textColor="#000000" />

   <TextView
    android:id="@+id/tvContent"
    android:layout_width="wrap_content"
    android:layout_height="18dp"
    android:layout_toRightOf="@+id/imgLamp"
    android:layout_below="@+id/tvName"
    android:layout_marginLeft="10dp"
    android:gravity="center"
    android:textSize="14sp"
    android:textColor="#000000"
    android:text="content"/>
  </RelativeLayout>

  <View
   android:layout_width="match_parent"
   android:layout_height="1dp"
   android:layout_marginLeft="20dp"
   android:layout_marginRight="20dp"
   android:layout_below="@+id/rlTop"
   android:background="#EEEEEE"/>

 </RelativeLayout>

 <!--Edit-->
 <TextView
  android:id="@+id/tvEdit"
  android:layout_width="80dp"
  android:layout_height="match_parent"
  android:background="#dddddd"
  android:gravity="center"
  android:paddingLeft="20dp"
  android:layout_marginBottom="1dp"
  android:textColor="@android:color/white"
  android:paddingRight="20dp"
  android:text="编辑" />

 <!--delete-->
 <TextView
  android:id="@+id/delete"
  android:layout_width="80dp"
  android:layout_height="match_parent"
  android:background="#FFFF0000"
  android:gravity="center"
  android:paddingLeft="20dp"
  android:layout_marginBottom="1dp"
  android:textColor="@android:color/white"
  android:paddingRight="20dp"
  android:text="删除" />

</LinearLayout>
Adapter code:
package com.lei.slidelistview;

import android.content.Context;
import android.view.View;
import android.view.ViewGroup;
import android.widget.BaseAdapter;
import android.widget.ImageView;
import android.widget.TextView;
import java.util.List;

/**
 * Created by 磊 on 2016/7/7.
 */
public class ListViewSlideAdapter extends BaseAdapter{

 private List<String> bulbList;
 private Context context;
 private OnClickListenerEditOrDelete onClickListenerEditOrDelete;

  public ListViewSlideAdapter(Context context, List<String> bulbList){
   this.bulbList=bulbList;
   this.context=context;
  }

  @Override
  public int getCount() {
   return bulbList.size();
  }

  @Override
  public Object getItem(int position) {
   return bulbList.get(position);
  }

  @Override
  public long getItemId(int position) {
   return position;
  }

  @Override
  public View getView(final int position, View convertView, ViewGroup parent) {
   final String bulb=bulbList.get(position);
   View view;
   ViewHolder viewHolder;
   if(null == convertView) {
    view = View.inflate(context, R.layout.item_slide_delete_edit, null);
    viewHolder=new ViewHolder();
    viewHolder.tvName=(TextView)view.findViewById(R.id.tvName);
    viewHolder.img=(ImageView)view.findViewById(R.id.imgLamp);
    viewHolder.tvDelete=(TextView)view.findViewById(R.id.delete);
    viewHolder.tvEdit=(TextView)view.findViewById(R.id.tvEdit);
    view.setTag(viewHolder);//store up viewHolder
   }else {
    view=convertView;
    viewHolder=(ViewHolder)view.getTag();
   }

   viewHolder.img.setImageResource(R.mipmap.ic_launcher);
   viewHolder.tvName.setText(bulb);
   viewHolder.tvDelete.setOnClickListener(new View.OnClickListener() {
    @Override
    public void onClick(View v) {
     if (onClickListenerEditOrDelete!=null){
      onClickListenerEditOrDelete.OnClickListenerDelete(position);
     }
    }
   });
   viewHolder.tvEdit.setOnClickListener(new View.OnClickListener() {
    @Override
    public void onClick(View v) {
     if (onClickListenerEditOrDelete!=null){
      onClickListenerEditOrDelete.OnClickListenerEdit(position);
     }
    }
   });
   return view;
  }

  private class ViewHolder{
   TextView tvName,tvEdit,tvDelete;
   ImageView img;
  }

 public interface OnClickListenerEditOrDelete{
  void OnClickListenerEdit(int position);
  void OnClickListenerDelete(int position);
 }

 public void setOnClickListenerEditOrDelete(OnClickListenerEditOrDelete onClickListenerEditOrDelete1){
  this.onClickListenerEditOrDelete=onClickListenerEditOrDelete1;
 }

 }
Customized ListView file code:
package com.lei.slidelistview;

import android.content.Context;
import android.util.AttributeSet;
import android.util.DisplayMetrics;
import android.view.MotionEvent;
import android.view.ViewGroup;
import android.view.WindowManager;
import android.widget.LinearLayout;
import android.widget.ListView;

public class SlideListView extends ListView {
 private int mScreenWidth; // 屏幕宽度
 private int mDownX; // 按下点的x值
 private int mDownY; // 按下点的y值
 private int mDeleteBtnWidth;// 删除按钮的宽度

 private boolean isDeleteShown; // 删除按钮是否正在显示

 private ViewGroup mPointChild; // 当前处理的item
 private LinearLayout.LayoutParams mLayoutParams; // 当前处理的item的LayoutParams

 public SlideListView(Context context, AttributeSet attrs) {
 this(context, attrs, 0);
 }

 public SlideListView(Context context, AttributeSet attrs, int defStyle) {
 super(context, attrs, defStyle);

 // 获取屏幕宽度
 WindowManager wm = (WindowManager) context.getSystemService(Context.WINDOW_SERVICE);
 DisplayMetrics dm = new DisplayMetrics();
 wm.getDefaultDisplay().getMetrics(dm);
 mScreenWidth = dm.widthPixels;
 }

 @Override
 public boolean onTouchEvent(MotionEvent ev) {
 switch (ev.getAction()) {
 case MotionEvent.ACTION_DOWN:
 performActionDown(ev);
 break;
 case MotionEvent.ACTION_MOVE:
 return performActionMove(ev);
 case MotionEvent.ACTION_UP:
 performActionUp();
 break;
 }

 return super.onTouchEvent(ev);
 }

 // 处理action_down事件
 private void performActionDown(MotionEvent ev) {
 if(isDeleteShown) {
 turnToNormal();
 }

 mDownX = (int) ev.getX();
 mDownY = (int) ev.getY();
 // 获取当前点的item
 mPointChild = (ViewGroup) getChildAt(pointToPosition(mDownX, mDownY)
 - getFirstVisiblePosition());
 // 获取删除按钮的宽度
 mDeleteBtnWidth = mPointChild.getChildAt(1).getLayoutParams().width;
 mLayoutParams = (LinearLayout.LayoutParams) mPointChild.getChildAt(0)
 .getLayoutParams();
 mLayoutParams.width = mScreenWidth;
 mPointChild.getChildAt(0).setLayoutParams(mLayoutParams);
 }

 // 处理action_move事件
 private boolean performActionMove(MotionEvent ev) {
 int nowX = (int) ev.getX();
 int nowY = (int) ev.getY();
 if(Math.abs(nowX - mDownX) > Math.abs(nowY - mDownY)) {
 // 如果向左滑动
 if(nowX < mDownX) {
 // 计算要偏移的距离
 int scroll = (nowX - mDownX) / 2;
 // 如果大于了删除按钮的宽度, 则最大为删除按钮的宽度
 if(-scroll >= mDeleteBtnWidth) {
  scroll = -mDeleteBtnWidth;
 }
 // 重新设置leftMargin
 mLayoutParams.leftMargin = scroll*2;
 mPointChild.getChildAt(0).setLayoutParams(mLayoutParams);
 }
 return true;
 }
 return super.onTouchEvent(ev);
 }

 // 处理action_up事件
 private void performActionUp() {
 // 偏移量大于button的一半,则显示button
 // 否则恢复默认
 if(-mLayoutParams.leftMargin >= mDeleteBtnWidth / 2) {
 mLayoutParams.leftMargin = -mDeleteBtnWidth*2;
 isDeleteShown = true;
 }else {
 turnToNormal();
 }

 mPointChild.getChildAt(0).setLayoutParams(mLayoutParams);
 }
 /**
 * 变为正常状态
 */
 public void turnToNormal() {
 mLayoutParams.leftMargin = 0;
 mPointChild.getChildAt(0).setLayoutParams(mLayoutParams);
 isDeleteShown = false;
 }
 /**
 * 当前是否可点击
 * @return 是否可点击
 */
 public boolean canClick() {
 return !isDeleteShown;
 }


}
Attached below is the use of layout code + the use of background code (available for personal testing on July 7, 2016)
Layout:
<?xml version="1.0" encoding="utf-8"?>
<RelativeLayout xmlns:android="http://schemas.android.com/apk/res/android"
 xmlns:tools="http://schemas.android.com/tools"
 android:layout_width="match_parent"
 android:layout_height="match_parent"
 tools:context="com.lei.slidelistview.MainActivity">

 <TextView
  android:id="@+id/tvTitle"
  android:layout_width="match_parent"
  android:layout_height="wrap_content"
  android:gravity="center"
  android:textSize="20sp"
  android:text="title" />

 <com.lei.slidelistview.SlideListView
  android:id="@+id/list"
  android:layout_width="match_parent"
  android:layout_height="wrap_content"
  android:layout_below="@+id/tvTitle">

 </com.lei.slidelistview.SlideListView>
</RelativeLayout>
Use the background code. Please pay attention here to the following adapter setting listening position, misplaced An error will be reported
package com.lei.slidelistview;

import android.support.v7.app.AppCompatActivity;
import android.os.Bundle;
import android.widget.Toast;
import java.util.ArrayList;
import java.util.List;

public class MainActivity extends AppCompatActivity {
 private SlideListView listView;
 private List<String> list=new ArrayList<String>();
 private ListViewSlideAdapter listViewSlideAdapter;

 @Override
 protected void onCreate(Bundle savedInstanceState) {
  super.onCreate(savedInstanceState);
  setContentView(R.layout.activity_main);
  getData();
  initView();
 }

 private void initView(){
  listView=(SlideListView)findViewById(R.id.list);
  listViewSlideAdapter=new ListViewSlideAdapter(this,list);
  listView.setAdapter(listViewSlideAdapter);
  listViewSlideAdapter.setOnClickListenerEditOrDelete(new ListViewSlideAdapter.OnClickListenerEditOrDelete() {
   @Override
   public void OnClickListenerEdit(int position) {
    Toast.makeText(MainActivity.this, "edit position: " + position, Toast.LENGTH_SHORT).show();
   }

   @Override
   public void OnClickListenerDelete(int position) {
    Toast.makeText(MainActivity.this, "delete position: " + position, Toast.LENGTH_SHORT).show();
   }
  });
 }

 private void getData(){
  for (int i=0;i<20;i++){
   list.add(new String("第"+i+"个item"));
  }
 }
}
The above is the entire content of this article. I hope it will be helpful to everyone's learning. I also hope that everyone will support the PHP Chinese website.
For more Android custom editable and deleteable side-sliding LisitView related articles, please pay attention to the PHP Chinese website!

