Home >Java >javaTutorial >SpringMVC+MyBatis paging (latest)
SpringMVC+MyBatis paging (latest)
- 高洛峰Original
- 2017-01-07 10:31:591496browse
The current mainstream Web MVC framework, in addition to Struts, also has Spring MVC, mainly because Spring MVC is relatively simple to configure, very clear to use, very flexible, has good integration with Spring, and supports RESTful API It's also better than struts.
MyBatis is an upgraded version of ibatis. As an old rival of hibernate, it is a persistence layer framework that can customize SQL, stored procedures and advanced mapping.
The main difference with hibernate is that mybatis is semi-automatic, while hibernate is fully automatic, so when application requirements become more and more complex, automated sql becomes more clumsy.
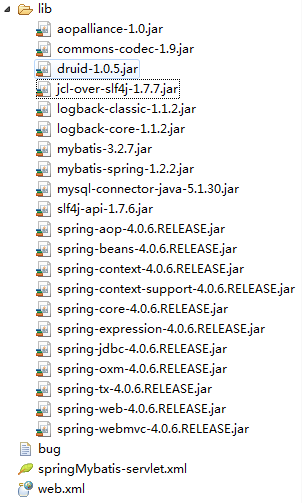
Since I took on a project some time ago and wanted to use springmvc, I took a hands-on attitude and played the game of integrating the framework again. Anyone who often builds frameworks should know that the core of framework construction is configuration files. So I mainly post the code of several configuration files. Again, after I write the configuration file, I report an error when running and add the jar. Here is a list of the jar packages I use (should be the minimum):

Note: There are some additional jars in the picture above, for example, the database connection pool I use is Alibaba Druid and log framework logback, so related jars were introduced. The use and configuration of these two frameworks are very simple, so I won’t go into details here.
1. Integrate SpringMVC
springMybatis-servlet.xml:
<?xml version="1.0" encoding="UTF-8"?>
<beans xmlns="http://www.springframework.org/schema/beans" xmlns:xsi="http://www.w3.org/2001/XMLSchema-instance"
    xmlns:context="http://www.springframework.org/schema/context"
    xmlns:mvc="http://www.springframework.org/schema/mvc"
    xsi:schemaLocation="http://www.springframework.org/schema/beans http://www.springframework.org/schema/beans/spring-beans.xsd
    http://www.springframework.org/schema/context http://www.springframework.org/schema/context/spring-context.xsd
    http://www.springframework.org/schema/mvc http://www.springframework.org/schema/mvc/spring-mvc.xsd">

    <!-- 启用spring mvc 注解-->
  <mvc:annotation-driven>
  </mvc:annotation-driven>

  <!-- 自动扫描的包名 ,使Spring支持自动检测组件,如注解的Controller-->
  <context:component-scan base-package="com.alibaba.controller" />
  <context:component-scan base-package="com.alibaba.service"/>


  <!-- 视图解析器:定义跳转的文件的前后缀 -->
  <bean id="viewResolver" class="org.springframework.web.servlet.view.InternalResourceViewResolver">
    <property name="prefix" value="/WEB-INF/jsp/" />
    <property name="suffix" value=".jsp" /> <!--可为空,方便实现自已的依据扩展名来选择视图解释类的逻辑 -->
  </bean>

  <!--配置拦截器, 多个拦截器,顺序执行 -->
  <mvc:interceptors>
    <mvc:interceptor>
      <!-- 匹配的是url路径 -->
      <mvc:mapping path="/" />
      <mvc:mapping path="/user/**" />
      <mvc:mapping path="/test/**" />

      <bean class="com.alibaba.interceptor.CommonInterceptor"></bean>
    </mvc:interceptor>
    <!-- 当设置多个拦截器时,先按顺序调用preHandle方法,然后逆序调用每个拦截器的postHandle和afterCompletion方法 -->
  </mvc:interceptors>

</beans>
2. Integrate Mybatis
spring- dao.xml:
<?xml version="1.0" encoding="UTF-8"?>
<beans xmlns="http://www.springframework.org/schema/beans" xmlns:xsi="http://www.w3.org/2001/XMLSchema-instance"
xmlns:mybatis="http://mybatis.org/schema/mybatis-spring"
xmlns:context="http://www.springframework.org/schema/context"
xsi:schemaLocation="http://www.springframework.org/schema/beans http://www.springframework.org/schema/beans/spring-beans.xsd
http://mybatis.org/schema/mybatis-spring http://mybatis.org/schema/mybatis-spring.xsd
http://www.springframework.org/schema/context http://www.springframework.org/schema/context/spring-context.xsd">
<!-- 该包下的类支持注解,表示会被当作{@code mybatis mapper}处理 配置了之后表示可以自动引入mapper类-->
<mybatis:scan base-package="com.alibaba.dao"/>
<!--引入属性文件 -->
<context:property-placeholder location="classpath:configuration.properties"/>
<!--数据库连接-->
<bean id="dataSource" class="com.alibaba.druid.pool.DruidDataSource" init-method="init" destroy-method="close">
<property name="url" value="${jdbc.url}" />
<property name="username" value="${jdbc.username}"/>
<property name="password" value="${jdbc.password}"/>
<!-- 配置初始化大小、最小、最大 -->
<property name="initialSize"><value>1</value></property>
<property name="maxActive"><value>5</value></property>
<property name="minIdle"><value>1</value></property>
<!-- 配置获取连接等待超时的时间 -->
<property name="maxWait"><value>60000</value></property>
<!-- 配置监控统计拦截的filters -->
<property name="filters"><value>stat</value></property>
<!-- 配置间隔多久才进行一次检测,检测需要关闭的空闲连接,单位是毫秒 -->
<property name="timeBetweenEvictionRunsMillis"><value>60000</value></property>
<!-- 配置一个连接在池中最小生存的时间,单位是毫秒 -->
<property name="minEvictableIdleTimeMillis"><value>300000</value></property>
<!--
<property name="validationQuery"><value>SELECT 'x'</value></property>
<property name="testWhileIdle"><value>true</value></property>
<property name="testOnBorrow"><value>false</value></property>
<property name="testOnReturn"><value>false</value></property>
<property name="poolPreparedStatements"><value>true</value></property>
<property name="maxOpenPreparedStatements"><value>20</value></property>
-->
</bean>
<!-- mybatis配置 -->
<bean id="sqlSessionFactory" class="org.mybatis.spring.SqlSessionFactoryBean">
<property name="dataSource" ref="dataSource" />
</bean>
</beans>3.web.xml integrates SpringMVC and Mybatis
<?xml version="1.0" encoding="UTF-8"?>
<web-app xmlns:xsi="http://www.w3.org/2001/XMLSchema-instance" xmlns="http://java.sun.com/xml/ns/javaee" xmlns:web="http://java.sun.com/xml/ns/javaee/web-app_2_5.xsd" xsi:schemaLocation="http://java.sun.com/xml/ns/javaee http://java.sun.com/xml/ns/javaee/web-app_3_0.xsd" version="3.0">
  <!-- 该servlet为tomcat,jetty等容器提供,将静态资源映射从/改为/static/目录,如原来访问 http://localhost/foo.css ,现在http://localhost/static/foo.css -->
  <!-- 不拦截静态文件 -->
  <servlet-mapping>
    <servlet-name>default</servlet-name>
    <url-pattern>/js/*</url-pattern>
    <url-pattern>/css/*</url-pattern>
    <url-pattern>/images/*</url-pattern>
    <url-pattern>/fonts/*</url-pattern>
  </servlet-mapping>

  <!-- 配置字符集 -->
  <filter>
    <filter-name>encodingFilter</filter-name>
    <filter-class>org.springframework.web.filter.CharacterEncodingFilter</filter-class>
    <init-param>
      <param-name>encoding</param-name>
      <param-value>UTF-8</param-value>
    </init-param>
    <init-param>
      <param-name>forceEncoding</param-name>
      <param-value>true</param-value>
    </init-param>
  </filter>
  <filter-mapping>
    <filter-name>encodingFilter</filter-name>
    <url-pattern>/*</url-pattern>
  </filter-mapping>

  <!-- 初始化 DispatcherServlet时,该框架在 web应用程序WEB-INF目录中寻找一个名为[servlet-名称]-servlet.xml的文件,
      并在那里定义相关的Beans,重写在全局中定义的任何Beans -->
  <servlet>
    <servlet-name>springMybatis</servlet-name>
    <servlet-class>org.springframework.web.servlet.DispatcherServlet</servlet-class>
    <load-on-startup>1</load-on-startup>
  </servlet>
  <servlet-mapping>
    <servlet-name>springMybatis</servlet-name>
    <!-- 所有的的请求,都会被DispatcherServlet处理 -->
    <url-pattern>/</url-pattern>
  </servlet-mapping>

  <context-param>
    <param-name>contextConfigLocation</param-name>
    <param-value>/WEB-INF/config/spring-*.xml</param-value>
  </context-param>
  <listener>
    <listener-class>org.springframework.web.context.ContextLoaderListener</listener-class>
  </listener>
  <!-- druid web 监控 -->
  <servlet>
    <servlet-name>DruidStatView</servlet-name>
    <servlet-class>com.alibaba.druid.support.http.StatViewServlet</servlet-class>
  </servlet>
  <servlet-mapping>
    <servlet-name>DruidStatView</servlet-name>
    <url-pattern>/druid/*</url-pattern>
  </servlet-mapping>

  <error-page>
    <error-code>404</error-code>
    <location>/error/404.jsp</location>
  </error-page>
  <error-page>
    <error-code>500</error-code>
    <location>/error/500.jsp</location>
  </error-page>
</web-app>
4.logback.xml log configuration
<?xml version="1.0" encoding="UTF-8"?>
<configuration>

 <appender name="STDOUT" class="ch.qos.logback.core.ConsoleAppender">
  <encoder>
    <pattern>%d{HH:mm:ss.SSS} [%thread] %-5level %logger{36} - %msg%n</pattern>
  </encoder>
 </appender>

 <logger name="test.LogbackTest" level="TRACE"/>

 <logger name="com.alibaba.controller.TestController" level="TRACE"/>

 <logger name="org.springframework.web.servlet.DispatcherServlet" level="DEBUG" />
 <logger name="druid.sql" level="INFO" /><!-- 如果spring-config里面没有配置slf4j,就不会显示sql日志,logback只是slf4j的一个实现 -->
 <root level="debug">
  <appender-ref ref="STDOUT" />
 </root>
</configuration>
5.configuration.properties configuration
jdbc.url=jdbc\:mysql\://localhost\:3306/druid?useUnicode\=true&characterEncoding\=UTF-8&zeroDateTimeBehavior\=convertToNull
jdbc.username=root
jdbc.password=123456
6. Test whether the setup is successful. The background code
is to log in first. Encryption is used, which can be removed.
package com.alibaba.controller;
import javax.annotation.Resource;
import javax.servlet.http.HttpServletRequest;

import org.apache.commons.codec.digest.DigestUtils;
import org.slf4j.Logger;
import org.slf4j.LoggerFactory;
import org.springframework.stereotype.Controller;
import org.springframework.web.bind.annotation.RequestMapping;
import org.springframework.web.bind.annotation.RequestMethod;
import org.springframework.web.bind.annotation.RequestParam;

import com.alibaba.model.User;
import com.alibaba.service.UserService;
import com.alibaba.util.RequestUtil;

/**
 * @author tfj
 * 2014-7-26
 */
@Controller
public class SystemController {
  private final Logger log = LoggerFactory.getLogger(SystemController.class);
  @Resource
  private UserService userService;

  @RequestMapping(value = "/",method = RequestMethod.GET)
  public String home() {
    log.info("返回首页!");
    return "index";
  }

  @RequestMapping(value = "/test/hello",method = RequestMethod.GET)
  public String testHello() {
    log.info("执行了testHello方法!");
    return "testHello";
  }

  @RequestMapping(value = "/login",method = RequestMethod.POST)
  public String testLogin(HttpServletRequest request,@RequestParam String username, @RequestParam String password) {
    log.info("执行了testLogin方法!");
    User user = userService.findUserByName(username);
    if(user!=null){
      if(user.getPassword().equals(DigestUtils.md5Hex(password))){
        request.getSession().setAttribute("userId", user.getId());
        request.getSession().setAttribute("user", username);
        return "redirect:" + RequestUtil.retrieveSavedRequest();//跳转至访问页面
      }else{
        log.info("密码错误");
        request.getSession().setAttribute("message", "用户名密码错误,请重新登录");
        return "login";
      }
    }else{
      log.info("用户名不存在");
      request.getSession().setAttribute("message", "用户名不存在,请重新登录");
      return "login";
    }
  }
}
I won’t write about the service and model. Let’s write about it. Mybatis mapper class mapping
<?xml version="1.0" encoding="UTF-8" ?>
<!DOCTYPE mapper PUBLIC "-//mybatis.org//DTD Mapper 3.0//EN" "http://mybatis.org/dtd/mybatis-3-mapper.dtd">
<mapper namespace="com.alibaba.dao.UserMapper">
  <select id="findUserByName" resultType="com.alibaba.model.User">
    select id, username , password from sysuser where username = #{username}
  </select>
</mapper>
7. The front-end jsp is mainly the login and login success page, I won’t write it anymore
At this point, springmvc+mybatis integration is successful. Subsequent complex functions will be added
Notes
1. The configurations of druid and logback in the framework are all copied from the official website, so they are the most basic. , readers can ignore it, or replace it with database components and log frameworks that readers are familiar with, such as c3p0 and log4j.
2. Permission management has been added to the code, that is, you need to log in before accessing, and after logging in, you will jump to the page to be accessed
3. This article is the simplest version stripped from my test code It is also the most basic code. Please forgive me for some places that are not stripped cleanly.
The above is the entire content of this article. I hope it will be helpful to everyone's study. I also hope that everyone will support the PHP Chinese website.
For more SpringMVC+MyBatis paging (latest) related articles, please pay attention to the PHP Chinese website!

