






在java单元测试中验证缓存命中,核心做法是控制缓存的底层存储(如redis或caffeine)并断言其状态变化。通常通过注入mock对象或使用testcontainers连接真实中间件,先执行一次数据写入操作,再执行读取操作,最后检查缓存中是否存在对应键值对。若使用本地缓存,可直接获取缓存实例进行断言;若使用分布式缓存,则需确保测试环境能访问该缓存服务。

如何模拟本地缓存的命中行为
对于基于Caffeine或Guava的本地缓存,可以直接获取缓存实例来验证命中。关键在于绕过业务逻辑,直接操作缓存对象,或者通过反射获取内部状态。以下代码展示了如何使用Caffeine构建缓存,并在测试中验证第一次调用未命中、第二次调用命中的过程。
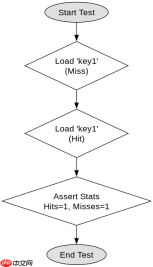
import com.github.benmanes.caffeine.cache.Caffeine;
import com.github.benmanes.caffeine.cache.LoadingCache;
import org.junit.jupiter.api.Test;

import java.util.concurrent.TimeUnit;

import static org.junit.jupiter.api.Assertions.*;

public class LocalCacheTest {

    private LoadingCache<string string> cache = Caffeine.newBuilder()
            .maximumSize(100)
            .expireAfterWrite(10, TimeUnit.MINUTES)
            .build(key -> "value-for-" + key);

    @Test
    public void testCacheHit() {
        // 第一次加载,应触发load方法,缓存未命中
        String result1 = cache.get("key1");
        assertEquals("value-for-key1", result1);

        // 第二次加载,应从缓存中获取,命中
        String result2 = cache.get("key1");
        assertEquals("value-for-key1", result2);

        // 验证:可以通过统计信息确认命中次数
        assertEquals(1, cache.stats().hits().count());
        assertEquals(1, cache.stats().misses().count());
    }
}</string>
上述代码中,cache.stats()提供了精确的命中与未命中计数。这是验证本地缓存行为最直接的方式。如果业务代码封装了缓存访问,可以通过暴露统计接口或断言返回值的一致性来间接验证。
如何验证分布式缓存的命中状态
当缓存位于Redis等外部服务时,单元测试需要能够访问该服务。推荐使用Testcontainers启动一个临时的Redis容器,从而在隔离环境中验证缓存命中。这种方式比Mock更可靠,因为它验证的是真实的协议交互和数据结构。


import org.junit.jupiter.api.Test;
import org.testcontainers.containers.GenericContainer;
import org.testcontainers.utility.DockerImageName;
import redis.clients.jedis.Jedis;

import static org.junit.jupiter.api.Assertions.*;

public class RedisCacheIntegrationTest {

    private GenericContainer> redis = new GenericContainer(DockerImageName.parse("redis:7-alpine"))
            .withExposedPorts(6379);

    @Test
    public void testRedisCacheHit() throws Exception {
        redis.start();
        int port = redis.getMappedPort(6379);
        String host = redis.getHost();

        try (Jedis jedis = new Jedis(host, port)) {
            // 清除旧数据
            jedis.flushAll();

            // 模拟首次设置缓存(未命中场景下的写入)
            jedis.set("user:1", "{\"name\":\"Alice\"}");

            // 模拟业务读取:先查缓存
            String cachedValue = jedis.get("user:1");
            assertNotNull(cachedValue); // 命中

            // 模拟缓存失效后重新设置
            jedis.del("user:1");
            cachedValue = jedis.get("user:1");
            assertNull(cachedValue); // 未命中

            // 再次设置
            jedis.set("user:1", "{\"name\":\"Bob\"}");
            cachedValue = jedis.get("user:1");
            assertEquals("{\"name\":\"Bob\"}", cachedValue); // 命中
        } finally {
            redis.stop();
        }
    }
}
该测试通过Testcontainers管理Redis生命周期,确保每次测试都在干净的数据库中运行。通过jedis.get()的返回值判断是否命中:非空表示命中,null表示未命中。这种方法避免了Mock带来的复杂性,直接验证了缓存系统的实际行为。
当缓存键包含动态参数时如何验证命中
在实际应用中,缓存键往往由多个参数动态生成,例如用户ID和时间戳。验证此类缓存命中的难点在于确保键的生成逻辑一致。以下代码展示了一个基于Spring Cache的示例,其中缓存键由方法参数决定。测试时需关注键的生成规则,并确保在相同输入下缓存被正确复用。
import org.springframework.cache.CacheManager;
import org.springframework.cache.annotation.Cacheable;
import org.springframework.stereotype.Service;

@Service
public class UserService {

    private final CacheManager cacheManager;

    public UserService(CacheManager cacheManager) {
        this.cacheManager = cacheManager;
    }

    @Cacheable(value = "users", key = "#id")
    public String getUserById(String id) {
        return "User-" + id;
    }

    public String getCachedUser(String id) {
        var cache = cacheManager.getCache("users");
        if (cache != null) {
            var value = cache.get(id);
            return value != null ? value.get() : null;
        }
        return null;
    }
}
在测试中,可以通过直接调用getCachedUser方法来检查缓存内容,而不是依赖@Cacheable注解的行为。这样可以更灵活地验证不同条件下的命中情况。例如,先调用getUserById触发缓存写入,再调用getCachedUser验证缓存中存在该键。这种方法适用于任何基于Spring Cache的实现,无论底层是ConcurrentMap还是Redis。
Java免费学习笔记:立即使用
解锁 Java 大师之旅:从入门到精通的终极指南


