






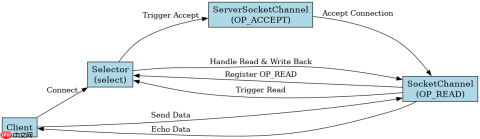
java nio 实现简单 echo 服务器的核心做法是创建一个 selector,将 serversocketchannel 注册为 op_accept 事件,并在循环中处理 selectionkey。当有连接接入时,服务器读取客户端发送的数据并原样写回;当有数据可读时,服务器读取缓冲区内容并立即写回给对应的 socketchannel。这种非阻塞模型允许单个线程高效地管理多个并发连接。
如何配置 Selector 和 Channel 以接收连接
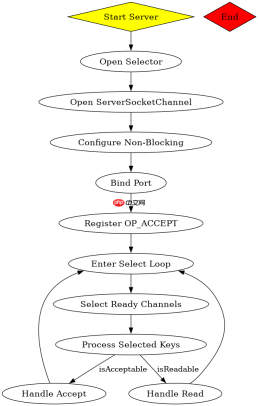
要实现 Echo 功能,首先需要绑定端口并注册选择器。关键步骤是将 ServerSocketChannel 设置为非阻塞模式,并将其注册到 Selector 上,监听 SelectionKey.OP_ACCEPT 事件。这样,当客户端尝试连接时,selector.select() 会返回并触发接受逻辑。对于每个新接受的 SocketChannel,同样需要设置为非阻塞模式,并注册 OP_READ 事件,以便在客户端发送数据时能收到通知。
import java.io.IOException;
import java.net.InetSocketAddress;
import java.nio.ByteBuffer;
import java.nio.channels.SelectionKey;
import java.nio.channels.Selector;
import java.nio.channels.ServerSocketChannel;
import java.nio.channels.SocketChannel;
import java.util.Iterator;
import java.util.Set;

public class SimpleEchoServer {
    private static final int PORT = 8080;
    private static final int BUFFER_SIZE = 1024;

    public static void main(String[] args) throws IOException {
        Selector selector = Selector.open();
        ServerSocketChannel serverChannel = ServerSocketChannel.open();
        serverChannel.configureBlocking(false);
        serverChannel.bind(new InetSocketAddress(PORT));
        serverChannel.register(selector, SelectionKey.OP_ACCEPT);

        System.out.println("Echo Server started on port " + PORT);

        while (true) {
            int readyChannels = selector.select();
            if (readyChannels == 0) continue;

            Set<selectionkey> selectedKeys = selector.selectedKeys();
            Iterator<selectionkey> keyIterator = selectedKeys.iterator();

            while (keyIterator.hasNext()) {
                SelectionKey key = keyIterator.next();
                keyIterator.remove();

                if (key.isAcceptable()) {
                    handleAccept(key, selector);
                } else if (key.isReadable()) {
                    handleRead(key);
                }
            }
        }
    }

    private static void handleAccept(SelectionKey key, Selector selector) throws IOException {
        ServerSocketChannel serverChannel = (ServerSocketChannel) key.channel();
        SocketChannel clientChannel = serverChannel.accept();
        if (clientChannel != null) {
            clientChannel.configureBlocking(false);
            clientChannel.register(selector, SelectionKey.OP_READ);
        }
    }

    private static void handleRead(SelectionKey key) throws IOException {
        SocketChannel channel = (SocketChannel) key.channel();
        ByteBuffer buffer = ByteBuffer.allocate(BUFFER_SIZE);
        int bytesRead = channel.read(buffer);

        if (bytesRead == -1) {
            channel.close();
            return;
        }

        buffer.flip();
        channel.write(buffer);
        buffer.clear();
    }
}</selectionkey></selectionkey>
如何处理读写缓冲区的状态转换
在 NIO 中,ByteBuffer 的状态管理是 Echo 服务器正确回显数据的关键。读取数据后,必须调用 buffer.flip() 将位置指针重置为起始位置,并将限制指针设为当前位置,这样才能从缓冲区头部开始写入数据。如果不进行翻转,直接写入会导致写入空数据或抛出异常。此外,每次操作完成后,通常需要调用 buffer.clear() 来重置缓冲区,准备下一次读取。这种状态转换确保了数据流的正确性和缓冲区的复用性。


// 模拟 handleRead 中的缓冲区操作逻辑
// 假设 buffer 中已包含读取到的数据
buffer.flip(); // 准备读取:limit=position, position=0
System.out.println("Buffer limit: " + buffer.limit()); // 输出实际数据长度
channel.write(buffer); // 将数据写回客户端
buffer.clear(); // 重置缓冲区:position=0, limit=capacity
当客户端断开连接时服务器如何响应
当客户端主动断开连接时,SocketChannel.read() 方法会返回 -1。这是 NIO 中表示流结束的标准信号。在 Echo 服务器的 handleRead 方法中,必须检查这个返回值。如果检测到 -1,应立即关闭该 SocketChannel 并从 Selector 中注销相关的 SelectionKey(虽然关闭通道通常会自动注销键,但显式处理更清晰)。如果不处理这种情况,服务器可能会继续尝试读取或写入一个已关闭的通道,导致 IOException 或资源泄漏。因此,检测 -1 并优雅地关闭连接是保证服务器稳定运行的必要步骤。
Java免费学习笔记:立即使用
解锁 Java 大师之旅:从入门到精通的终极指南


