Home >Backend Development >Python Tutorial >Detailed explanation of Python+OpenCV face recognition technology
Detailed explanation of Python+OpenCV face recognition technology
- 高洛峰Original
- 2016-10-18 14:54:381771browse
We always see face recognition in science fiction movies, and now we can also implement it through programming. Haha~~
OpenCV is Intel® open source computer vision library. It consists of a series of C functions and a small number of C++ classes that implement many common algorithms in image processing and computer vision.
OpenCV has a cross-platform mid- and high-level API including more than 300 C functions. It has no dependencies on other external libraries - although some can be used. It also provides interfaces in Python, Ruby, MATLAB and other languages, and implements many common algorithms in image processing and computer vision.
So overall, OpenCV’s face detection function is very good.
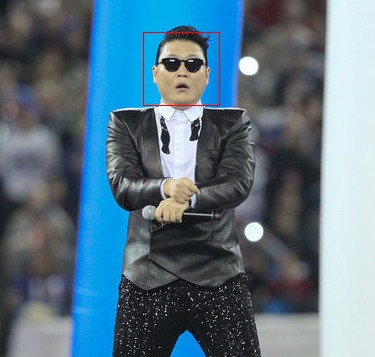
The rendering is as follows:
 Next we will use python + OpenCV to implement face recognition.
Development and running environment:
Centos5.5
OpenCV
python2.7
PIL
The code below:
#!/usr/bin/python
# -*- coding: UTF-8 -*-
# face_detect.py
# Face Detection using OpenCV. Based on sample code from:
# http://www.pythontab.com
# Usage: python face_detect.py
import sys, os
#Introducing the opencv library Corresponding components
from opencv.cv import *
from opencv.highgui import *
#Introduce the PIL library
from PIL import Image, ImageDraw
from math import sqrt
def detectObjects(image):
#First convert the image to gray degree mode to find the face position
grayscale = cvCreateImage(cvSize(image.width, image.height), 8, 1)
cvCvtColor(image, grayscale, CV_BGR2GRAY)
storage = cvCreateMemStorage(0)
cvClearMemStorage(s storage)
cvEqualizeHist(grayscale, grayscale)
cascade = cvLoadHaarClassifierCascade(
'/usr/share/opencv/haarcascades/haarcascade_frontalface_default.xml',
cvSize(1,1))
faces = cvHaarDetectObjects(grayscale, cascade, storage, 1.1, 2,
CV_HAAR_DO_CANNY_PRUNING, cvSize(20,20))
result = []
for f in faces:
result.append((f.x, f.y, f.x+f.width, f.y+f.height) )
return result
def grayscale(r, g, b):
return int(r * .3 + g * .59 + b * .11)
def process(infile, outfile):
image = cvLoadImage(infile);
if image:
faces = detectObjects(image)
im = Image.open(infile)
if faces:
draw = ImageDraw.Draw(im)
for f in faces:
draw.rectangle (f, outline=(255, 0, 255)) im.save(outfile, "JPEG", quality=100) else:
print "Error: cannot detect faces on %s" % infile
if __name__ == "__main__":
process('input.jpg', 'output.jpg')
The code ends here. The above example cannot be understood. It doesn't matter, because we use a lot of functions and methods in the library. If If you don’t understand, we can check it online or use the manual. As long as you use these to understand this code, it will be ok. The important thing is to master the facial recognition implementation ideas

