Home >Web Front-end >HTML Tutorial >Let's talk about some interesting CSS topics (8)-Pure CSS navigation bar Tab switching solution
Let's talk about some interesting CSS topics (8)-Pure CSS navigation bar Tab switching solution
- WBOYWBOYWBOYWBOYWBOYWBOYWBOYWBOYWBOYWBOYWBOYWBOYWBOriginal
- 2016-10-15 10:32:021240browse
Start this series and talk about some interesting CSS questions. The types of questions are wild and imaginative. Say whatever comes to mind. Not only to broaden the ideas for solving problems, but also to cover some CSS details that are easily overlooked.
Compatibility is not taken into account when solving problems. The questions are wild and wild. Just say whatever comes to mind. If there are CSS properties that you feel are unfamiliar in the problem solving, go and study them quickly.
Keep updating, keep updating, keep updating, say important things three times.
Let’s talk about some interesting CSS topics (1)--How to implement the vertical bar on the left
Let’s talk about some interesting CSS topics (2) – Talking about the box model from the implementation of striped borders
Let’s talk about some interesting CSS topics (3) – How much do you know about stacking order and stack context
Let’s talk about some interesting CSS topics (4) – starting with reflection, let’s talk about CSS inheritance inherit
Let’s talk about some interesting CSS topics (5)--center a single line, center two lines, and omit more than two lines
Let’s talk about some interesting CSS issues (6) – fully compatible multi-column uniform layout issues
Let’s talk about some interesting CSS topics (7)--the disappearing borderline problem
All topics are summarized in my Github.
8. Pure CSS navigation bar Tab switching solution
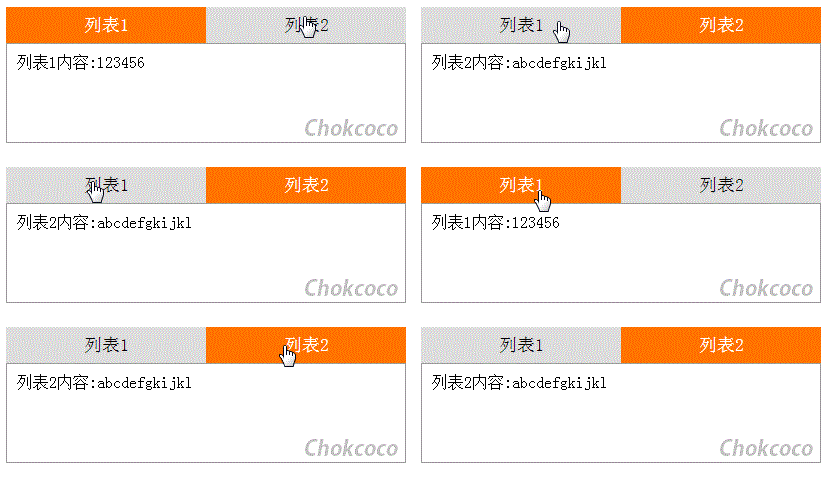
No need for Javascript, use pure CSS solution to achieve navigation bar switching similar to the picture below:

The power of CSS is sometimes beyond our imagination. Generally speaking, tab switching does require the use of certain scripts to achieve it. Let’s see how to accomplish the same thing using CSS.
The difficulty in implementing Tab switching is how to use CSS to receive the user’s click events and operate on the related nodes. That is:
-
How to receive click events
-
How to operate related DOM
Let’s see how to use two different methods to achieve the requirements:
Method 1: :target Pseudo-class selector
First of all, the problem we need to solve is how to receive click events. Here, we use the :target pseudo-class to receive the first method.
:targetis a new pseudo-class in CSS3, which can be used to select the currently active target element. Of course, the anchor name # at the end of the URL can point to a specific element in the document. The linked element is the target element. It requires an id to match the target in the document.
The explanation is difficult to understand. Let’s look at the actual usage. Suppose our HTML code is as follows:
<span style="font-family: verdana, geneva;"><ul class='nav'>
    <li>列表1</li>
    <li>列表2</li>
</ul>
<div>列表1内容:123456</div>
<div>列表2内容:abcdefgkijkl</div></span>
Since you want to use :target, you need an HTML anchor point and the HTML fragment corresponding to the anchor point. So the above structure should become:
<span style="font-family: verdana, geneva;"><ul class='nav'>
    <li><a href="#content1">列表1</a></li>
    <li><a href="#content2">列表2</a></li>
</ul>
<div id="content1">列表1内容:123456</div>
<div id="content2">列表2内容:abcdefgkijkl</div></span>
这样,上面 57abfd0ab4302cf66807d66e43e864b1 中的锚点 #content1 就对应了列表1 21222cb62e82bb01180fda983340a480 。锚点2与之相同对应列表2。
接下来,我们就可以使用 :target 接受到点击事件,并操作对应的 DOM 了:
<span style="font-family: verdana, geneva;">#content1,
#content2{
    display:none;
}

#content1:target,
#content2:target{
    display:block;
}</span>
上面的 CSS 代码,一开始页面中的 #content1 与 #content2 都是隐藏的,当点击列表1触发href="#content1" 时,页面的 URL 会发生变化:
-
由
www.example.com变成www.example.com#content1 -
接下来会触发
#content1:target{ }这条 CSS 规则,#content1元素由display:none变成display:block,点击列表2亦是如此。
如此即达到了 Tab 切换。当然除了 content1 content2 的切换,我们的 li 元素样式也要不断变化,这个时候,就需要我们在 DOM 结构布局的时候多留心,在 #content1:target 触发的时候可以同时去修改 li 的样式。
在上面 HTML 的基础上,再修改一下,变成如下结构:
<span style="font-family: verdana, geneva;"><div id="content1">列表1内容:123456</div>
<div id="content2">列表2内容:abcdefgkijkl</div>
<ul class='nav'>
    <li><a href="#content1">列表1</a></li>
    <li><a href="#content2">列表2</a></li>
</ul></span>
仔细对比一下与上面结构的异同,这里我只是将 ul 从两个 content 上面挪到了下面,为什么要这样做呢?
因为这里需要使用兄弟选择符 ~ 。
E~F{ cssRules } ,CSS3 兄弟选择符(E~F) ,选择 E 元素后面的所有兄弟元素 F。
注意这里,最重要的一句话是 E~F 只能选择 E 元素 之后 的 F 元素,所以顺序就显得很重要了。
在这样调换位置之后,通过兄弟选择符 ~ 可以操作整个 .nav 的样式。
<span style="font-family: verdana, geneva;">#content1:target ~ .nav li{
    // 改变li元素的背景色和字体颜色
    &:first-child{
        background:#ff7300;
        color:#fff;
    }
}
#content2:target ~ .nav li{
    // 改变li元素的背景色和字体颜色
    &:last-child{
        background:#ff7300;
        color:#fff;
    }
}</span>
上面的 CSS 规则中,我们使用 ~ 选择符,在 #content1:target 和 #content2:target 触发的时候分别去控制两个导航 li 元素的样式。
至此两个问题,1. 如何接收点击事件 与 2. 如何操作相关DOM 都已经解决,剩下的是一些小样式的修补工作。
Demo戳我:纯CSS导航切换(:target伪类实现)
法二:d11dad02a1f3abd212da65221b2dc681 && 07a5fe68cfe4c8f299058d0c23b3057c
上面的方法通过添加 3499910bf9dac5ae3c52d5ede7383485 标签添加页面锚点的方式接收点击事件。
这里还有一种方式能够接收到点击事件,就是拥有 checked 属性的表单元素, d11dad02a1f3abd212da65221b2dc681 或者2213c9627c391f00ef101b1592023bcb 。
假设有这样的结构:
<input class="nav1" type="radio">

<ul class='nav'>
    <li>列表1</li>
</ul>
对于上面的结构,当我们点击 97d2998c67e236daed11a9b3f665d970 单选框表单元素的时候,使用 :checked是可以捕获到点击事件的。
.nav1:checked ~ .nav li {
  // 进行样式操作
}
同样用到了兄弟选择符 ~
这样,当接收到表单元素的点击事件时,可以通过兄弟选择符 ~ 操作它的兄弟元素的样式。
可以试着点击下面 codepen 中的单选框。
但是,这里有个问题 我们的 Tab 切换,要点击的是25edfb22a4f469ecb59f1190150159c6元素,而不是表单元素,所以这里很重要的一点是,使用 07a5fe68cfe4c8f299058d0c23b3057c 绑定表单元素。看看如下结构:
<input class="nav1" id="li1" type="radio">

<ul class='nav'>
    <li><label for="li1">列表1</label></li>
</ul>
通过使用 2e1cf0710519d5598b1f0f14c36ba674 包裹一个 25edfb22a4f469ecb59f1190150159c6 元素,而 2e1cf0710519d5598b1f0f14c36ba674 有一个属性 for 可以绑定一个表单元素。
上面的 25edfb22a4f469ecb59f1190150159c6 中,有一层 dc7b69aa900addef93c41855147fdd26 ,里面的 for="li1" 意思是绑定 id 为li1 的表单元素。
label 标签中的 for 定义:for 属性规定 label 与哪个表单元素绑定。
这样改造之后,当我们点击 25edfb22a4f469ecb59f1190150159c6 元素的时候,相当于点击了 1e992fcb8938427046f4223500b9defd这个单选框表单元素,而这个表单元素被点击选中的时候,又可以被 :checked 伪类捕获到。
这个时候,我们就可以将页面上的表单元素隐藏,做到点击 25edfb22a4f469ecb59f1190150159c6 相当于点击表单:
input{
    display:none;
}
这样,应用到本题目,我们应该建立如下 DOM 结构:
<div class="container">
    <input class="nav1" id="li1" type="radio" name="nav">
    <input class="nav2" id="li2" type="radio" name="nav">
    <ul class='nav'>
        <li class='active'><label for="li1">列表1</label></li>
        <li><label for="li2">列表2</label></li>
    </ul>
    <div class="content">
        <div class="content1">列表1内容:123456</div>
        <div class="content1">列表2内容:abcdefgkijkl</div>
    </div>
</div>
使用两个单选框,分别对应两个导航选项,运用上面介绍的 label 绑定表单,:checked 接收点击事件,可以得到第二解法。
看看最后的结果:
Demo戳我:纯CSS导航切换(label 绑定 input:radio && ~)
所有题目汇总在我的 Github ,发到博客希望得到更多的交流。
到此本文结束,如果还有什么疑问或者建议,可以多多交流,原创文章,文笔有限,才疏学浅,文中若有不正之处,万望告知。

