


In order to learn high-performance concurrent servers, I plan to study the implementation of Nginx. According to convention, you have to write a hello world program at the beginning, so the next step is to introduce how to write a simple HTTP module to print "Hello World" under the Nginx framework.
Define the processing of hello configuration items
First, we need to define a commands array to define the configuration file parameters of the module. Each array element is of type ngx_command_t, and the end of the array is terminated with ngx_null_command.
When Nginx parses a configuration item in the configuration file, it will first traverse all modules. For each module, it will traverse the commands array. Each ngx_command_t structure defines a configuration item that it is interested in. The structure is defined as follows:
<code><span>struct</span> ngx_command_s {
    <span>/* 配置项名称 */</span>
    ngx_str_t             name;
    <span>/* 指定配置项可以出现的位置 */</span>
    ngx_uint_t            type;
    <span>/* 出现了name中指定的配置项后,将会调用set方法处理配置项的参数 */</span><span>char</span>               *(*<span>set</span>)(ngx_conf_t *cf, ngx_command_t *cmd, <span>void</span> *conf);
    ngx_uint_t            conf;
    <span>/* 在配置文件中的偏移量 */</span>
    ngx_uint_t            offset;
    <span>/* 配置项读取后的处理过程,必须是ngx_conf_post_t结构的指针 */</span><span>void</span>                 *post;
};

<span>#define ngx_null_command  { ngx_null_string, 0, NULL, 0, 0, NULL }</span></code>
After understanding the commands array, we define the processing of the hello configuration item:
<code><span>static</span> ngx_command_t ngx_http_hello_commands[] = {

    {   ngx_string(<span>"hello"</span>),
        NGX_HTTP_LOC_CONF|NGX_CONF_NOARGS,
        ngx_http_hello,
        NGX_HTTP_LOC_CONF_OFFSET,
        <span>0</span>,
        NULL },

    ngx_null_command
};</code>
Among them, ngx_http_hello is the set member in the ngx_command_t structure. When the hello configuration item appears in a certain configuration block, Nginx will call the ngx_http_hello method. The following is the implementation of ngx_http_hello:
<code><span>static</span><span>char</span> *
ngx_http_hello(ngx_conf_t *cf, ngx_command_t *cmd, <span>void</span> *conf)
{
    ngx_http_core_loc_conf_t *clcf;

    <span>/* 首先找到hello配置项所属的配置块 */</span>
    clcf = ngx_http_conf_get_module_loc_conf(cf, ngx_http_core_module);

    <span>/* HTTP框架在处理用户请求进行到NGX_HTTP_CONTENT_PHASE阶段时
     * 如果请求的主机域名、URI与hello配置项所在的配置块相匹配
     * 则调用ngx_http_hello_handler方法处理这个请求
     */</span>
    clcf->handler = ngx_http_hello_handler;

    <span>return</span> NGX_CONF_OK;
}</code>
Define hello module
The way to define an HTTP module is very simple, just define an ngx_moodule_t structure as follows:
<code>ngx_module_t ngx_http_hello_module = {
    NGX_MODULE_V1,
    &ngx_http_hello_module_ctx,    <span>/* module context */</span>
    ngx_http_hello_commands,       <span>/* module directives */</span>
    NGX_HTTP_MODULE,               <span>/* module type */</span>
    NULL,                          <span>/* init master */</span>
    NULL,                          <span>/* init module */</span>
    NULL,                          <span>/* init process */</span>
    NULL,                          <span>/* init thread */</span>
    NULL,                          <span>/* exit thread */</span>
    NULL,                          <span>/* exit process */</span>
    NULL,                          <span>/* exit master */</span>
    NGX_MODULE_V1_PADDING
};</code>
The hello module will be added to the ngx_modules global at compile time in the array.
Among them ngx_http_hello_commands is the processing of the hello configuration item we defined in the previous section.
Because we are defining the HTTP module, type must be set to NGX_HTTP_MODULE.
There is also an important member void* ctx. For the HTTP module, the ctx pointer must point to the ngx_http_module_t interface.
The HTTP framework defines 8 stages described by the ngx_http_module_t interface when reading and reloading the configuration file. When the HTTP framework is started, it will call the corresponding method in ngx_http_module_t in each stage. If no work is required, it can be defined as NULL. Because the hello module does not need to do any work, it is defined as follows:
<code><span>static</span> ngx_http_module_t ngx_http_hello_module_ctx = {
    NULL,                          <span>/* preconfiguration */</span>
    NULL,                           <span>/* postconfiguration */</span>    NULL,                          <span>/* create main configuration */</span>
    NULL,                          <span>/* init main configuration */</span>    NULL,                          <span>/* create server configuration */</span>
    NULL,                          <span>/* merge server configuration */</span>    NULL,                           <span>/* create location configuration */</span>
    NULL                            <span>/* merge location configuration */</span>
};</code>
Processing user requests
The last step is to process user requests. This requires some knowledge of HTTP. You can refer to Introduction to HTTP Protocol. We handle the user's request by implementing the ngx_http_hello_handler method, which is defined as follows:
<code><span>static</span> ngx_int_t
ngx_http_hello_handler(ngx_http_request_t *r)</code>
where the ngx_http_request_t structure contains all the information of the request (such as method, URI, protocol version number and header, etc.) , in addition, it also contains many other members, such as memory pool, response header, etc.
Because we only deal with the GET method and the HEAD method, we need to make the following judgment:
<code><span>if</span> (!(r->method & (NGX_HTTP_GET | NGX_HTTP_HEAD))) {
        <span>return</span> NGX_HTTP_NOT_ALLOWED;
 }</code>
Next, because we don’t need the package body in the request, we need to discard the package body. The method is as follows:
<code>ngx_int_t rc = ngx_http_discard_request_body(r);
<span>if</span> (rc != NGX_OK) {
    <span>return</span> rc;
}</code>
Then set the returned Response package, the returned package body only contains a "Hello World" string:
<code>ngx_str_type = ngx_string(<span>"text/plain"</span>);
ngx_str_response = ngx_string(<span>"Hello World"</span>);
r->headers_out.status = NGX_HTTP_OK;
r->headers_out.content_length_n = response.len;
r->headers_out.content_type = type;</code>
Finally, the header and body of the response package are sent:
<code>    rc = ngx_http_send_header(r);
    <span>if</span> (rc == NGX_ERR || rc > NGX_OK || r->header_only) {
        <span>return</span> rc;
    }

    ngx_buf_t *b;
    b = ngx_create_temp_buf(r->pool, response.len);
    <span>if</span> (b == NULL) {
        <span>return</span> NGX_HTTP_INTERNAL_SERVER_ERROR;
    }

    ngx_memcpy(b->pos, response.data, response.len);
    b->last = b->pos + response.len;
    b->last_buf = <span>1</span>;

    ngx_chain_t out;
    out.buf = b;
    out.next = NULL;

    <span>/* send the buffer chain of your response */</span><span>return</span> ngx_http_output_filter(r, &out);</code>
The complete code can be viewed here: hello_module
Compile and run
Create a new config file in the same directory as the code, add the following lines:
<code>ngx_addon_name=ngx_http_hello_module
HTTP_MODULES=<span>"<span>$HTTP_MODULES</span> ngx_http_hello_module"</span>
NGX_ADDON_SRCS=<span>"<span>$NGX_ADDON_SRCS</span><span>$ngx_addon_dir</span>/ngx_http_hello_module.c"</span></code>
Then enter the Nginx source code root directory, run configure, remember to bring the –add-module parameter, and add our own writing after the parameter The path where the HTTP module code is located: After
<code>./configure --prefix=<span>/usr/local</span><span>/nginx --add-module=/code</span><span>/nginx-1.8.0/src</span><span>/http/hello</span>_module</code>
configure is completed, use the make command to compile. After successful compilation, enter make install to complete the installation.
Modify /usr/local/nginx/conf/nginx.conf, add:
<code>http{
    <span>...</span>
    server {
        <span>...</span>
        location /hello {
            hello;
        }
        <span>...</span>
    }
    <span>...</span>
}</code>
Run Nginx, and then enter IP/hello in the browser to see the "Hello World string" displayed. 
Reference
"In-depth understanding of Nginx"
The above introduces the writing of the hello module, including various aspects. I hope it will be helpful to friends who are interested in PHP tutorials.

 Springboot怎么使用内置tomcat禁止不安全HTTPMay 12, 2023 am 11:49 AM
Springboot内置tomcat禁止不安全HTTP方法1、在tomcat的web.xml中可以配置如下内容让tomcat禁止不安全的HTTP方法/*PUTDELETEHEADOPTIONSTRACEBASIC2、Springboot使用内置tomcat没有web.xml配置文件,可以通过以下配置进行,简单来说就是要注入到Spring容器中@ConfigurationpublicclassTomcatConfig{@BeanpublicEmbeddedServletContainerFacto
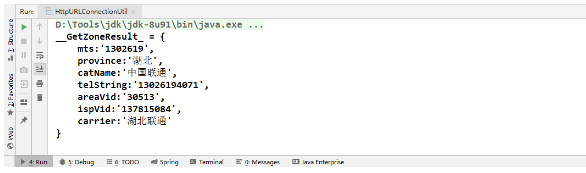
 JAVA发送HTTP请求的方式有哪些Apr 15, 2023 am 09:04 AM
1.HttpURLConnection使用JDK原生提供的net,无需其他jar包,代码如下:importcom.alibaba.fastjson.JSON;importjava.io.BufferedReader;importjava.io.InputStream;importjava.io.InputStreamReader;importjava.io.OutputStream;importjava.net.HttpURLConnection;
 nginx中如何升级到支持HTTP2.0May 24, 2023 pm 10:58 PM
一、前言#ssl写在443端口后面。这样http和https的链接都可以用listen443sslhttp2default_server;server_namechat.chengxinsong.cn;#hsts的合理使用,max-age表明hsts在浏览器中的缓存时间,includesubdomainscam参数指定应该在所有子域上启用hsts,preload参数表示预加载,通过strict-transport-security:max-age=0将缓存设置为0可以撤销hstsadd_head
 Nginx的HTTP2协议优化与安全设置Jun 10, 2023 am 10:24 AM
随着互联网的不断发展和改善,Web服务器在速度和性能上的需求也越来越高。为了满足这样的需求,Nginx已经成功地掌握了HTTP2协议并将其融入其服务器的性能中。HTTP2协议要比早期的HTTP协议更加高效,但同时也存在着特定的安全问题。本文将为您详细介绍如何进行Nginx的HTTP2协议优化和安全设置。一、Nginx的HTTP2协议优化1.启用HTTP2在N
 Nginx中HTTP的keepalive怎么配置May 12, 2023 am 11:28 AM
httpkeepalive在http早期,每个http请求都要求打开一个tpcsocket连接,并且使用一次之后就断开这个tcp连接。使用keep-alive可以改善这种状态,即在一次tcp连接中可以持续发送多份数据而不会断开连接。通过使用keep-alive机制,可以减少tcp连接建立次数,也意味着可以减少time_wait状态连接,以此提高性能和提高httpd服务器的吞吐率(更少的tcp连接意味着更少的系统内核调用,socket的accept()和close()调用)。但是,keep-ali
 Python的HTTP客户端模块urllib与urllib3怎么使用May 20, 2023 pm 07:58 PM
一、urllib概述:urllib是Python中请求url连接的官方标准库,就是你安装了python,这个库就已经可以直接使用了,基本上涵盖了基础的网络请求功能。在Python2中主要为urllib和urllib2,在Python3中整合成了urllib。Python3.x中将urllib2合并到了urllib,之后此包分成了以下四个模块:urllib.request:它是最基本的http请求模块,用来模拟发送请求urllib.error:异常处理模块,如果出现错误可以捕获这些异常urllib
 怎么利用Java实现调用http请求Jun 02, 2023 pm 04:57 PM
一、概述在实际开发过程中,我们经常需要调用对方提供的接口或测试自己写的接口是否合适。很多项目都会封装规定好本身项目的接口规范,所以大多数需要去调用对方提供的接口或第三方接口(短信、天气等)。在Java项目中调用第三方接口的方式有:1、通过JDK网络类Java.net.HttpURLConnection;2、通过common封装好的HttpClient;3、通过Apache封装好的CloseableHttpClient;4、通过SpringBoot-RestTemplate;二、Java调用第三方
 Nginx http运行状况健康检查如何配置May 14, 2023 pm 06:10 PM
被动检查对于被动健康检查,nginx和nginxplus会在事件发生时对其进行监控,并尝试恢复失败的连接。如果仍然无法恢复正常,nginx开源版和nginxplus会将服务器标记为不可用,并暂时停止向其发送请求,直到它再次标记为活动状态。上游服务器标记为不可用的条件是为每个上游服务器定义的,其中包含块中server指令的参数upstream:fail_timeout-设置服务器标记为不可用时必须进行多次失败尝试的时间,以及服务器标记为不可用的时间(默认为10秒)。max_fails-设置在fai


Hot AI Tools

Undresser.AI Undress
AI-powered app for creating realistic nude photos

AI Clothes Remover
Online AI tool for removing clothes from photos.

Undress AI Tool
Undress images for free

Clothoff.io
AI clothes remover

AI Hentai Generator
Generate AI Hentai for free.

Hot Article
Hot Tools

ZendStudio 13.5.1 Mac
Powerful PHP integrated development environment

MinGW - Minimalist GNU for Windows
This project is in the process of being migrated to osdn.net/projects/mingw, you can continue to follow us there. MinGW: A native Windows port of the GNU Compiler Collection (GCC), freely distributable import libraries and header files for building native Windows applications; includes extensions to the MSVC runtime to support C99 functionality. All MinGW software can run on 64-bit Windows platforms.

Notepad++7.3.1
Easy-to-use and free code editor

VSCode Windows 64-bit Download
A free and powerful IDE editor launched by Microsoft

SAP NetWeaver Server Adapter for Eclipse
Integrate Eclipse with SAP NetWeaver application server.

