

 Backend DevelopmentPHP TutorialInstallation of LAMP environment and installation of yaf extension under Ubuntu14
I installed the lamp environment under Ubuntu some time ago. Record the installation process for future reference.
InstalllampEnvironment
① Install
<span>sudo</span> apt-get <span>install</span> apache2
The system will pop up the prompt as shown in the picture. At this time, you need to enter the user's password to install. All other installation operations below need to be entered. The password is the same every time.

Open the browser and enter

② Install php
<span>sudo</span> apt-get <span>install</span> php5
③ Install mysql
<span>sudo</span> apt-get <span>install</span> mysql-server
At this time, the environment installation of
ApacheAfter the installation is complete
cd  /var/www/<span>html
</span><span>sudo</span><span>vi</span> phpinfo.php
Enter
<span>php
  </span><span>phpinfo</span><span>();
</span>?>
Then open the browser and enter

Install the development package of php
Only after installing the development package can you install the extension
<span>sudo</span> apt-get <span>install</span> php5-dev
Install the extension of php
a) Installation
This installation comes with the system library, you can install it directly.
<span>sudo</span> apt-get <span>install</span> php5-mysql
Restart
<span>sudo</span> service apache2 restart
b) Install
Install
<span>sudo</span> apt-get <span>install</span> libpcre3 libpcre3-dev
Download the latest
cd  /usr/local/src/
<span>sudo</span><span>wget</span> https:<span>//</span><span>github.com/laruence/php-yaf/archive/master.zip</span>

- to prevent it from having the same name as the file downloaded later, so change it Let’s distinguish by name.

Unzip
<span>sudo</span><span>unzip</span> yaf.<span>zip</span>
After decompression, it is as shown in the picture below

cd php-yaf-<span>master
</span><span>sudo</span> /usr/bin/phpize

Configuration

Compile

Compile and install

After completion, the yaf.so file is generated in the following directory

Modify the configuration of

<span>sudo</span><span>vi</span> php.ini
Change the expansion directory to survival The directory where the

Added

Restart
<span>sudo</span> service apache2 restart
Refresh at this time to find

If you need other extensions like yaf installation steps.
The above introduces the installation of the LAMP environment and the installation of the yaf extension under Ubuntu14, including the relevant content. I hope it will be helpful to friends who are interested in PHP tutorials.

 mysql为什么连接不上localhostAug 10, 2023 pm 02:55 PM
mysql连接不上localhost的原因有mysql服务未启动、mysql端口被占用和MySQL配置文件问题。详细介绍:1、在Windows系统中,可以通过在命令提示符下输入“services.msc”来打开服务管理器,然后找到mysql服务,确保其状态为“运行中”。在Linux系统中,可以使用“services.msc”命令来检查和控制服务状态;2、可以通过打开命令等等。
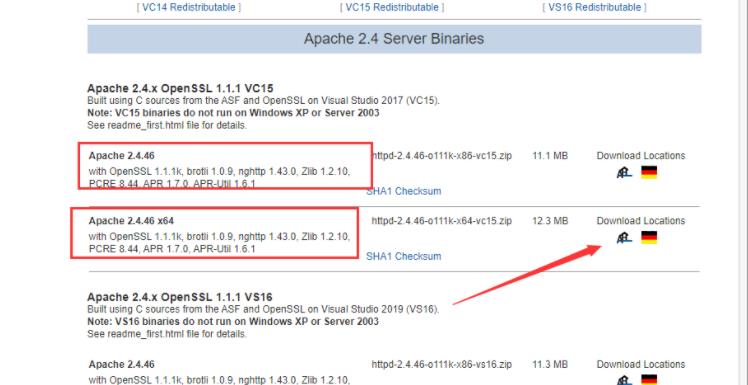 图文详解apache2.4+php8.0的安装配置方法Dec 06, 2022 pm 04:53 PM
本文给大家介绍如何安装apache2.4,以及如何配置php8.0,文中附有图文详细步骤,下面就带大家一起看看怎么安装配置apache2.4+php8.0吧~
 Linux apache怎么限制并发连接和下载速度May 12, 2023 am 10:49 AM
mod_limitipconn,这个是apache的一个非官方模块,根据同一个来源ip进行并发连接控制,bw_mod,它可以根据来源ip进行带宽限制,它们都是apache的第三方模块。1.下载:wgetwget2.安装#tar-zxvfmod_limitipconn-0.22.tar.gz#cdmod_limitipconn-0.22#vimakefile修改:apxs=“/usr/local/apache2/bin/apxs”#这里是自己apache的apxs路径,加载模块或者#/usr/lo
 apache版本怎么查看?Jun 14, 2019 pm 02:40 PM
查看apache版本的步骤:1、进入cmd命令窗口;2、使用cd命令切换到Apache的bin目录下,语法“cd bin目录路径”;3、执行“httpd -v”命令来查询版本信息,在输出结果中即可查看apache版本号。
 超细!Ubuntu20.04安装Apache+PHP8环境Mar 21, 2023 pm 03:26 PM
本篇文章给大家带来了关于PHP的相关知识,其中主要跟大家分享在Ubuntu20.04 LTS环境下安装Apache的全过程,并且针对其中可能出现的一些坑也会提供解决方案,感兴趣的朋友下面一起来看一下吧,希望对大家有帮助。
 nginx,tomcat,apache的区别是什么May 15, 2023 pm 01:40 PM
1.Nginx和tomcat的区别nginx常用做静态内容服务和代理服务器,直接外来请求转发给后面的应用服务器(tomcat,Django等),tomcat更多用来做一个应用容器,让javawebapp泡在里面的东西。严格意义上来讲,Apache和nginx应该叫做HTTPServer,而tomcat是一个ApplicationServer是一个Servlet/JSO应用的容器。客户端通过HTTPServer访问服务器上存储的资源(HTML文件,图片文件等),HTTPServer是中只是把服务器
 localhost打不开怎么办Nov 07, 2023 pm 02:47 PM
解决办法:1、检查服务器的运行状态,并确保它正在监听正确的端口;2、尝试暂时禁用防火墙或安全软件,然后重新尝试访问localhost;3、检查操作系统的hosts文件,确保localhost的解析正确;4、尝试重启网络适配器或重新配置网络连接;5、尝试更改本地服务器使用的端口,或关闭其他占用相同端口的程序;6、尝试在hosts文件中手动添加对应的IP地址和域名等等。
 php站用iis乱码而apache没事怎么解决Mar 23, 2023 pm 02:48 PM
在使用 PHP 进行网站开发时,你可能会遇到字符编码问题。特别是在使用不同的 Web 服务器时,会发现 IIS 和 Apache 处理字符编码的方法不同。当你使用 IIS 时,可能会发现在使用 UTF-8 编码时出现了乱码现象;而在使用 Apache 时,一切正常,没有出现任何问题。这种情况应该怎么解决呢?


Hot AI Tools

Undresser.AI Undress
AI-powered app for creating realistic nude photos

AI Clothes Remover
Online AI tool for removing clothes from photos.

Undress AI Tool
Undress images for free

Clothoff.io
AI clothes remover

AI Hentai Generator
Generate AI Hentai for free.

Hot Article
Hot Tools

Dreamweaver Mac version
Visual web development tools

SublimeText3 Chinese version
Chinese version, very easy to use

SAP NetWeaver Server Adapter for Eclipse
Integrate Eclipse with SAP NetWeaver application server.

Safe Exam Browser
Safe Exam Browser is a secure browser environment for taking online exams securely. This software turns any computer into a secure workstation. It controls access to any utility and prevents students from using unauthorized resources.

VSCode Windows 64-bit Download
A free and powerful IDE editor launched by Microsoft

