


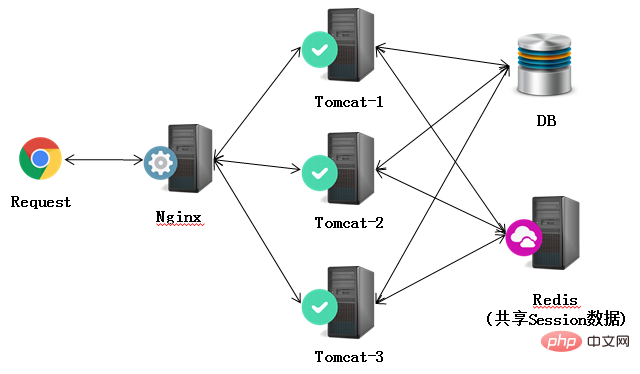
Nginx + Tomcat + Memcached cluster must consider at least 2 aspects:
1. How to achieve load balancing?
2. How to implement session replication and synchronization?
This article collects relevant materials from the Internet and summarizes the process of building an Nginx + Tomcat + Memcached cluster under window as follows.
1. Development environment
1. nginx version: 1.8.0
2. tomcat version: 7.0.55
3. memcached version: 1.4.13
4. Session replication synchronization uses memcache-session- The latest version of manager: 1.6.3
5. Operating system: Win7
2. Nginx + Tomcat to achieve load balancing
1. Download and install nginx and tomcat
I won’t go into details here. For details, see nginx and Download and install tomcat
2. nginx configuration
Open the main configuration file of nginx: D:nginx-1.8.0confnginx.conf, mainly modify the proxy forwarding server IP and port, weight is the server weight, the higher the number, the higher the number means it is accessed The greater the chance:
	upstream local_tomcat {
	   server localhost:18080 weight=1;
           server localhost:18081 weight=1;
	}

    server {
        listen       80;

        location / {
            root   html;
            index  index.html index.htm;
            proxy_pass http://local_tomcat;
        }
    }
3. Tomcat + memcached implements session replication and synchronization
Tomcat session replication and synchronization problems are usually solved by using memcached or nginx_upstream_jvm_route, which is an Nginx extension module used to implement Cookie-based Session Sticky functionality. If there are too many tomcats, session synchronization is not recommended. Synchronizing sessions between servers consumes resources, and high concurrency environments can easily cause session storms. Please adopt the session solution appropriately according to your application situation.
The following introduces the use of memcached (memcache-session-manager) to manage sessions
1. Download and install memcached (omitted)
2. Download related jar packages
There are many jar packages that need to be downloaded, each jar The version cannot be mistaken. I have provided a complete set of jar packages that need to be downloaded (already tested and available). If you need to download, please click Link Download.
3. Configure session sharing
Okay, put the above jar package in the tomcat/lib directory, modify each tomcat configuration file tomcatconfcontext.xml, between the
a. Configure tomcat
Modify tomcatconfserver.xml. Since I have two tomcats downloaded from the local win7 system, I want to avoid port conflicts. Taking tomcat-node1 as an example, the main modifications are as follows: (Node2 and so on)
<server port="8005" shutdown="SHUTDOWN"></server>
<connector port="18080" protocol="HTTP/1.1" c redirectport="8443"></connector>
<connector port="8009" protocol="AJP/1.3" redirectport="8443"></connector>
<engine name="Catalina" defaulthost="localhost" jvmroute="jvm1"></engine>Modify tomcatconfcontext.xml and add the following code between the
	<manager classname="de.javakaffee.web.msm.MemcachedBackupSessionManager" memcachednodes="<span style=" color:><strong>n1:127.0.0.1:11211</strong>"
		sticky="false"
		sessi
		lockingMode="uriPattern:/path1|/path2"
		requestUriIgnorePattern=".*\.(ico|png|gif|jpg|css|js)$"
		transcoderFactoryClass="de.javakaffee.web.msm.serializer.kryo.KryoTranscoderFactory"/></manager>
(note that memecachedNodes in the two tomcat configurations are all n1:* )
b. Modify the application jsp
I am using the examples project that comes with tomcat, and directly replace the following jsp with D:nginx-1.8.0Tomcattomcat-node1webappsexamplesindex.html
    <title>Tomcat集群测试</title>


    session id:" + session.getId());
    %>
Four. Test
Start nginx, memcached and Two tomcats, use the browser to access http://localhost/examples/, compare the two pages returned by the nginx server, and find that the two ports are different but the sessions are the same, which means that the Nginx + Tomcat + Memcached cluster is successfully established.

Reference article:
1. http://www.tuicool.com/articles/I7ryYf
2. http://blog.csdn.net/liuzhigang1237/article/details/8880752
3. http://www.cnblogs.com/phirothing/archive/2013/12/05/3459814.html
Copyright Statement: This article is an original article by the blogger and may not be reproduced without the blogger's permission.
The above introduces the Nginx + Tomcat + Memcached cluster, including the relevant content. I hope it will be helpful to friends who are interested in PHP tutorials.

 Springboot怎么使用内置tomcat禁止不安全HTTPMay 12, 2023 am 11:49 AM
Springboot内置tomcat禁止不安全HTTP方法1、在tomcat的web.xml中可以配置如下内容让tomcat禁止不安全的HTTP方法/*PUTDELETEHEADOPTIONSTRACEBASIC2、Springboot使用内置tomcat没有web.xml配置文件,可以通过以下配置进行,简单来说就是要注入到Spring容器中@ConfigurationpublicclassTomcatConfig{@BeanpublicEmbeddedServletContainerFacto
 Nginx+Tomcat高性能负载均衡集群怎么搭建May 14, 2023 am 11:34 AM
nginx是一个高性能的http服务器/反向代理服务器及电子邮件(imap/pop3)代理服务器。其占有内存少,并发能力强,在同类型的网页服务器中表现较好。nginx可以在大多数unixlinuxos上编译运行,并有windows移植版。一般情况下,对于新建站点,建议使用最新稳定版作为生产版本。单个tomcat最大支持在线访问是500左右,要通知支持更多的访问量一个tomcat就没法做到了。在这里我们采用集群部署方式,使用多个tomcat,反向代理使用nginx。架构如下:准备工作apache-
 nginx,tomcat,apache的区别是什么May 15, 2023 pm 01:40 PM
1.Nginx和tomcat的区别nginx常用做静态内容服务和代理服务器,直接外来请求转发给后面的应用服务器(tomcat,Django等),tomcat更多用来做一个应用容器,让javawebapp泡在里面的东西。严格意义上来讲,Apache和nginx应该叫做HTTPServer,而tomcat是一个ApplicationServer是一个Servlet/JSO应用的容器。客户端通过HTTPServer访问服务器上存储的资源(HTML文件,图片文件等),HTTPServer是中只是把服务器
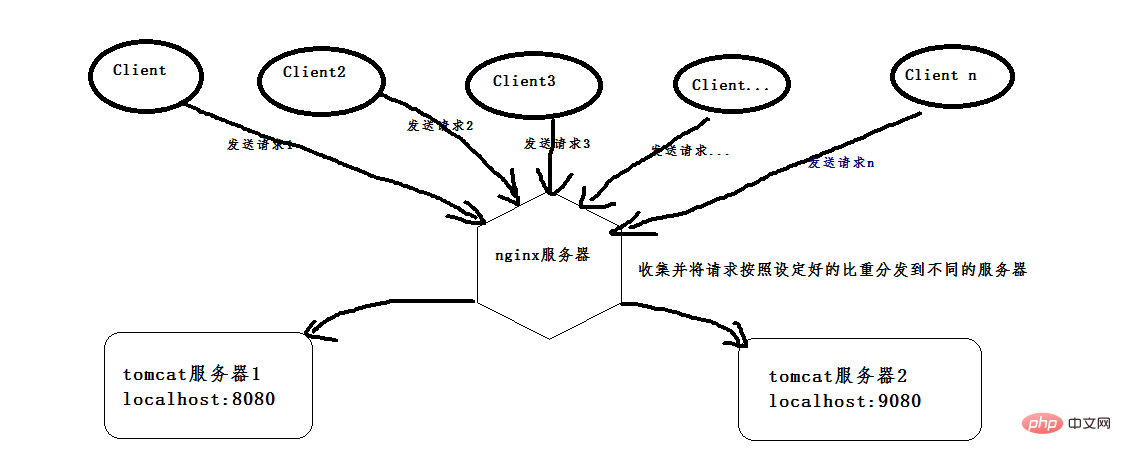 nginx+tomcat怎么实现Windows系统下的负载均衡May 16, 2023 pm 01:28 PM
首先,安装两个tomcat,可以是同一个复制成两个,也可以下载两个不同版本的tomcat,我就是下载了两个不同版本的。(这是8.0版本的,随便找两个不是特别老的版本的就行)。然后启动两个tomcat,在启动前,先更改其中一个的端口号,使得两个tomcat启动时不会端口冲突,一个是本身的8080端口,一个是改成了9080端口。配好以后,打开cmd命令窗口,我的tomcat一个放在d:\software\apache-tomcat-8.5.24目录下,按照如下命令即可启动,启动成功会弹出另一个窗口,
 Java环境变量和Tomcat服务器怎么配置May 11, 2023 pm 08:49 PM
第一步:配置与系统一致的jdk环境变量(32位/64位)(1)官网下载jdk安装包:官网下载地址:根据自己的操作系统选择对应的安装包(一定要选择接受许可协议)(2)安装jdk:安装jdk选择安装目录安装过程中会出现两次安装提示。第一次是安装jdk,第二次是安装jre。建议两个都安装在同一个java文件夹中的不同文件夹中。(不能都安装在java文件夹的根目录下,jdk和jre安装在同一文件夹会出错)安装完成如下图所示(3)配置环境变量安装完jdk后配置环境变量计算机→属性→高级系统设置→高级→环境
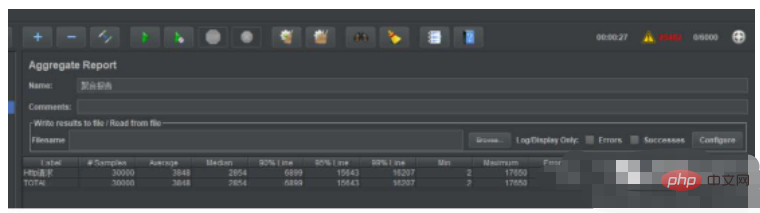 如何在SpringBoot中内嵌Tomcat并发容量May 11, 2023 pm 11:13 PM
发现并发容器问题对单接口进行6000线程压测,每个线程请求5次,线程在5秒内创建完毕,当进行一半的时候,已经出现了请求响应时间过大及其错误率达到了43%。这个并发容量对于配置比较好点的服务器相对来说有点弱。深入SpringBoot底层了解原因在SpringBoot官方文档中提到了关于元数据的配置可以看到,关于我们最常用的设置项目的端口的默认配置就在其中。默认内嵌Tomcat配置1、server.tomcat.accept-count:等待队列长度,当可分配的线程数全部用完之后,后续的请求将进入等
 SpringBoot部署到外部Tomcat无法注册到Nacos服务端如何解决May 13, 2023 pm 11:13 PM
事情经过近期做一个项目投标演示(POC)环境支持,需要集成Nacos服务端。考虑到现有项目中已经有了Nacos相关依赖,那还不简单?新建个服务端,配置几下重启不就搞定了吗?然而事情远没有想得这么简单。同样的代码在我本地IDE里运行就能注册成功,在演示环境Tomcat+War部署就不行了。经过远程Debug代码,发现Nacos客户端的线程都有启动,却没有注册成功。思路想到可能与Tomcat部署模式有关系,就去查了官方issue和StackOverFlowTheeventispublishedasp
 linux怎么查看tomcat运行状态Mar 22, 2023 am 09:34 AM
linux查看tomcat运行状态的方法:1、通过cd进入tomcat的bin目录下;2、执行“ps -ef|grep java”命令将进程显示出来;3、通过“tail -f catalina.out”命令实时查看tomcat运行日志即可。


Hot AI Tools

Undresser.AI Undress
AI-powered app for creating realistic nude photos

AI Clothes Remover
Online AI tool for removing clothes from photos.

Undress AI Tool
Undress images for free

Clothoff.io
AI clothes remover

AI Hentai Generator
Generate AI Hentai for free.

Hot Article
Hot Tools

VSCode Windows 64-bit Download
A free and powerful IDE editor launched by Microsoft

SublimeText3 Mac version
God-level code editing software (SublimeText3)

EditPlus Chinese cracked version
Small size, syntax highlighting, does not support code prompt function

MantisBT
Mantis is an easy-to-deploy web-based defect tracking tool designed to aid in product defect tracking. It requires PHP, MySQL and a web server. Check out our demo and hosting services.

mPDF
mPDF is a PHP library that can generate PDF files from UTF-8 encoded HTML. The original author, Ian Back, wrote mPDF to output PDF files "on the fly" from his website and handle different languages. It is slower than original scripts like HTML2FPDF and produces larger files when using Unicode fonts, but supports CSS styles etc. and has a lot of enhancements. Supports almost all languages, including RTL (Arabic and Hebrew) and CJK (Chinese, Japanese and Korean). Supports nested block-level elements (such as P, DIV),

