


Please indicate the source for reprinting: http://blog.csdn.net/l1028386804/article/details/48272857
Today we will work with you to implement clustering and load balancing of Tomcat and nginx
1. Tomcat cluster configuration Port planning
Note: This port is used to start two tomcats on the same machine. You need to modify the port so that it is not repeated. If a machine only deploys one tomcat, its port can be the same.
Serial number |
SHUTDOWN |
AJP |
http |
Cluster Receiver |
1 |
8005 |
8009 |
8080 |
5001 |
2 |
8015 |
8019 |
8081 |
5002 |
1. Tomcat cluster configuration
Modify in server.xml:
will:<engine name="Catalina" defaulthost="localhost"></engine>is modified to:
<engine name="Catalina" defaulthost="localhost" jvmroute="jvm1"> </engine>
where jvmRoute="jvm1" has different names in different tomcats.
Add the following content to the
<cluster classname="org.apache.catalina.ha.tcp.SimpleTcpCluster" channelsendopti expiresessi notifylisteners></cluster>

  <channel classname="org.apache.catalina.tribes.group.GroupChannel">
    <membership classname="org.apache.catalina.tribes.membership.McastService" address="228.0.0.4" port="45564" frequency="500" droptime="3000"></membership>
    <receiver classname="org.apache.catalina.tribes.transport.nio.NioReceiver" address="auto">
              port="5001"
              autoBind="100"
              selectorTimeout="5000"
              maxThreads="6"/>

    <sender classname="org.apache.catalina.tribes.transport.ReplicationTransmitter">
      <transport classname="org.apache.catalina.tribes.transport.nio.PooledParallelSender"></transport>
    </sender>
    <interceptor classname="org.apache.catalina.tribes.group.interceptors.TcpFailureDetector"></interceptor>
    <interceptor classname="org.apache.catalina.tribes.group.interceptors.MessageDispatch15Interceptor"></interceptor>
  </receiver></channel>

  <valve classname="org.apache.catalina.ha.tcp.ReplicationValve" filter=""></valve>
  <valve classname="org.apache.catalina.ha.session.JvmRouteBinderValve"></valve>

  <deployer classname="org.apache.catalina.ha.deploy.FarmWarDeployer" tempdir="/tmp/war-temp/" deploydir="/tmp/war-deploy/" watchdir="/tmp/war-listen/" watchenabled="false"></deployer>

  <clusterlistener classname="org.apache.catalina.ha.session.JvmRouteSessionIDBinderListener"></clusterlistener>
  <clusterlistener classname="org.apache.catalina.ha.session.ClusterSessionListener"></clusterlistener>
Note that on the same machine: Receiver node port: port="5001"or else Same.
2. Modify tomcat’s web.xml
You need to modify tomcat’s web.xml configuration parameters to truly realize the setting of session synchronization replication
<welcome-file-list>
<welcome-file>index.html</welcome-file>
<welcome-file>index.htm</welcome-file>
<welcome-file>index.jsp</welcome-file>
</welcome-file-list>
<distributable></distributable> (在倒数第二行增加这个代码才能实现session同步复制功能)
2. Optimization:
1. Memory optimization configuration
1) Windows:
set JAVA_OPTS = " -server -Xms512M -Xmx2048M -XX:MaxNewSize=256M -XX:PermSize=256M
-XX:MaxPermSize=512M -XX:+UseConcMarkSweepGC -XX:+PrintGCDetails
-XX:+PrintGCTimeStamps -Djava.awt.headless=true"
2) Linux
JAVA_OPTS = " -server -Xms512M -Xmx2048M -XX:MaxNewSize=256M -XX:PermSize=256M
-XX:MaxPermSize=512M -XX:+UseConcMarkSweepGC  -XX:+PrintGCDetails
-XX:+PrintGCTimeStamps -Djava.awt.headless=true"
2. Other optimized configurations:
1) Add the following configuration 1
<executor name="tomcatThreadPool" nameprefix="catalina-exec-" maxthreads="500" minsparethreads="50"></executor>to modify
<connector port="8080" protocol="HTTP/1.1" c redirectport="8443"></connector>to
<connector port="8080" executor="tomcatThreadPool" protocol="HTTP/1.1" c enablelookups="false" redirectport="8443"></connector>:
<connector port="8009" protocol="AJP/1.3" redirectport="8443"></connector>to
<connector port="8009" executor="tomcatThreadPool" c enablelookups="false" redirectport="8443" protocol="AJP/1.3"></connector>
2) or
to modify
<connector port="8080" protocol="HTTP/1.1" c redirectport="8443"></connector>is
<connector port="8080" protocol="HTTP/1.1" maxthreads="500" acceptcount="50" c enablelookups="false" redirectport="8443"></connector>modified
<connector port="8009" protocol="AJP/1.3" redirectport="8443"></connector>is
<connector port="8009" maxthreads="500" c enablelookups="false" redirectport="8443" protocol="AJP/1.3"></connector>
Note: The main difference between the two is: maxThreads="500" is ignored when the executor is enabled and associated.
3) Several attribute explanations:
- maxThreads
Tomcat uses threads to handle each request received. This value represents the maximum number of threads that Tomcat can create. Default value is 200. It can be adjusted according to the machine's period performance and memory size, generally between 400-500. The maximum can be around 800.
- acceptCount
Specifies the number of requests that can be placed in the processing queue when all available threads for processing requests are used. Requests exceeding this number will not be processed. Default value is 10.
- minSpareThreads
The number of threads created when Tomcat is initialized. Default value is 4.
- connnectionTimeout
Network connection timeout, default value 20000, unit: milliseconds. Setting it to 0 means it will never time out, which is a dangerous setting. Usually it can be set to 30000 milliseconds. (Due to the long timeout of the interface with the backend system, this system is set to 60000)
- enableLookups
Whether to reverse-check the domain name, the default value is true. To increase processing power, it should be set to false
- Executor node
represents a thread pool shared between Tomcat components.
- maxIdleTime
The number of milliseconds before an idle thread is shut down. The default value is 60000.
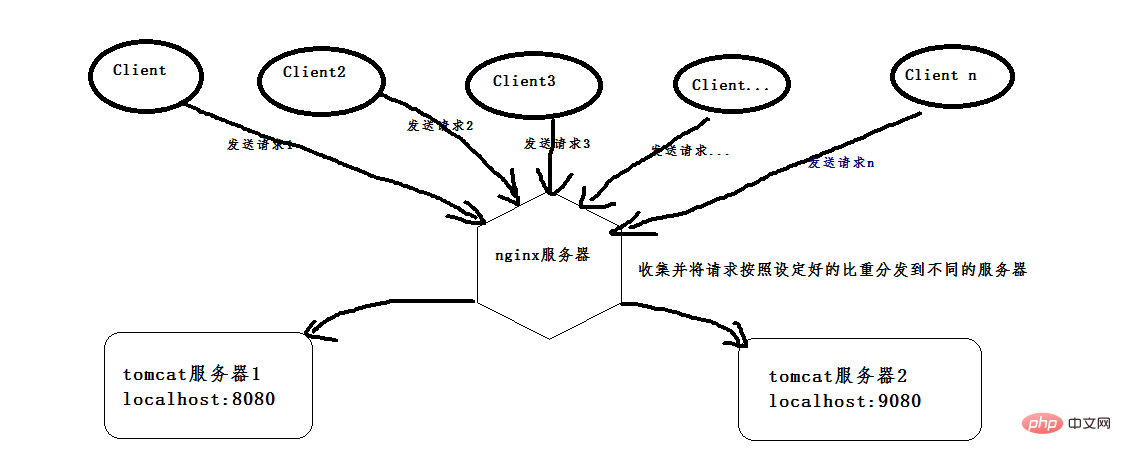
3. Nginx + Tomcat load balancing configuration
Add the following code in the configuration file /usr/local/nginx/conf/nginx.conf file
  upstream  tomcat {
        server 192.168.100.50:8080  weight=1;
        server 192.168.100.50:8081  weight=1;
  }
The tomcat name is arbitrary, pay attention to the IP address and port. Modify the location in the Server node:
location / {
        root   html;
        index  index.html index.htm;
    }
is location / {
#root html;
#index index.html index.htm;
proxy_pass http://tomcat6;
}
Note that the tomcat name in http://tomcat is the same as the above configuration.
Copyright Statement: This article is an original article by the blogger and may not be reproduced without the blogger's permission.
The above introduces the Tomcat+Nginx cluster and load balancing, including the relevant content. I hope it will be helpful to friends who are interested in PHP tutorials.

 Springboot怎么使用内置tomcat禁止不安全HTTPMay 12, 2023 am 11:49 AM
Springboot内置tomcat禁止不安全HTTP方法1、在tomcat的web.xml中可以配置如下内容让tomcat禁止不安全的HTTP方法/*PUTDELETEHEADOPTIONSTRACEBASIC2、Springboot使用内置tomcat没有web.xml配置文件,可以通过以下配置进行,简单来说就是要注入到Spring容器中@ConfigurationpublicclassTomcatConfig{@BeanpublicEmbeddedServletContainerFacto
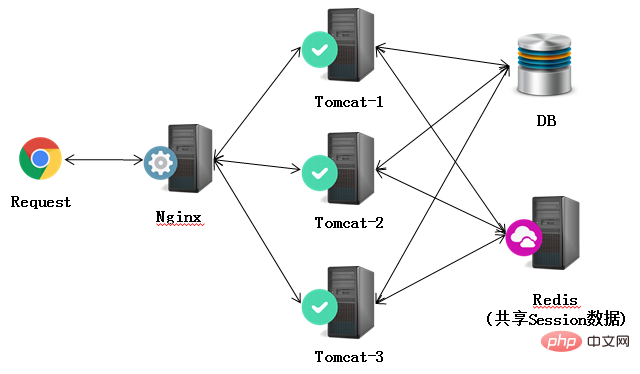 Nginx+Tomcat高性能负载均衡集群怎么搭建May 14, 2023 am 11:34 AM
nginx是一个高性能的http服务器/反向代理服务器及电子邮件(imap/pop3)代理服务器。其占有内存少,并发能力强,在同类型的网页服务器中表现较好。nginx可以在大多数unixlinuxos上编译运行,并有windows移植版。一般情况下,对于新建站点,建议使用最新稳定版作为生产版本。单个tomcat最大支持在线访问是500左右,要通知支持更多的访问量一个tomcat就没法做到了。在这里我们采用集群部署方式,使用多个tomcat,反向代理使用nginx。架构如下:准备工作apache-
 nginx,tomcat,apache的区别是什么May 15, 2023 pm 01:40 PM
1.Nginx和tomcat的区别nginx常用做静态内容服务和代理服务器,直接外来请求转发给后面的应用服务器(tomcat,Django等),tomcat更多用来做一个应用容器,让javawebapp泡在里面的东西。严格意义上来讲,Apache和nginx应该叫做HTTPServer,而tomcat是一个ApplicationServer是一个Servlet/JSO应用的容器。客户端通过HTTPServer访问服务器上存储的资源(HTML文件,图片文件等),HTTPServer是中只是把服务器
 nginx+tomcat怎么实现Windows系统下的负载均衡May 16, 2023 pm 01:28 PM
首先,安装两个tomcat,可以是同一个复制成两个,也可以下载两个不同版本的tomcat,我就是下载了两个不同版本的。(这是8.0版本的,随便找两个不是特别老的版本的就行)。然后启动两个tomcat,在启动前,先更改其中一个的端口号,使得两个tomcat启动时不会端口冲突,一个是本身的8080端口,一个是改成了9080端口。配好以后,打开cmd命令窗口,我的tomcat一个放在d:\software\apache-tomcat-8.5.24目录下,按照如下命令即可启动,启动成功会弹出另一个窗口,
 Java环境变量和Tomcat服务器怎么配置May 11, 2023 pm 08:49 PM
第一步:配置与系统一致的jdk环境变量(32位/64位)(1)官网下载jdk安装包:官网下载地址:根据自己的操作系统选择对应的安装包(一定要选择接受许可协议)(2)安装jdk:安装jdk选择安装目录安装过程中会出现两次安装提示。第一次是安装jdk,第二次是安装jre。建议两个都安装在同一个java文件夹中的不同文件夹中。(不能都安装在java文件夹的根目录下,jdk和jre安装在同一文件夹会出错)安装完成如下图所示(3)配置环境变量安装完jdk后配置环境变量计算机→属性→高级系统设置→高级→环境
 如何在SpringBoot中内嵌Tomcat并发容量May 11, 2023 pm 11:13 PM
发现并发容器问题对单接口进行6000线程压测,每个线程请求5次,线程在5秒内创建完毕,当进行一半的时候,已经出现了请求响应时间过大及其错误率达到了43%。这个并发容量对于配置比较好点的服务器相对来说有点弱。深入SpringBoot底层了解原因在SpringBoot官方文档中提到了关于元数据的配置可以看到,关于我们最常用的设置项目的端口的默认配置就在其中。默认内嵌Tomcat配置1、server.tomcat.accept-count:等待队列长度,当可分配的线程数全部用完之后,后续的请求将进入等
 SpringBoot部署到外部Tomcat无法注册到Nacos服务端如何解决May 13, 2023 pm 11:13 PM
事情经过近期做一个项目投标演示(POC)环境支持,需要集成Nacos服务端。考虑到现有项目中已经有了Nacos相关依赖,那还不简单?新建个服务端,配置几下重启不就搞定了吗?然而事情远没有想得这么简单。同样的代码在我本地IDE里运行就能注册成功,在演示环境Tomcat+War部署就不行了。经过远程Debug代码,发现Nacos客户端的线程都有启动,却没有注册成功。思路想到可能与Tomcat部署模式有关系,就去查了官方issue和StackOverFlowTheeventispublishedasp
 linux怎么查看tomcat运行状态Mar 22, 2023 am 09:34 AM
linux查看tomcat运行状态的方法:1、通过cd进入tomcat的bin目录下;2、执行“ps -ef|grep java”命令将进程显示出来;3、通过“tail -f catalina.out”命令实时查看tomcat运行日志即可。


Hot AI Tools

Undresser.AI Undress
AI-powered app for creating realistic nude photos

AI Clothes Remover
Online AI tool for removing clothes from photos.

Undress AI Tool
Undress images for free

Clothoff.io
AI clothes remover

AI Hentai Generator
Generate AI Hentai for free.

Hot Article
Hot Tools

SAP NetWeaver Server Adapter for Eclipse
Integrate Eclipse with SAP NetWeaver application server.

SublimeText3 Linux new version
SublimeText3 Linux latest version

MinGW - Minimalist GNU for Windows
This project is in the process of being migrated to osdn.net/projects/mingw, you can continue to follow us there. MinGW: A native Windows port of the GNU Compiler Collection (GCC), freely distributable import libraries and header files for building native Windows applications; includes extensions to the MSVC runtime to support C99 functionality. All MinGW software can run on 64-bit Windows platforms.

WebStorm Mac version
Useful JavaScript development tools

VSCode Windows 64-bit Download
A free and powerful IDE editor launched by Microsoft

