


As a WeChat developer using code or to implement functions such as event response, the basic configuration of WeChat development is an indispensable link. This article roughly outlines the development configuration process.
1. Log in to the WeChat public platform: Development ---> Basic Configuration

2. There is "Server Configuration" on the basic configuration page, and the default is not In the enabled state, we need to click "Modify Configuration" first to fill in the relevant items

3. Fill in the following project content

- URL: must start with http://, currently only Supports port 80, the server address must be an accessible and valid address (Note: Using the URL in this article as an example, I once saw a blog post filling in the URL address as http://tx.heivr.com/token, but in personal testing, the actual Unable to respond to events during development, modify the URL to a specific file to succeed );
- EncodingAESKey can be randomly generated;
-
token: WeChat particularly emphasizes that the filled in URL needs to respond to the token, so in index.php needs to be verified, the code is as follows:
<span> 1</span> <span>php
</span><span> 2</span><span>define</span>("TOKEN", "此处填写你设置的token值"<span>);
</span><span> 3</span><span> 4</span><span>$wechatObj</span> = <span>new</span><span> CallbackAPI;
</span><span> 5</span><span>$wechatObj</span>-><span>valid();
</span><span> 6</span><span> 7</span><span>class</span><span> CallbackAPI {
</span><span> 8</span><span> 9</span><span>/*</span><span>*
</span><span>10</span><span>     * 签名验证
</span><span>11</span><span>     * @return [type] [description]
</span><span>12</span><span>*/</span><span>13</span><span>public</span><span>function</span><span> valid() {
</span><span>14</span><span>$echoStr</span> = <span>$_GET</span>["echostr"<span>];
</span><span>15</span><span>$signature</span> = <span>$_GET</span>["signature"<span>];
</span><span>16</span><span>$timestamp</span> = <span>$_GET</span>["timestamp"<span>];
</span><span>17</span><span>$nonce</span> = <span>$_GET</span>["nonce"<span>];
</span><span>18</span><span>$token</span> =<span> TOKEN;
</span><span>19</span><span>//</span><span>将token、timestamp、nonce按字典序排序</span><span>20</span><span>$tmpArr</span> = <span>array</span>(<span>$token</span>, <span>$timestamp</span>, <span>$nonce</span><span>);
</span><span>21</span><span>sort</span>(<span>$tmpArr</span><span>);
</span><span>22</span><span>$tmpStr</span> = <span>implode</span>(<span>$tmpArr</span><span>);
</span><span>23</span><span>//</span><span>对tmpStr进行sha1加密</span><span>24</span><span>$tmpStr</span> = <span>sha1</span>(<span>$tmpStr</span><span>);
</span><span>25</span><span>if</span>(<span>$tmpStr</span> == <span>$signature</span><span>){
</span><span>26</span><span>header</span>('content-type:text'<span>);
</span><span>27</span><span>echo</span><span>$echoStr</span><span>;
</span><span>28</span><span>exit</span><span>;
</span><span>29</span><span>        }
</span><span>30</span><span>    }
</span><span>31</span> }
Run index.php in the browser. If the program is correct, you can see the returned string, and complete the verification at this time, and fill in the token in the code into the basic configuration In the corresponding position, click Submit. (Note: After submission, a "token verification failed" prompt may appear. If the code and parameters are checked correctly, you need to click a few more times to submit successfully)
4. After the submission is successful, Click the "Enable" button to enter the developer mode. After this mode is enabled, the functions ---> Some functions such as custom menus will not be available. If you want to use it, just click "Disable"

Hereby declare: The relevant articles are all compiled from the information and the problems encountered in the actual development situation after reading the blog posts of great experts. If you can find the original blog, you will definitely sign it. If you cannot find the original blog and quote the content, please contact the original blogger. Haihan
The above introduces (1) the basic configuration of WeChat public account development, including aspects of the content. I hope it will be helpful to friends who are interested in PHP tutorials.

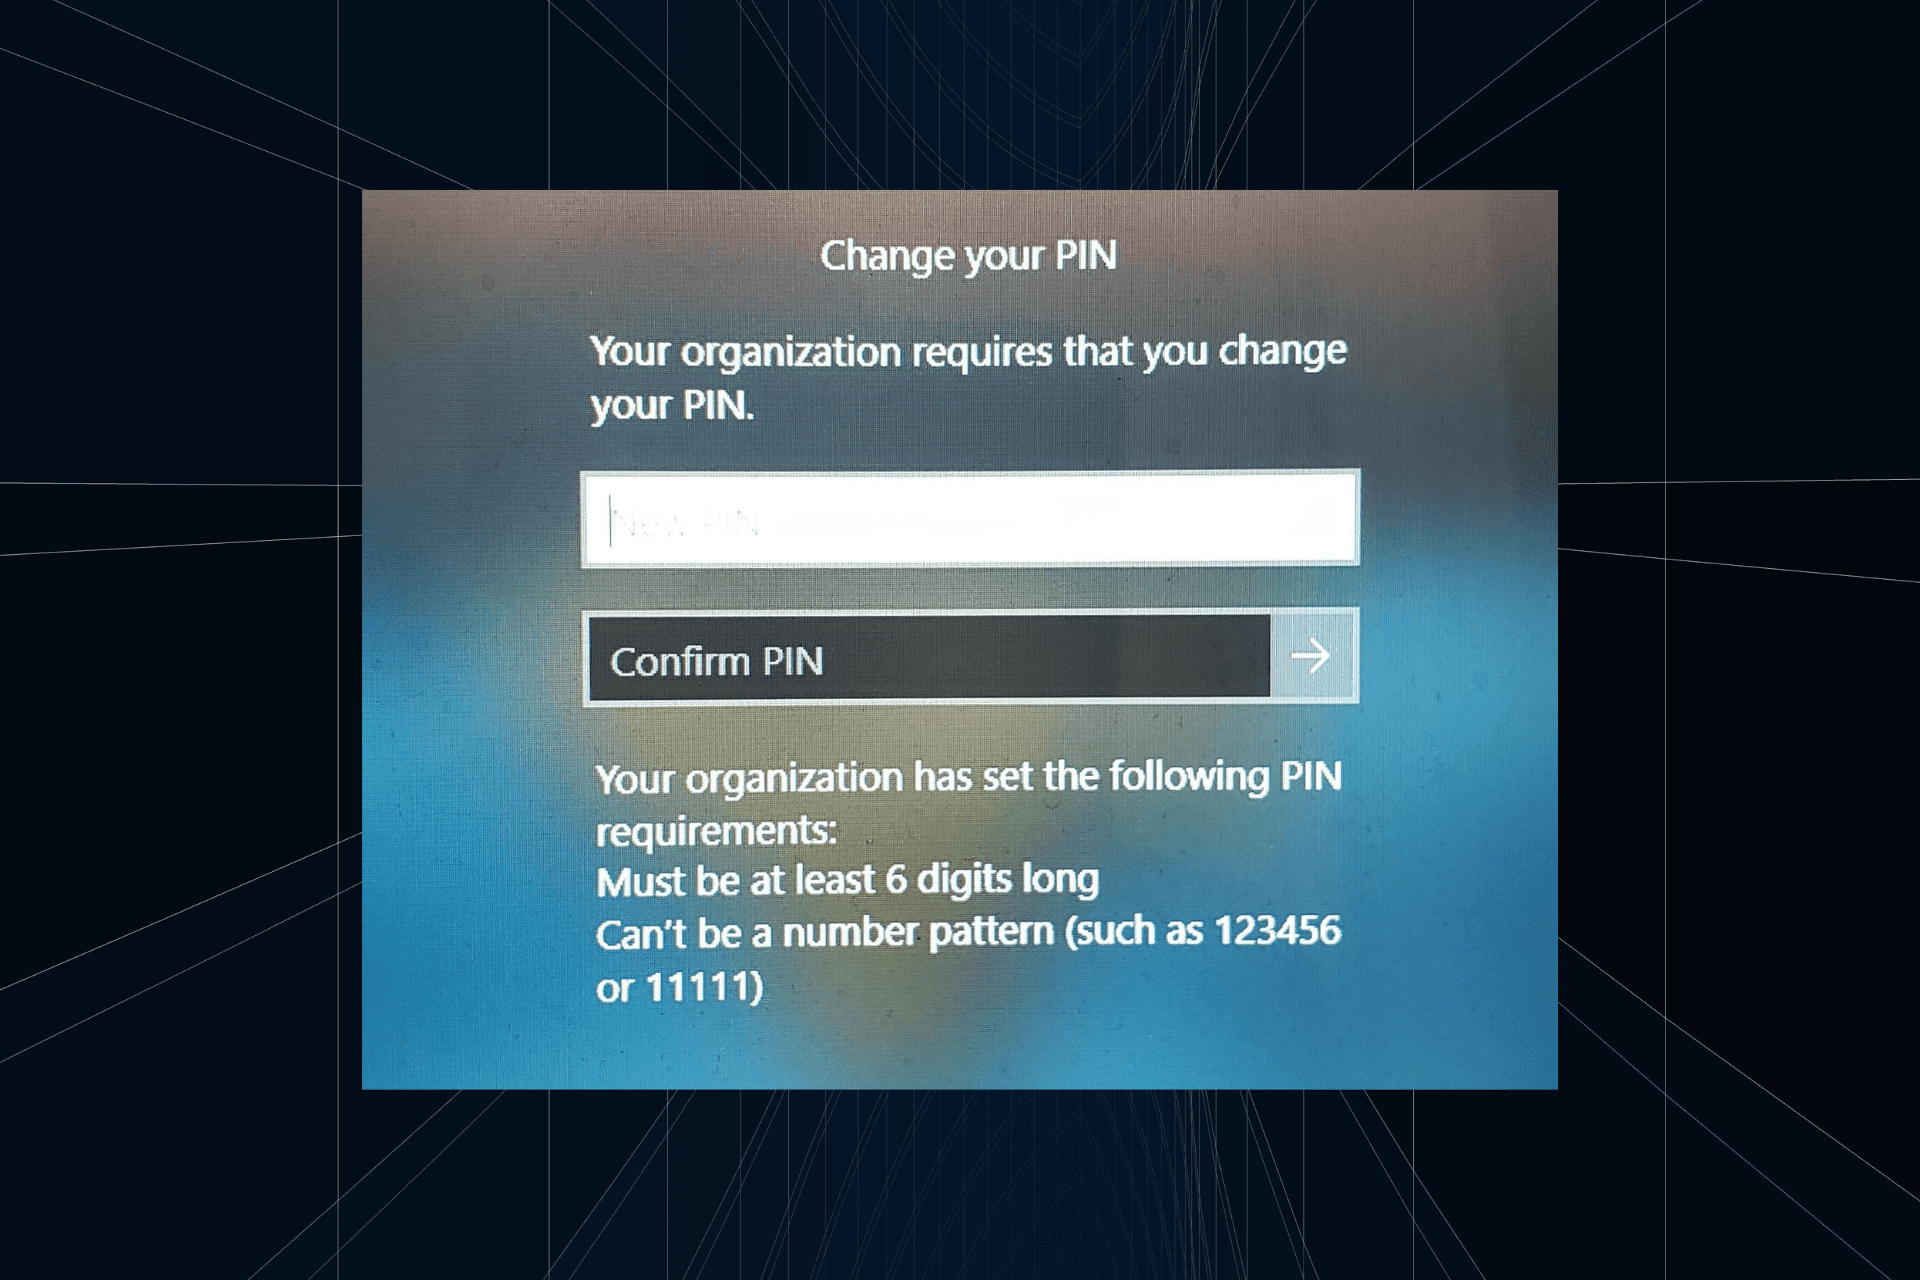 解决方法:您的组织要求您更改 PIN 码Oct 04, 2023 pm 05:45 PM
“你的组织要求你更改PIN消息”将显示在登录屏幕上。当在使用基于组织的帐户设置的电脑上达到PIN过期限制时,就会发生这种情况,在该电脑上,他们可以控制个人设备。但是,如果您使用个人帐户设置了Windows,则理想情况下不应显示错误消息。虽然情况并非总是如此。大多数遇到错误的用户使用个人帐户报告。为什么我的组织要求我在Windows11上更改我的PIN?可能是您的帐户与组织相关联,您的主要方法应该是验证这一点。联系域管理员会有所帮助!此外,配置错误的本地策略设置或不正确的注册表项也可能导致错误。即
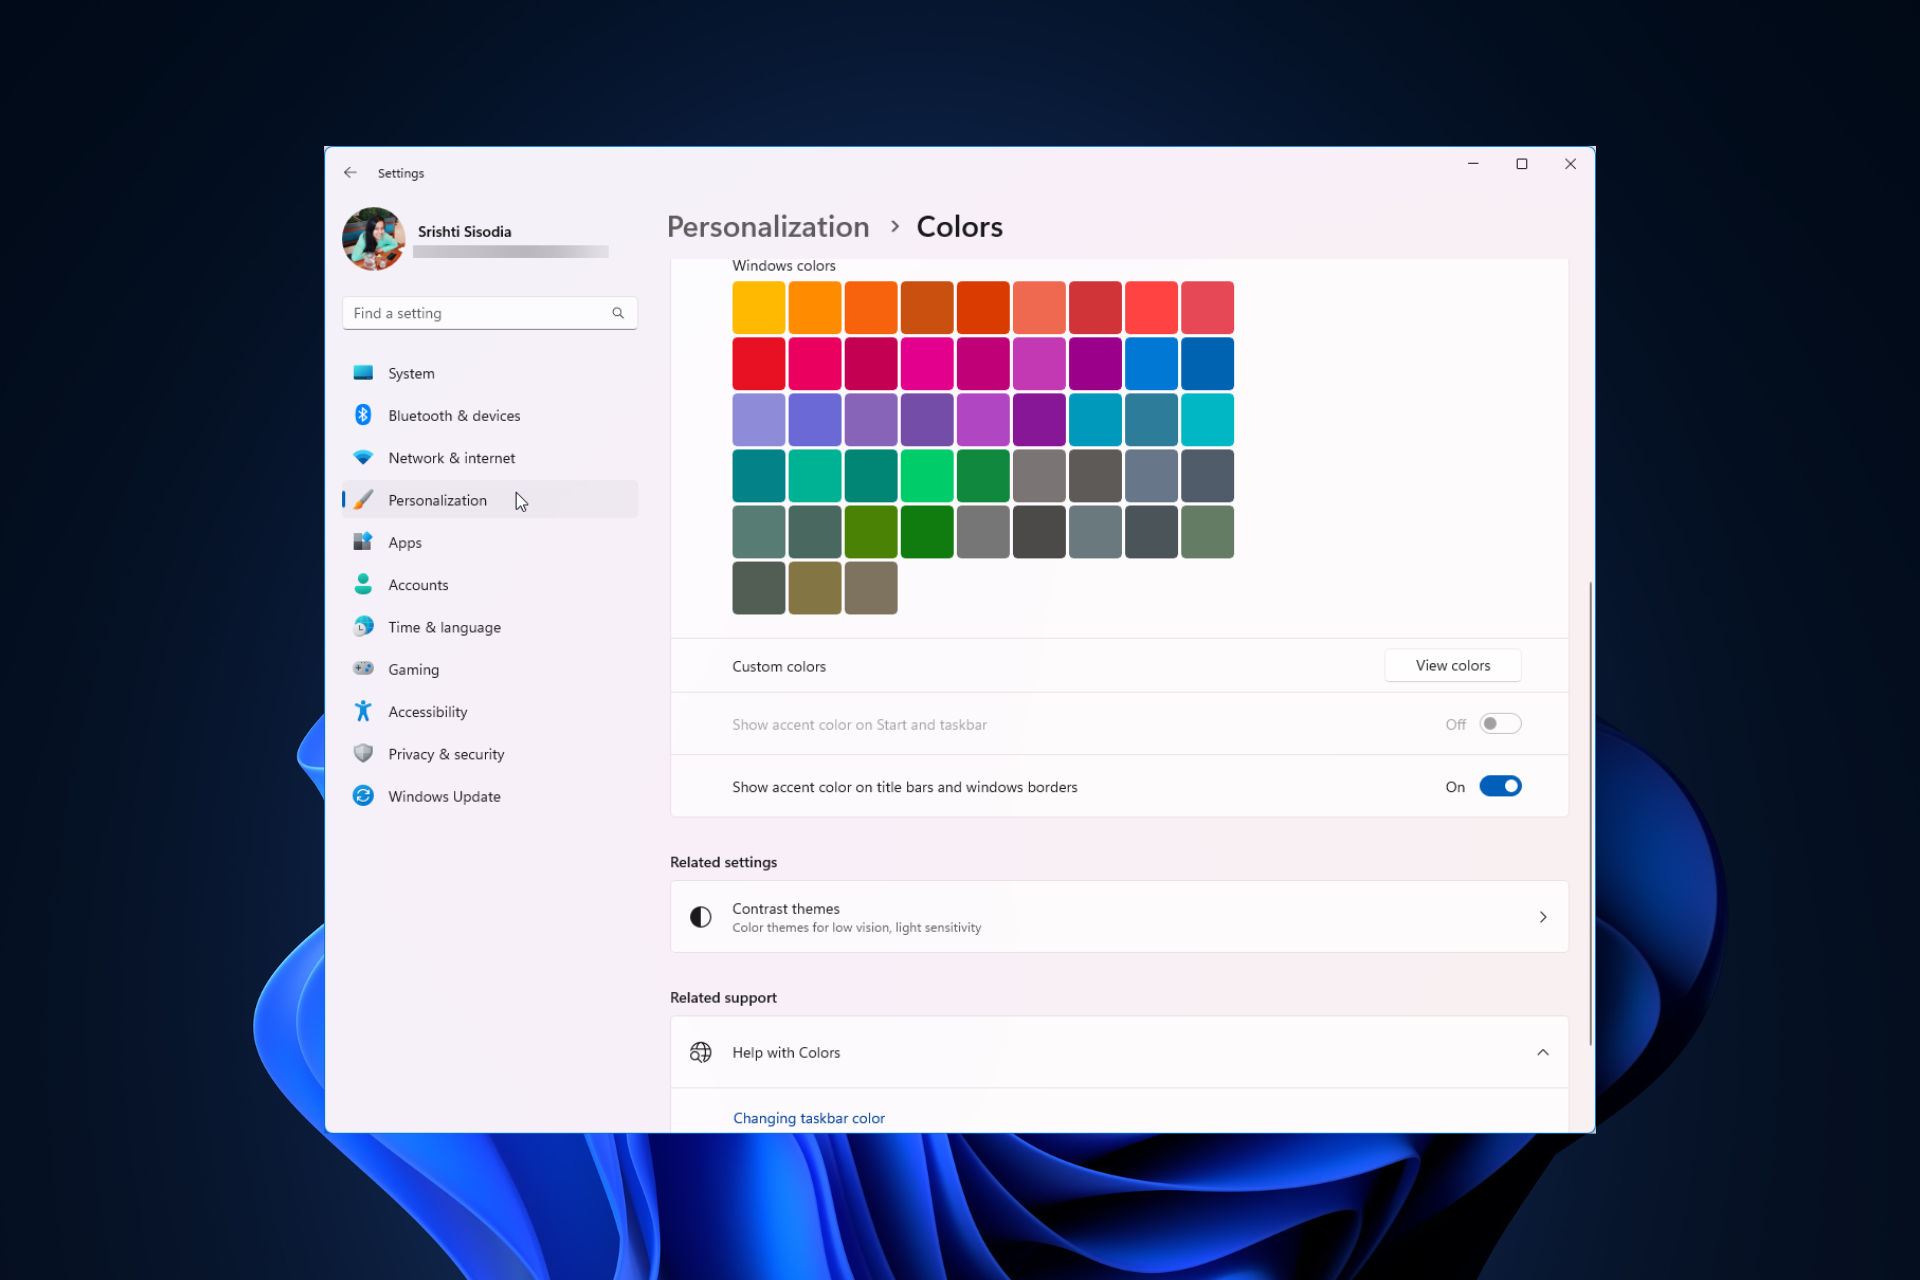 Windows 11 上调整窗口边框设置的方法:更改颜色和大小Sep 22, 2023 am 11:37 AM
Windows11将清新优雅的设计带到了最前沿;现代界面允许您个性化和更改最精细的细节,例如窗口边框。在本指南中,我们将讨论分步说明,以帮助您在Windows操作系统中创建反映您的风格的环境。如何更改窗口边框设置?按+打开“设置”应用。WindowsI转到个性化,然后单击颜色设置。颜色更改窗口边框设置窗口11“宽度=”643“高度=”500“>找到在标题栏和窗口边框上显示强调色选项,然后切换它旁边的开关。若要在“开始”菜单和任务栏上显示主题色,请打开“在开始”菜单和任务栏上显示主题
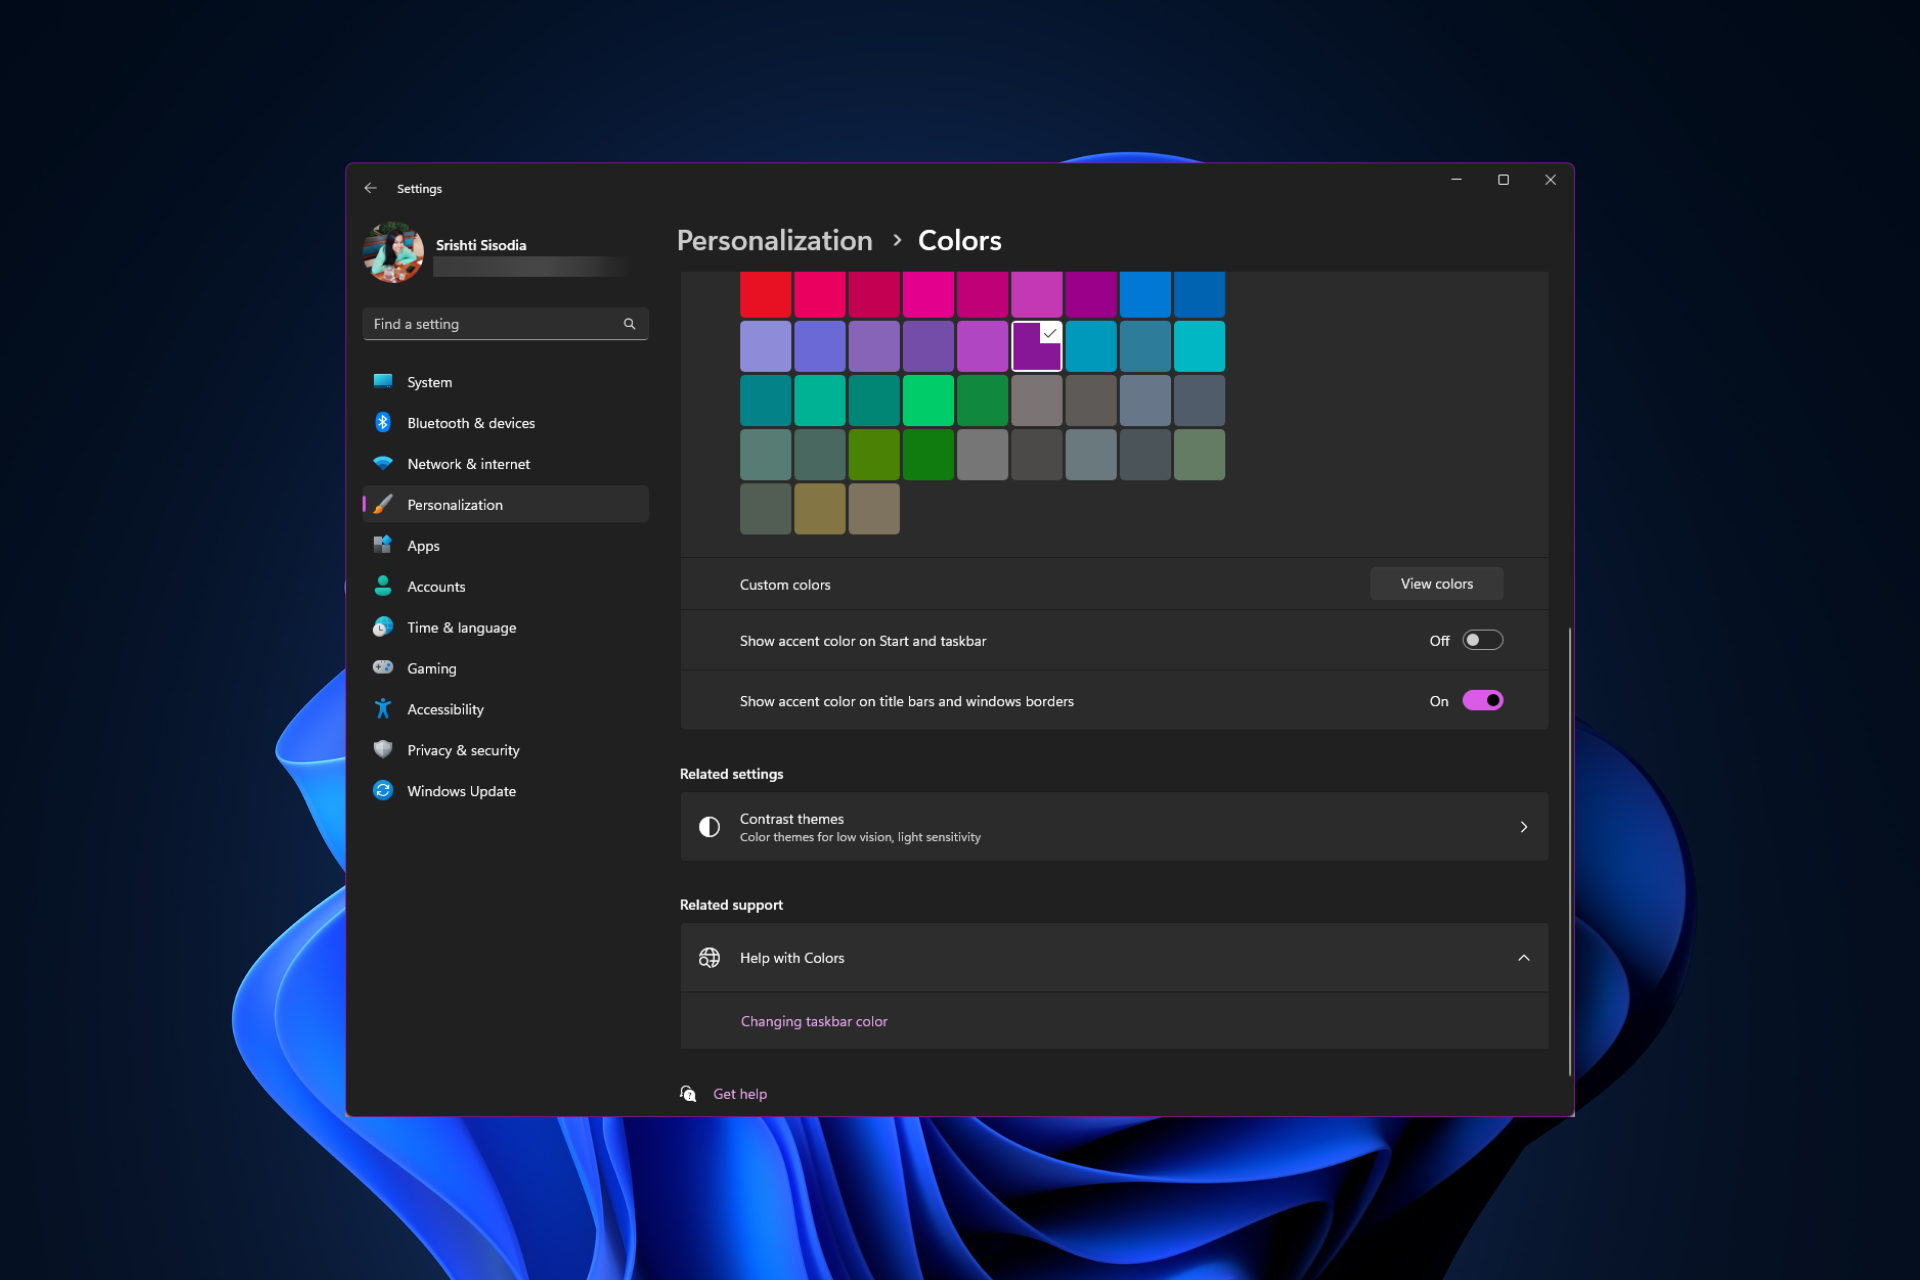 如何在 Windows 11 上更改标题栏颜色?Sep 14, 2023 pm 03:33 PM
默认情况下,Windows11上的标题栏颜色取决于您选择的深色/浅色主题。但是,您可以将其更改为所需的任何颜色。在本指南中,我们将讨论三种方法的分步说明,以更改它并个性化您的桌面体验,使其具有视觉吸引力。是否可以更改活动和非活动窗口的标题栏颜色?是的,您可以使用“设置”应用更改活动窗口的标题栏颜色,也可以使用注册表编辑器更改非活动窗口的标题栏颜色。若要了解这些步骤,请转到下一部分。如何在Windows11中更改标题栏的颜色?1.使用“设置”应用按+打开设置窗口。WindowsI前往“个性化”,然
 OOBELANGUAGE错误Windows 11 / 10修复中出现问题的问题Jul 16, 2023 pm 03:29 PM
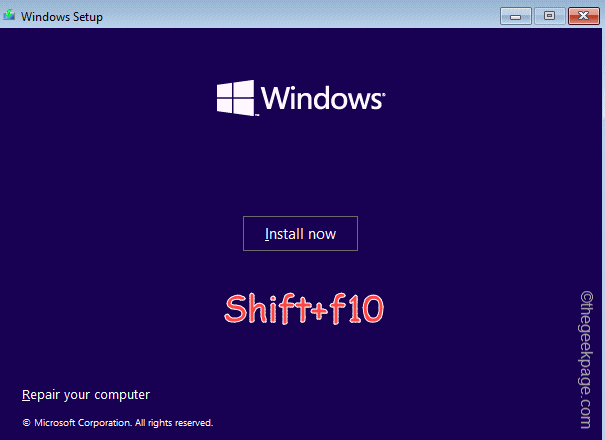
您是否在Windows安装程序页面上看到“出现问题”以及“OOBELANGUAGE”语句?Windows的安装有时会因此类错误而停止。OOBE表示开箱即用的体验。正如错误提示所表示的那样,这是与OOBE语言选择相关的问题。没有什么可担心的,你可以通过OOBE屏幕本身的漂亮注册表编辑来解决这个问题。快速修复–1.单击OOBE应用底部的“重试”按钮。这将继续进行该过程,而不会再打嗝。2.使用电源按钮强制关闭系统。系统重新启动后,OOBE应继续。3.断开系统与互联网的连接。在脱机模式下完成OOBE的所
 Windows 11 上启用或禁用任务栏缩略图预览的方法Sep 15, 2023 pm 03:57 PM
任务栏缩略图可能很有趣,但它们也可能分散注意力或烦人。考虑到您将鼠标悬停在该区域的频率,您可能无意中关闭了重要窗口几次。另一个缺点是它使用更多的系统资源,因此,如果您一直在寻找一种提高资源效率的方法,我们将向您展示如何禁用它。不过,如果您的硬件规格可以处理它并且您喜欢预览版,则可以启用它。如何在Windows11中启用任务栏缩略图预览?1.使用“设置”应用点击键并单击设置。Windows单击系统,然后选择关于。点击高级系统设置。导航到“高级”选项卡,然后选择“性能”下的“设置”。在“视觉效果”选
 Windows 11 上的显示缩放比例调整指南Sep 19, 2023 pm 06:45 PM
在Windows11上的显示缩放方面,我们都有不同的偏好。有些人喜欢大图标,有些人喜欢小图标。但是,我们都同意拥有正确的缩放比例很重要。字体缩放不良或图像过度缩放可能是工作时真正的生产力杀手,因此您需要知道如何对其进行自定义以充分利用系统功能。自定义缩放的优点:对于难以阅读屏幕上的文本的人来说,这是一个有用的功能。它可以帮助您一次在屏幕上查看更多内容。您可以创建仅适用于某些监视器和应用程序的自定义扩展配置文件。可以帮助提高低端硬件的性能。它使您可以更好地控制屏幕上的内容。如何在Windows11
 如何修复Windows服务器中的激活错误代码0xc004f069Jul 22, 2023 am 09:49 AM
Windows上的激活过程有时会突然转向显示包含此错误代码0xc004f069的错误消息。虽然激活过程已经联机,但一些运行WindowsServer的旧系统可能会遇到此问题。通过这些初步检查,如果这些检查不能帮助您激活系统,请跳转到主要解决方案以解决问题。解决方法–关闭错误消息和激活窗口。然后,重新启动计算机。再次从头开始重试Windows激活过程。修复1–从终端激活从cmd终端激活WindowsServerEdition系统。阶段–1检查Windows服务器版本您必须检查您使用的是哪种类型的W
![如何在 Windows 11 上隐藏和取消隐藏文件夹 [3 种方式]](https://img.php.cn/upload/article/000/887/227/169542942766265.jpg) 如何在 Windows 11 上隐藏和取消隐藏文件夹 [3 种方式]Sep 23, 2023 am 08:37 AM
如何在 Windows 11 上隐藏和取消隐藏文件夹 [3 种方式]Sep 23, 2023 am 08:37 AM隐藏文件夹是保持桌面井井有条的好方法。也许您想让您的个人文件或一些客户详细信息远离窥探。不管是什么,在必要时将它们收起来并取消隐藏的能力是一个很大的节省。简而言之,这些隐藏文件不会显示在主菜单中,但它们仍然可以访问。这非常简单,不应该花费您太多时间。如何在Windows11中隐藏文件夹?1.使用文件资源管理器打+键打开文件资源管理器。WindowsE找到要隐藏的文件夹,右键单击它,然后选择属性。导航到常规选项卡,选中隐藏框,单击应用,然后单击确定。在下一个对话框中,选中将更改应用于此文件夹,子文


Hot AI Tools

Undresser.AI Undress
AI-powered app for creating realistic nude photos

AI Clothes Remover
Online AI tool for removing clothes from photos.

Undress AI Tool
Undress images for free

Clothoff.io
AI clothes remover

AI Hentai Generator
Generate AI Hentai for free.

Hot Article
Hot Tools

Dreamweaver Mac version
Visual web development tools

SAP NetWeaver Server Adapter for Eclipse
Integrate Eclipse with SAP NetWeaver application server.

Atom editor mac version download
The most popular open source editor

VSCode Windows 64-bit Download
A free and powerful IDE editor launched by Microsoft

SublimeText3 Chinese version
Chinese version, very easy to use

