


1 Create a php user and user group, and download the php7 source code from GitHub
First create a user named php without login permission and a user group named php, and then go to GitHub to download the php7 source code package.
#######Create new php user and php group
[root@typecodes ~]# groupadd -r php && useradd -r -g php -s /bin/false -d /usr/local/php7 -M php
######Download the php7 installation package from GitHub
[root@typecodes ~]# wget -c --no-check-certificate -O php7-src-master.zip https://github.com/php/ php-src/archive/master.zip
######Start decompressing the php7 package
[root@typecodes ~]# unzip -q php7-src-master.zip && cd php-src-master
#### #Install the dependency packages needed to compile php7
[root@typecodes php-src-master]# yum -y install libxml2 libxml2-devel openssl openssl-devel curl-devel libjpeg-devel libpng-devel freetype-devel libmcrypt-devel
2 Configuration of PHP7 compilation parameters
After the preparations are completed, the formal configuration of the installation details of php7 begins.Note, you must first remove the comment text added after the backslash "" below! ! !
######Start generating configuration file
[root@typecodes php-src-master]# ./buildconf
buildconf: checking installation...
buildconf: autoconf version 2.69 (ok)
rebuilding aclocal.m4
rebuilding Configureurebuilding main/pHP_config.h.in
##### Start configuration
[root@typecodes pHP-SRC-MASTER]#./configure
🎜 🎜 🎜 🎜 🎜 🎜 🎜 🎜 🎜 🎜 🎜 🎜 🎜 🎜 🎜 🎜 🎜 🎜 🎜 🎜 🎜 🎜 🎜 🎜 🎜 🎜 🎜 🎜 🎜 🎜 🎜 🎜 🎜 🎜 🎜-” directory]🎜--exec-prefix=/usr/local/php7 🎜--bindir=/usr/local/php7/bin 🎜--sbindir=/usr/local/php7/sbin 🎜--includedir=/usr/local /php7/include 🎜--libdir=/usr/local/php7/lib/php 🎜--mandir=/usr/local/php7/php/man 🎜--with-config-file-path=/usr/local/ php7/etc with-mhash 🎜--with-openssl [PHP7 depends on the mysql library] 🎜--with-gd 🎜 --with-iconv 🎜--with-zlib 🎜--enable-zip 🎜--enable-inline-optimization 🎜--disable-debug 🎜--disable-rpath 🎜--enable-shared 🎜--enable-xml 🎜 --enable-bcmath 🎜--enable-shmop 🎜--enable-sysvsem 🎜--enable-mbregex 🎜--enable-mbstring 🎜--enable-ftp 🎜--enable-gd-native-ttf 🎜--enable- pcntl 🎜--enable-sockets 🎜--with-xmlrpc 🎜--enable-soap 🎜--without-pear 🎜--with-gettext 🎜--enable-session 🎜--with-curl Allow Curl extension] 🎜-with-JPEG-DIR 🎜-With-FreeType-DIR 🎜 --Nable -opcache = No [Use OPCACHE cache] 🎜 --nable-FPM 🎜-WITH-FPM-User = nginx [ php-fpm user]🎜--with-fpm-group=nginx Use /usr/local/php7 --exec-prefix=/usr/local/php7 --bindir=/usr/local/php7/bin --sbindir=/usr/local/php7/sbin --includedir=/usr/local /php7/include --libdir=/usr/local/php7/lib/php --mandir=/usr/local/php7/php/man --with-config-file-path=/usr/local/php7/etc
--with-mysql-sock=/var/run/mysql/mysql.sock --with-mcrypt=/usr/include --with-mhash --with-openssl --with-mysqli=shared,mysqlnd --with -pdo-mysql=shared,mysqlnd --with-gd --with-iconv --with-zlib --enable-zip --enable-inline-optimization --disable-debug --disable-rpath
--enable-shared --enable-xml --enable-bcmath --enable-shmop --enable-sysvsem --enable-mbregex --enable-mbstring --enable-ftp --enable-gd-native-ttf - -enable-pcntl --enable-sockets --with-xmlrpc --enable-soap --without-pear --with-gettext --enable-session --with-curl
--with-jpeg-dir --with-freetype-dir --enable-opcache=no --enable-fpm --with-fpm-user=nginx --with-fpm-group=nginx --without-gdbm - -disable-fileinfo🎜Error message: configure: error: mcrypt.h not found. Please reinstall libmcrypt🎜Solution: Download libmcrypt-2.5.8.tar.gz and then compile and install🎜Download address: http://sourceforge.net/ projects/mcrypt/files/Libmcrypt/🎜If you recompile libmcrypt, remember the installation directory, and then compile the php item --with-mcrypt=your libmcrypt installation directory🎜./configure --prefix=/usr/local/php7 --exec-prefix=/usr/local/php7 --bindir=/usr/local/php7/bin --sbindir=/usr/local/php7/sbin --includedir=/usr/local/php7/include --libdir=/usr/local/php7/lib/php --mandir=/usr/local/php7/php/man --with-config-file-path=/usr/local/php7/etc
--with-mysql-sock=/var/run/mysql/mysql.sock --with-mcrypt=/usr/local/libmcrytp/ --with-mhash --with-openssl --with-mysqli=mysqlnd --with-pdo-mysql=mysqlnd --with-gd --with-iconv --with-zlib --enable-inline-optimization --disable-debug --disable-rpath --enable-shared
--enable-xml --enable-bcmath --enable-shmop --enable-sysvsem --enable-mbregex --enable-mbstring --enable-ftp --enable-gd-native-ttf --enable-pcntl --enable-sockets --with-xmlrpc --enable-soap --without-pear --with-gettext --enable-session --with-curl --with-jpeg-dir
--with-freetype-dir --enable-opcache --enable-fpm --with-fpm-user=nginx --with-fpm-group=nginx --without-gdbm --disable-fileinfo
编译时遇到问题:Don't know how to define struct flock on this system, set --enable-opcache=no
解决方法:(我最终用这些方法还是没有解决)
一、yum groupinstall "Development Tools"。
二、编辑 /etc/ld.so.conf 加入/usr/local/lib,在执行ldconfig -v
提示:我在/usr/lib 看到libmysqlclient.so 所以在编辑/etc/ld.so.conf的时候,需要看一下,里面是否存在这个
3 开始编译和安装PHP7
相对编译安装MySQL的大量CPU和内存消耗,PHP7的编译安装轻松多了,整个过程大约1个小时左右。
在编译的时候,把--enable-opcache=no设为no,去掉了--enable-zip,所在安装完成之后,需要单独把这两个作为扩展安装
[root@typecodes php-src-master]# make clean && make && make install
如果遇到错误可参考:http://blog.chinaunix.net/uid-20776139-id-5421615.html
4 选做步骤:执行make test命令进行测试
这是一个非必需的操作步骤,执行make test命令。
有趣的一件事就是:在test期间,会和一个IP地址72.52.91.14建立tcp连接,它对应着php官网http://www.php.net。
5 查看编译成功后的PHP7安装目录
由于需要和MySQL进行通信,所以需要特别查看PHP7安装后的lib扩展库目录(/usr/local/php7/lib/php/extensions/no-debug-non-zts-20141001/)。需要确保至少存在mysqli.so、pdo_mysql.so这两个动态库文件。
6 开始设置PHP7的配置文件php.ini、php-fpm.conf、www.conf和php-fpm脚本
可以用编译后的配置文件复制到PHP7的配置目录(/usr/local/php7/etc/),推荐使用《PHP7中php.ini、php-fpm和www.conf的配置》文中整理的3个PHP7配置文件和php-fpm服务控制脚本。
#######方法一:直接使用编译后未经优化处理的配置
[root@typecodes php-src-master]# cp php.ini-production /usr/local/php7/etc/php.ini
[root@typecodes php-src-master]# cp /php-src-master/sapi/fpm/init.d.php-fpm /etc/init.d/php-fpm
[root@typecodes php-src-master]# cp /usr/local/php7/etc/php-fpm.conf.default /usr/local/php7/etc/php-fpm.conf
[root@typecodes php-src-master]# cp /usr/local/php7/etc/php-fpm.d/www.conf.default /usr/local/php7/etc/php-fpm.d/www.conf
#######方法二:使用https://typecodes.com/web/php7configure.html文中的配置
[root@typecodes php-src-master]# mv ~/php.ini /usr/local/php7/etc/php.ini && mv ~/php-fpm /etc/init.d/php-fpm
[root@typecodes php-src-master]# mv ~/php-fpm.conf /usr/local/php7/etc/php-fpm.conf && mv ~/www.conf /usr/local/php7/etc/php-fpm.d/www.conf
7 添加php的环境变量
将php编译生成的bin目录添加到当前Linux系统的环境变量中
[root@typecodes ~]# echo -e 'nexport PATH=/usr/local/php7/bin:/usr/local/php7/sbin:$PATHn' >> /etc/profile && source /etc/profile
8 设置PHP日志目录和php-fpm进程文件(php-fpm.sock)目录
其中,设置php-fpm进程目录的用户和用户组为nginx,并创建php会话session目录。
#######Set the PHP log directory and the directory of the running process ID file (php-fpm.sock) of php-fpm
[root@typecodes ~]# mkdir -p /var/log/php-fpm/ && mkdir -p /var/run/php-fpm && cd /var/run/ && chown -R nginx:nginx php-fpm
#######Modify the directory configuration of the session
[root@typecodes etc]# mkdir -p /var/lib/php/session
[root@typecodes etc]# chown -R nginx:nginx /var/lib/php
9 Set up PHP startup and test whether the configuration file is correct
######Configuration Start automatically at boot and add to host sysV service
[root@typecodes php-src-master]# chmod +x /etc/init.d/php-fpm
[root@typecodes php-src-master]# chkconfig --add php-fpm
[root@typecodes php-src-master]# chkconfig php-fpm on
######Test whether the PHP configuration file is correct and legal
[root@typecodes sbin]# php-fpm -t
[ 03-May-2015 17:50:04] NOTICE: configuration file /usr/local/php7/etc/php-fpm.conf test is successful
10 Start the php service
After completing the above operations, you can officially use php Served. The command to start the php process service is as follows:
[root@typecodes sbin]# service php-fpm start
Starting php-fpm done
11 Install opcache
Tutorial: http://blog.jjonline.cn/linux/135.html
Tutorial: http://blog.ich8.com/post/4142
Tutorial: http://my.oschina.net/u/919580/blog/406900 Practice has proven that this is available
Installation:
Linux
Install Zend Opcache (pecl Version):
Remove eaccelerator, xcache, apc:
yum remove php-eaccelerator php-xcache php-apcu
Skip if not used.
Upgrade the system:
yum update
Install Zend Opcache (pecl version)
yum install php-pecl-zendopcache PS: However, the php-pecl-zendopcache extension is still not found on centos7, so the following cannot be continued
Generated during installation The opcache configuration file is located in the default /etc/php.d directory:
opcache-default.blacklist
opcache.ini
This configuration file basically uses the recommended settings in the README, and only a few places need to be modified.
vi /etc/php.d/opcache.ini
Just modify and save the recommended configuration as follows:
opcache.memory_c>opcache.interned_strings_buffer=8
opcache.max_accelerated_files=4000
opcache.revalidate_freq=60
opcache.fast_shutdown= 1
opcache.enable_cli=1
There is no need to modify the php.ini configuration. Restart the Apache service to make it take effect:
service httpd restart
Check to see if it is started correctly:
php -v
The output result is similar to:
PHP 7 (cli) (built: Apr 11 2013 11:04:35)
Copyright (c) 1997-2013 The PHP Group
Zend Engine v2.4.0, Copyright (c) 1998-2013 Zend Technologies
with Zend OPcache v7.0.1 , Copyright (c) 1999-2013, by Zend Technologies
The above introduces the compilation and installation of PHP7 on CentOS 71, including the relevant aspects. I hope it will be helpful to friends who are interested in PHP tutorials.

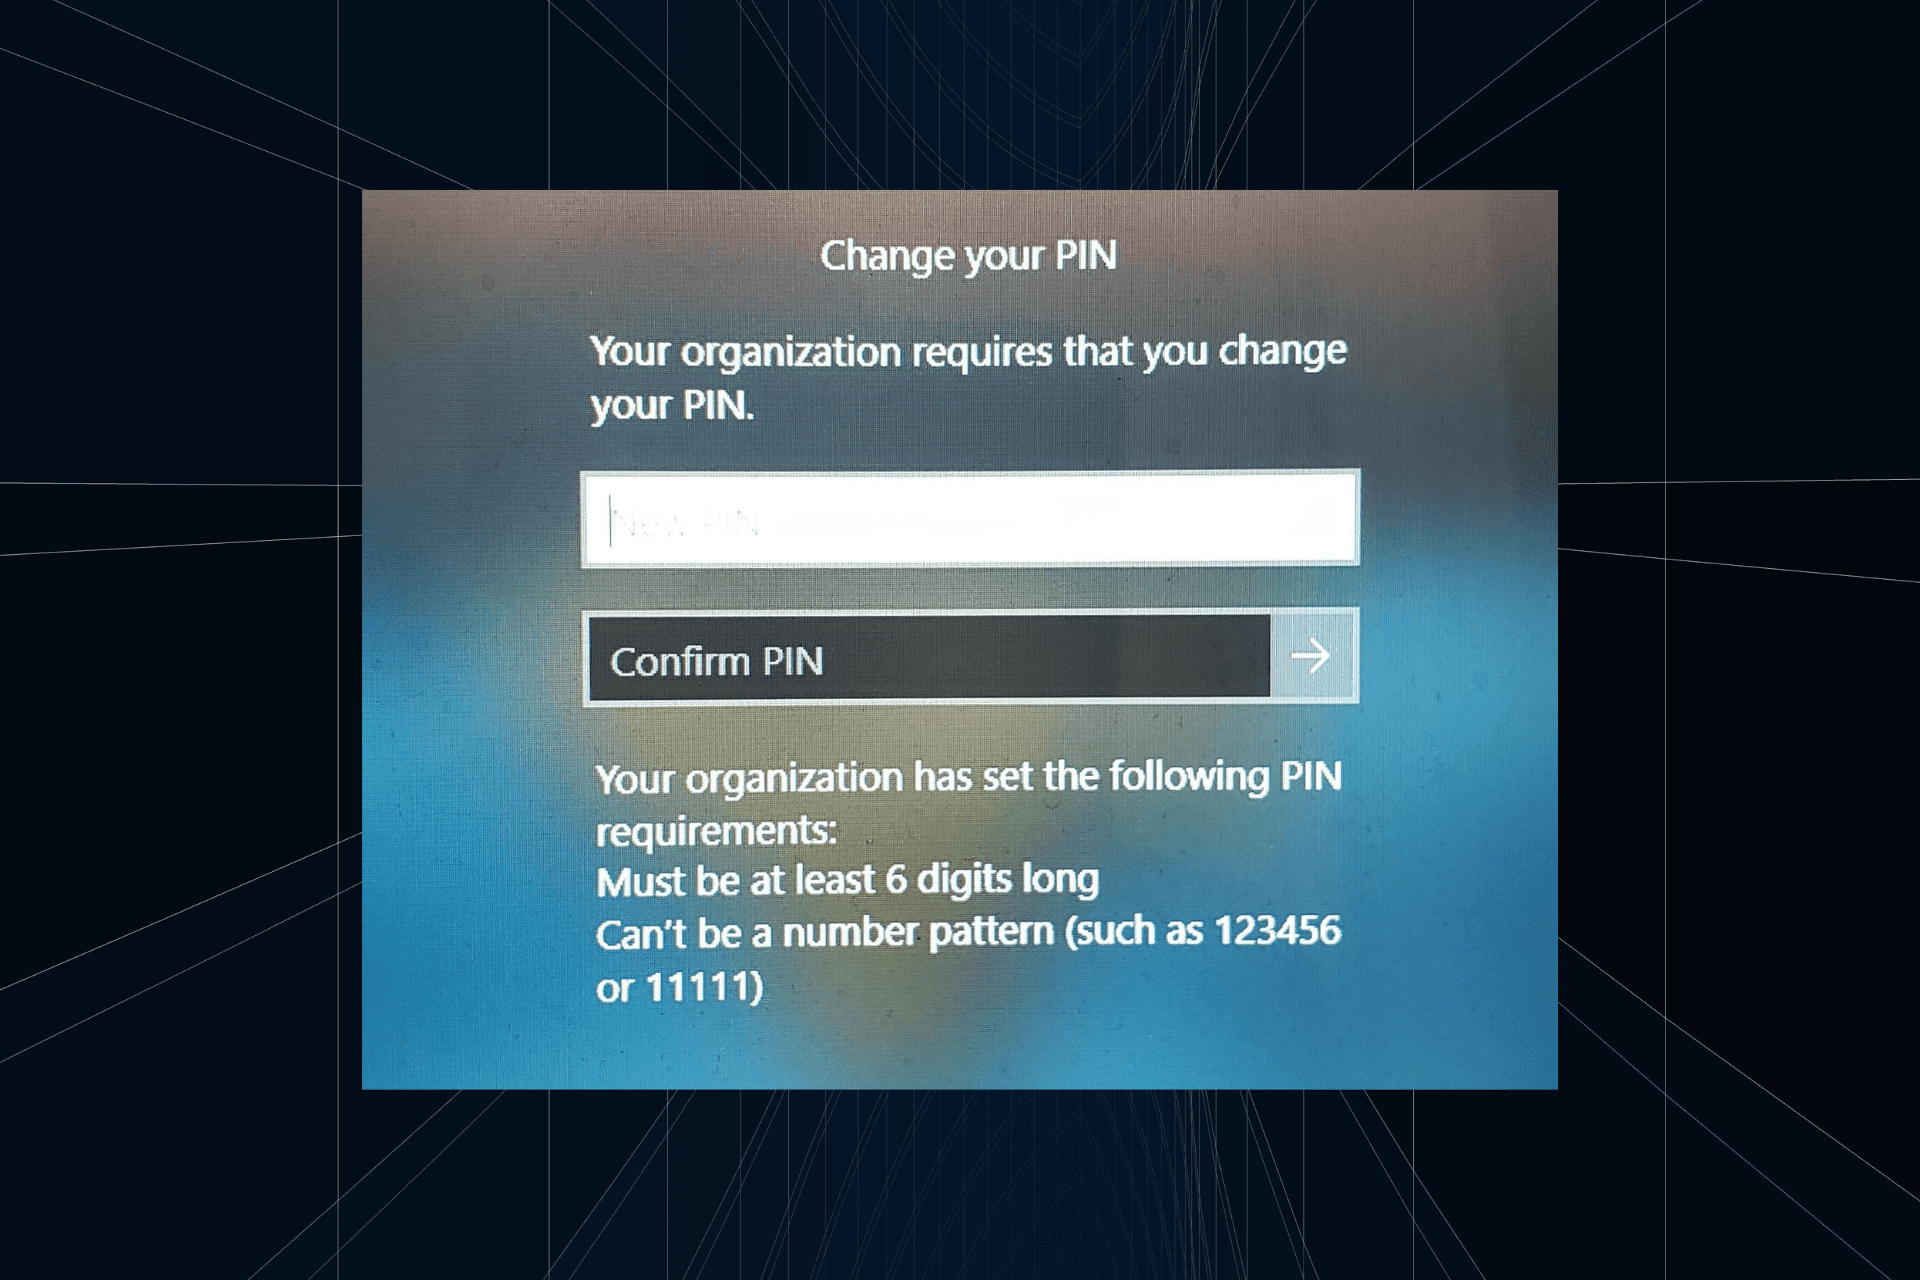 解决方法:您的组织要求您更改 PIN 码Oct 04, 2023 pm 05:45 PM
“你的组织要求你更改PIN消息”将显示在登录屏幕上。当在使用基于组织的帐户设置的电脑上达到PIN过期限制时,就会发生这种情况,在该电脑上,他们可以控制个人设备。但是,如果您使用个人帐户设置了Windows,则理想情况下不应显示错误消息。虽然情况并非总是如此。大多数遇到错误的用户使用个人帐户报告。为什么我的组织要求我在Windows11上更改我的PIN?可能是您的帐户与组织相关联,您的主要方法应该是验证这一点。联系域管理员会有所帮助!此外,配置错误的本地策略设置或不正确的注册表项也可能导致错误。即
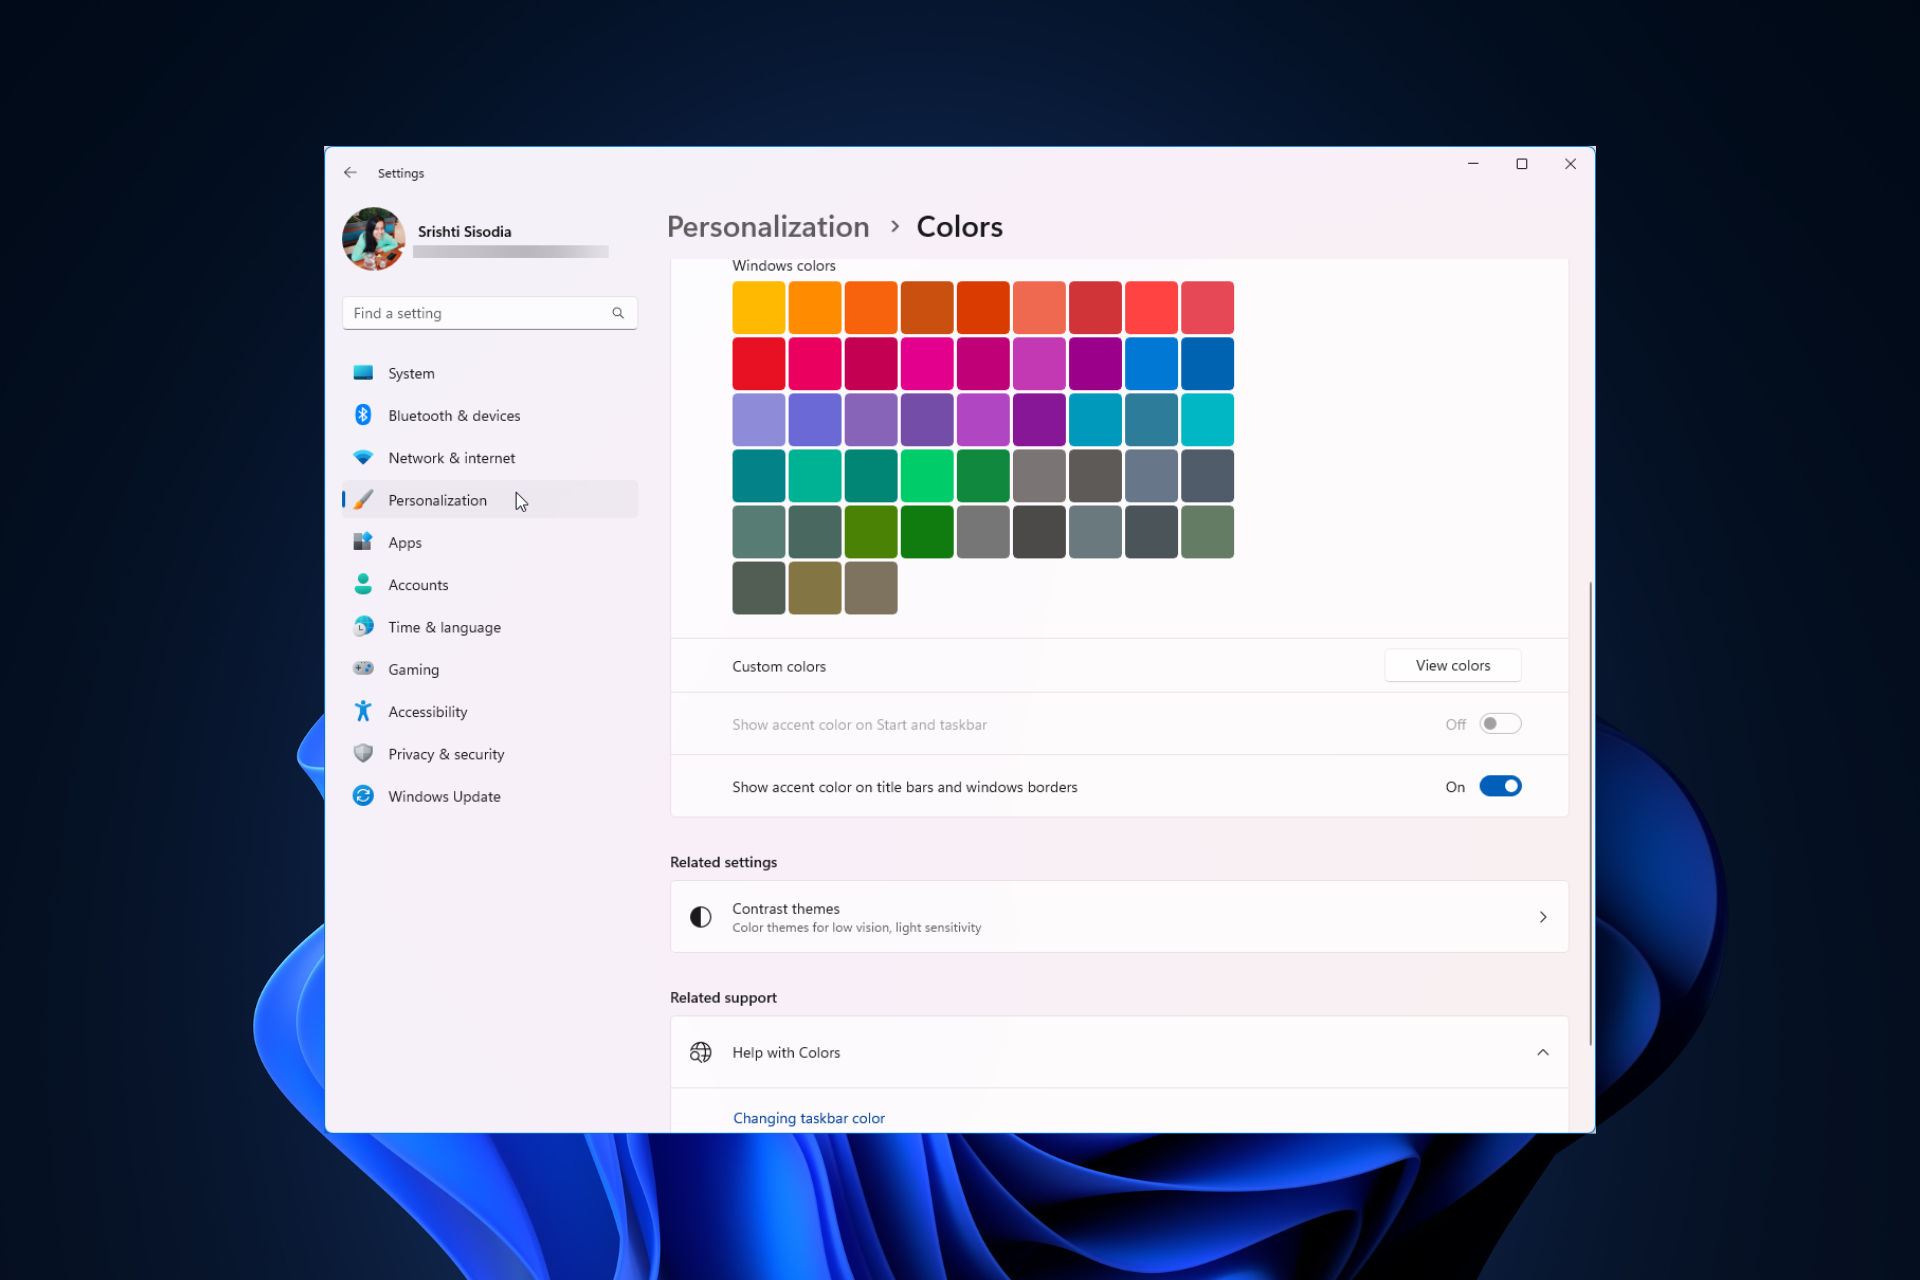 Windows 11 上调整窗口边框设置的方法:更改颜色和大小Sep 22, 2023 am 11:37 AM
Windows11将清新优雅的设计带到了最前沿;现代界面允许您个性化和更改最精细的细节,例如窗口边框。在本指南中,我们将讨论分步说明,以帮助您在Windows操作系统中创建反映您的风格的环境。如何更改窗口边框设置?按+打开“设置”应用。WindowsI转到个性化,然后单击颜色设置。颜色更改窗口边框设置窗口11“宽度=”643“高度=”500“>找到在标题栏和窗口边框上显示强调色选项,然后切换它旁边的开关。若要在“开始”菜单和任务栏上显示主题色,请打开“在开始”菜单和任务栏上显示主题
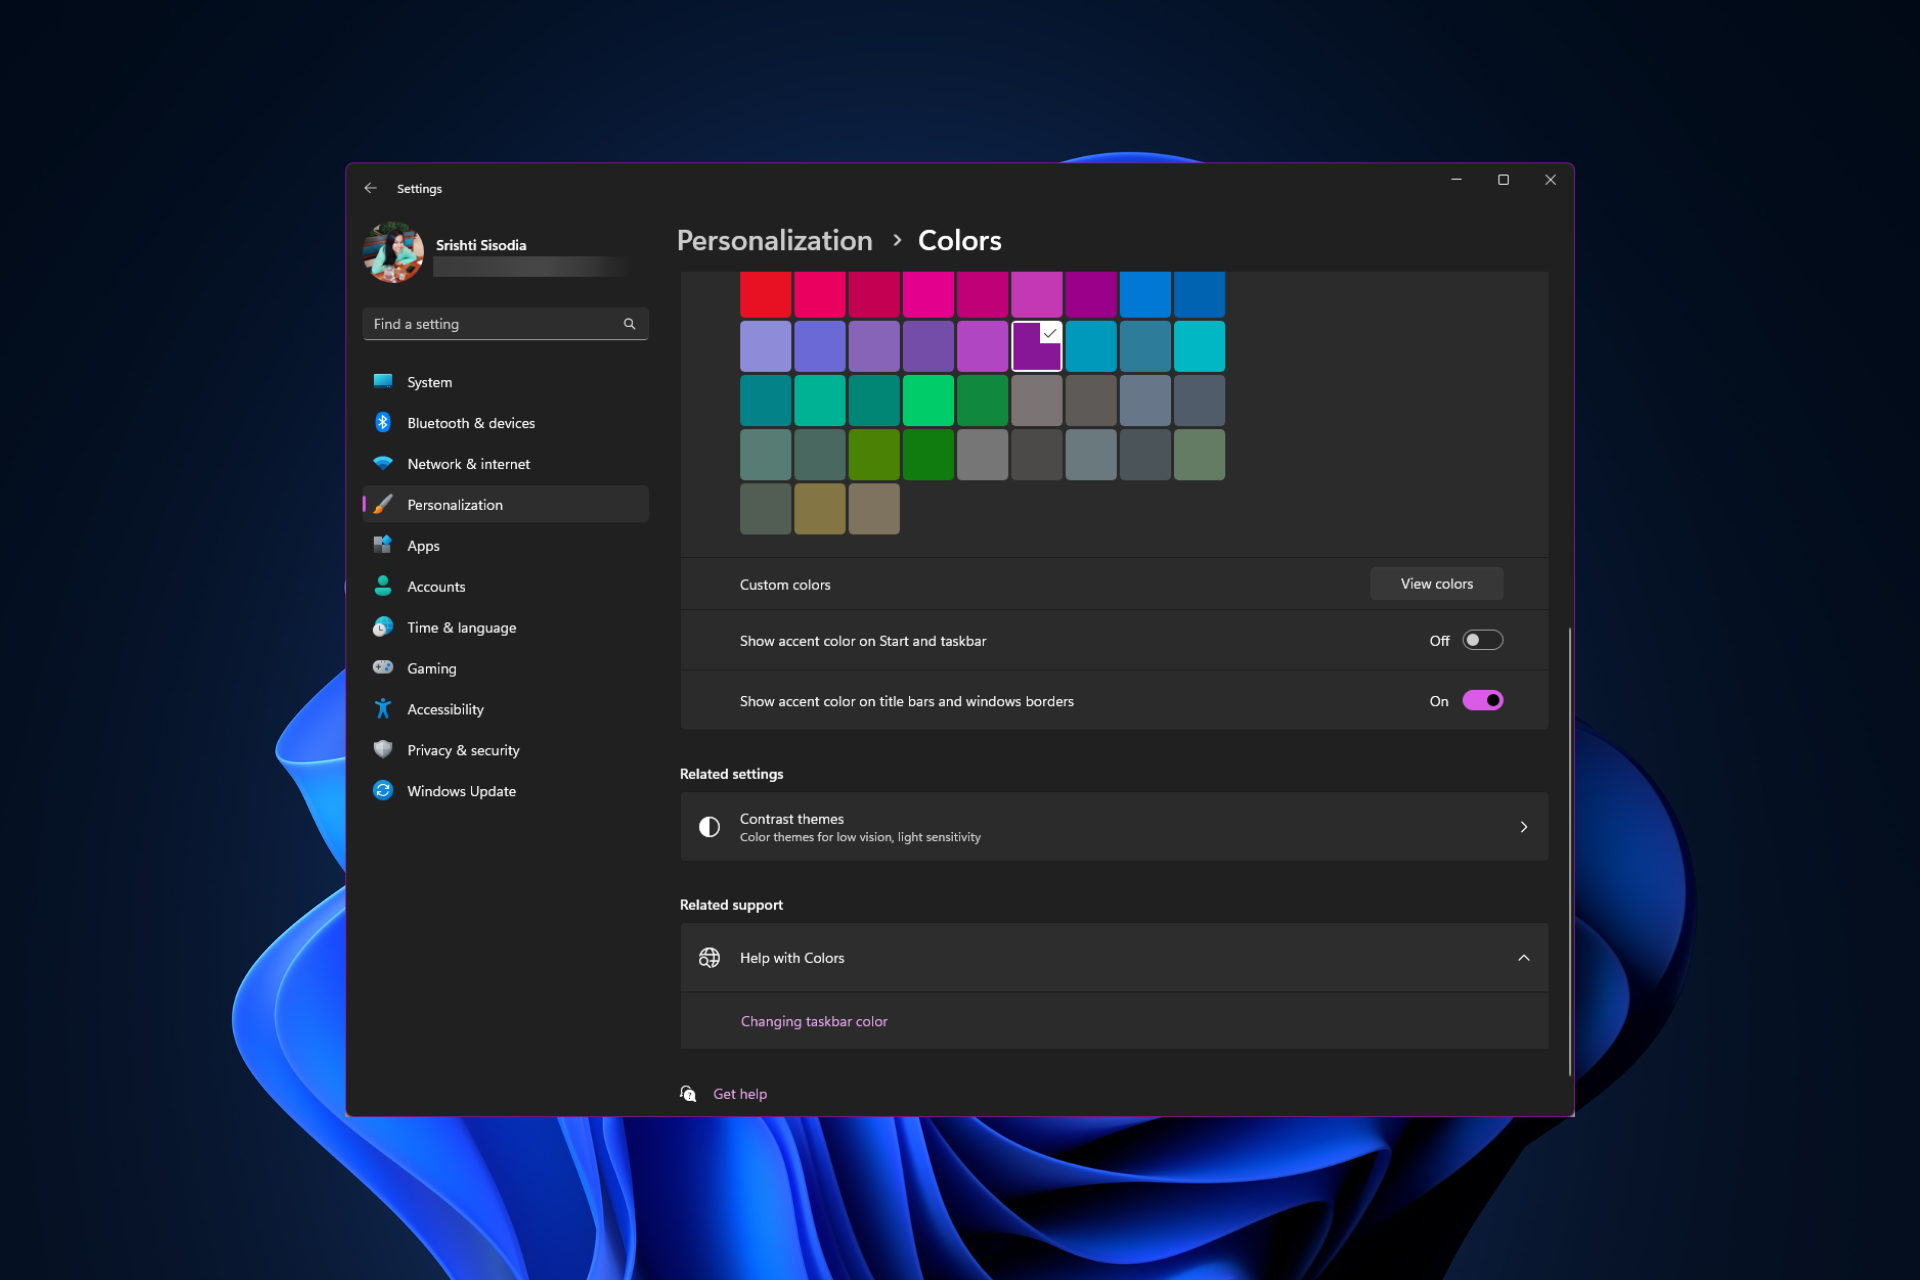 如何在 Windows 11 上更改标题栏颜色?Sep 14, 2023 pm 03:33 PM
默认情况下,Windows11上的标题栏颜色取决于您选择的深色/浅色主题。但是,您可以将其更改为所需的任何颜色。在本指南中,我们将讨论三种方法的分步说明,以更改它并个性化您的桌面体验,使其具有视觉吸引力。是否可以更改活动和非活动窗口的标题栏颜色?是的,您可以使用“设置”应用更改活动窗口的标题栏颜色,也可以使用注册表编辑器更改非活动窗口的标题栏颜色。若要了解这些步骤,请转到下一部分。如何在Windows11中更改标题栏的颜色?1.使用“设置”应用按+打开设置窗口。WindowsI前往“个性化”,然
 OOBELANGUAGE错误Windows 11 / 10修复中出现问题的问题Jul 16, 2023 pm 03:29 PM
您是否在Windows安装程序页面上看到“出现问题”以及“OOBELANGUAGE”语句?Windows的安装有时会因此类错误而停止。OOBE表示开箱即用的体验。正如错误提示所表示的那样,这是与OOBE语言选择相关的问题。没有什么可担心的,你可以通过OOBE屏幕本身的漂亮注册表编辑来解决这个问题。快速修复–1.单击OOBE应用底部的“重试”按钮。这将继续进行该过程,而不会再打嗝。2.使用电源按钮强制关闭系统。系统重新启动后,OOBE应继续。3.断开系统与互联网的连接。在脱机模式下完成OOBE的所
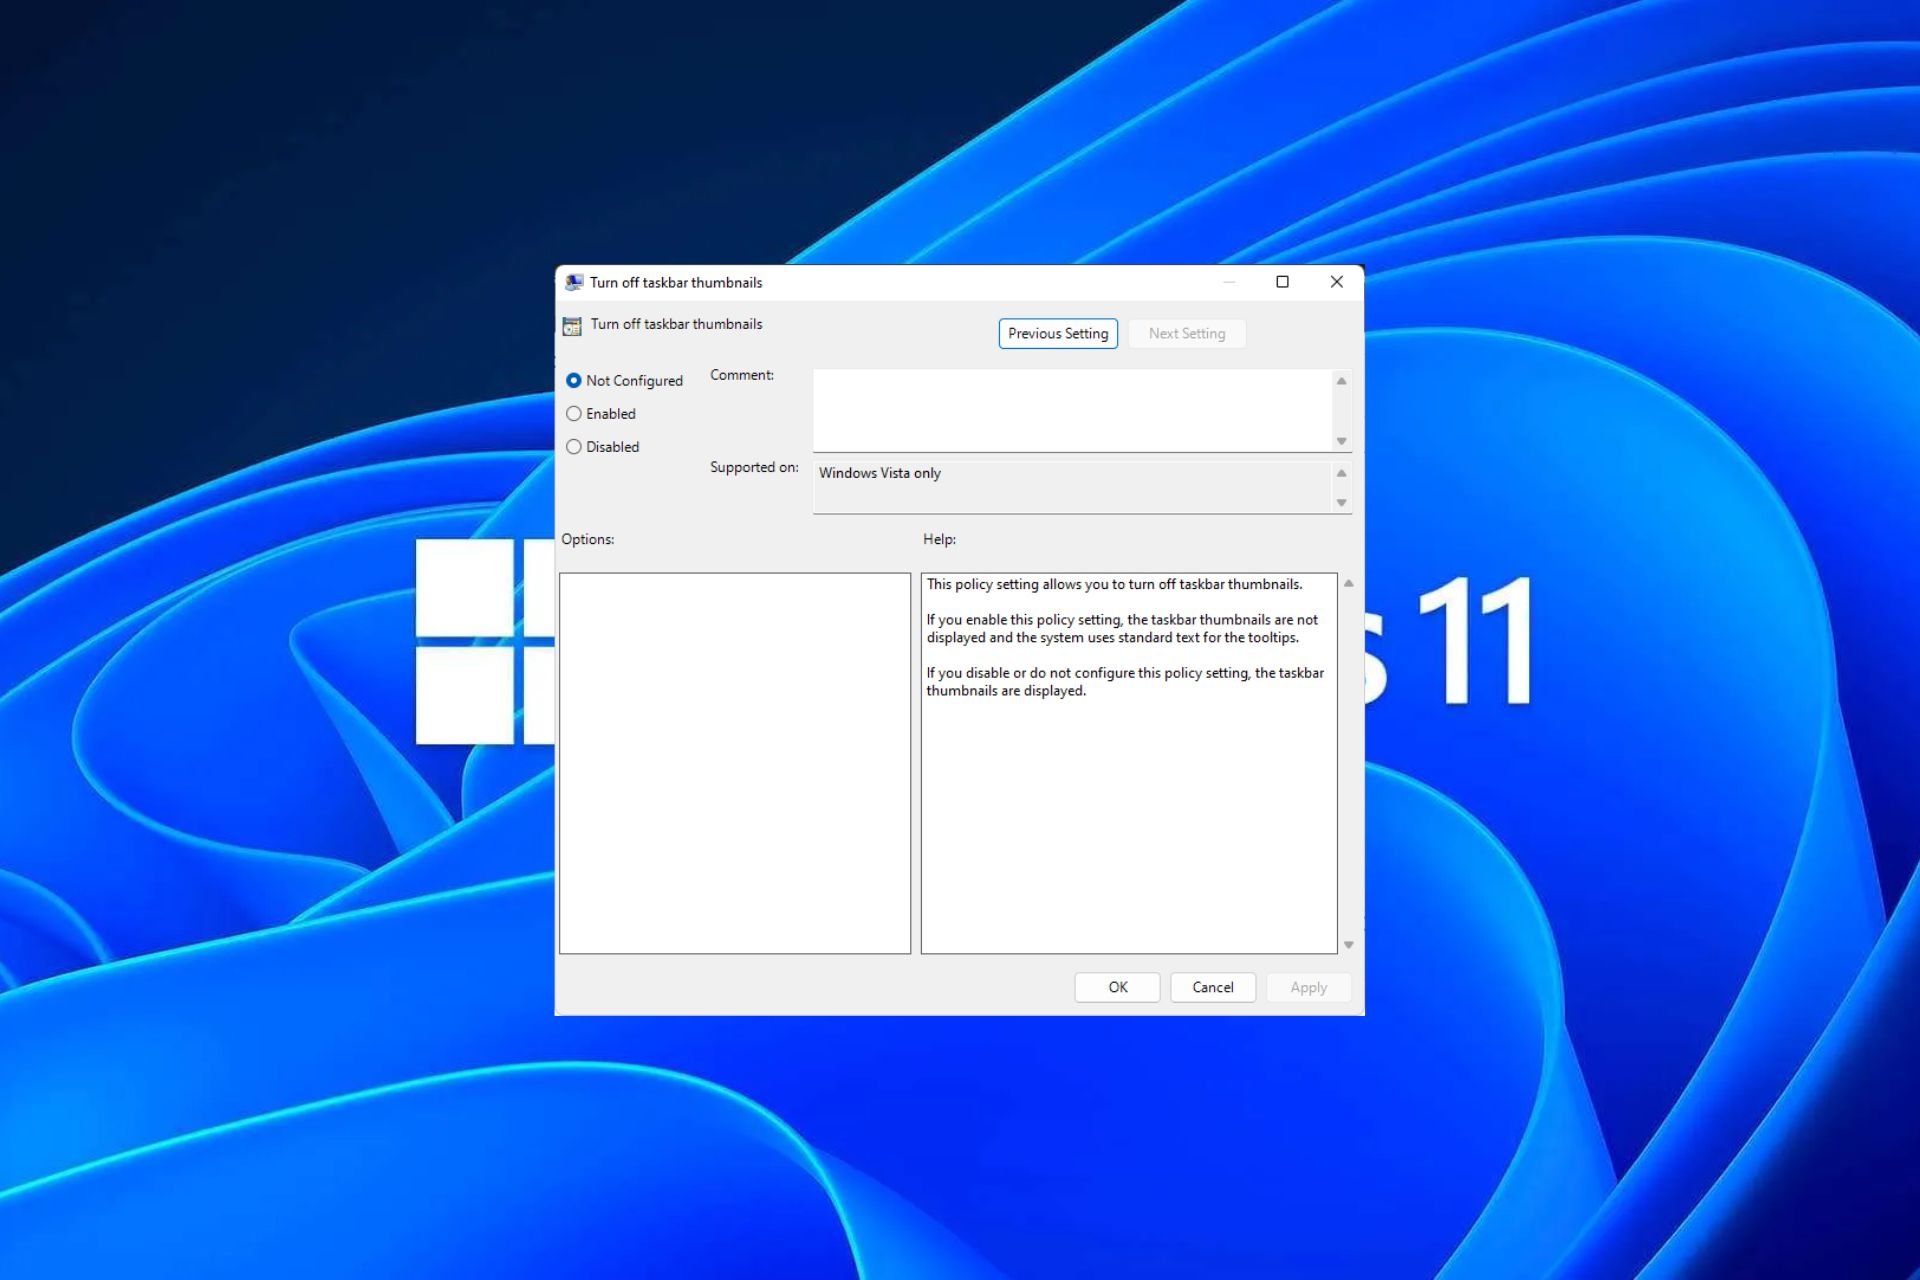 Windows 11 上启用或禁用任务栏缩略图预览的方法Sep 15, 2023 pm 03:57 PM
任务栏缩略图可能很有趣,但它们也可能分散注意力或烦人。考虑到您将鼠标悬停在该区域的频率,您可能无意中关闭了重要窗口几次。另一个缺点是它使用更多的系统资源,因此,如果您一直在寻找一种提高资源效率的方法,我们将向您展示如何禁用它。不过,如果您的硬件规格可以处理它并且您喜欢预览版,则可以启用它。如何在Windows11中启用任务栏缩略图预览?1.使用“设置”应用点击键并单击设置。Windows单击系统,然后选择关于。点击高级系统设置。导航到“高级”选项卡,然后选择“性能”下的“设置”。在“视觉效果”选
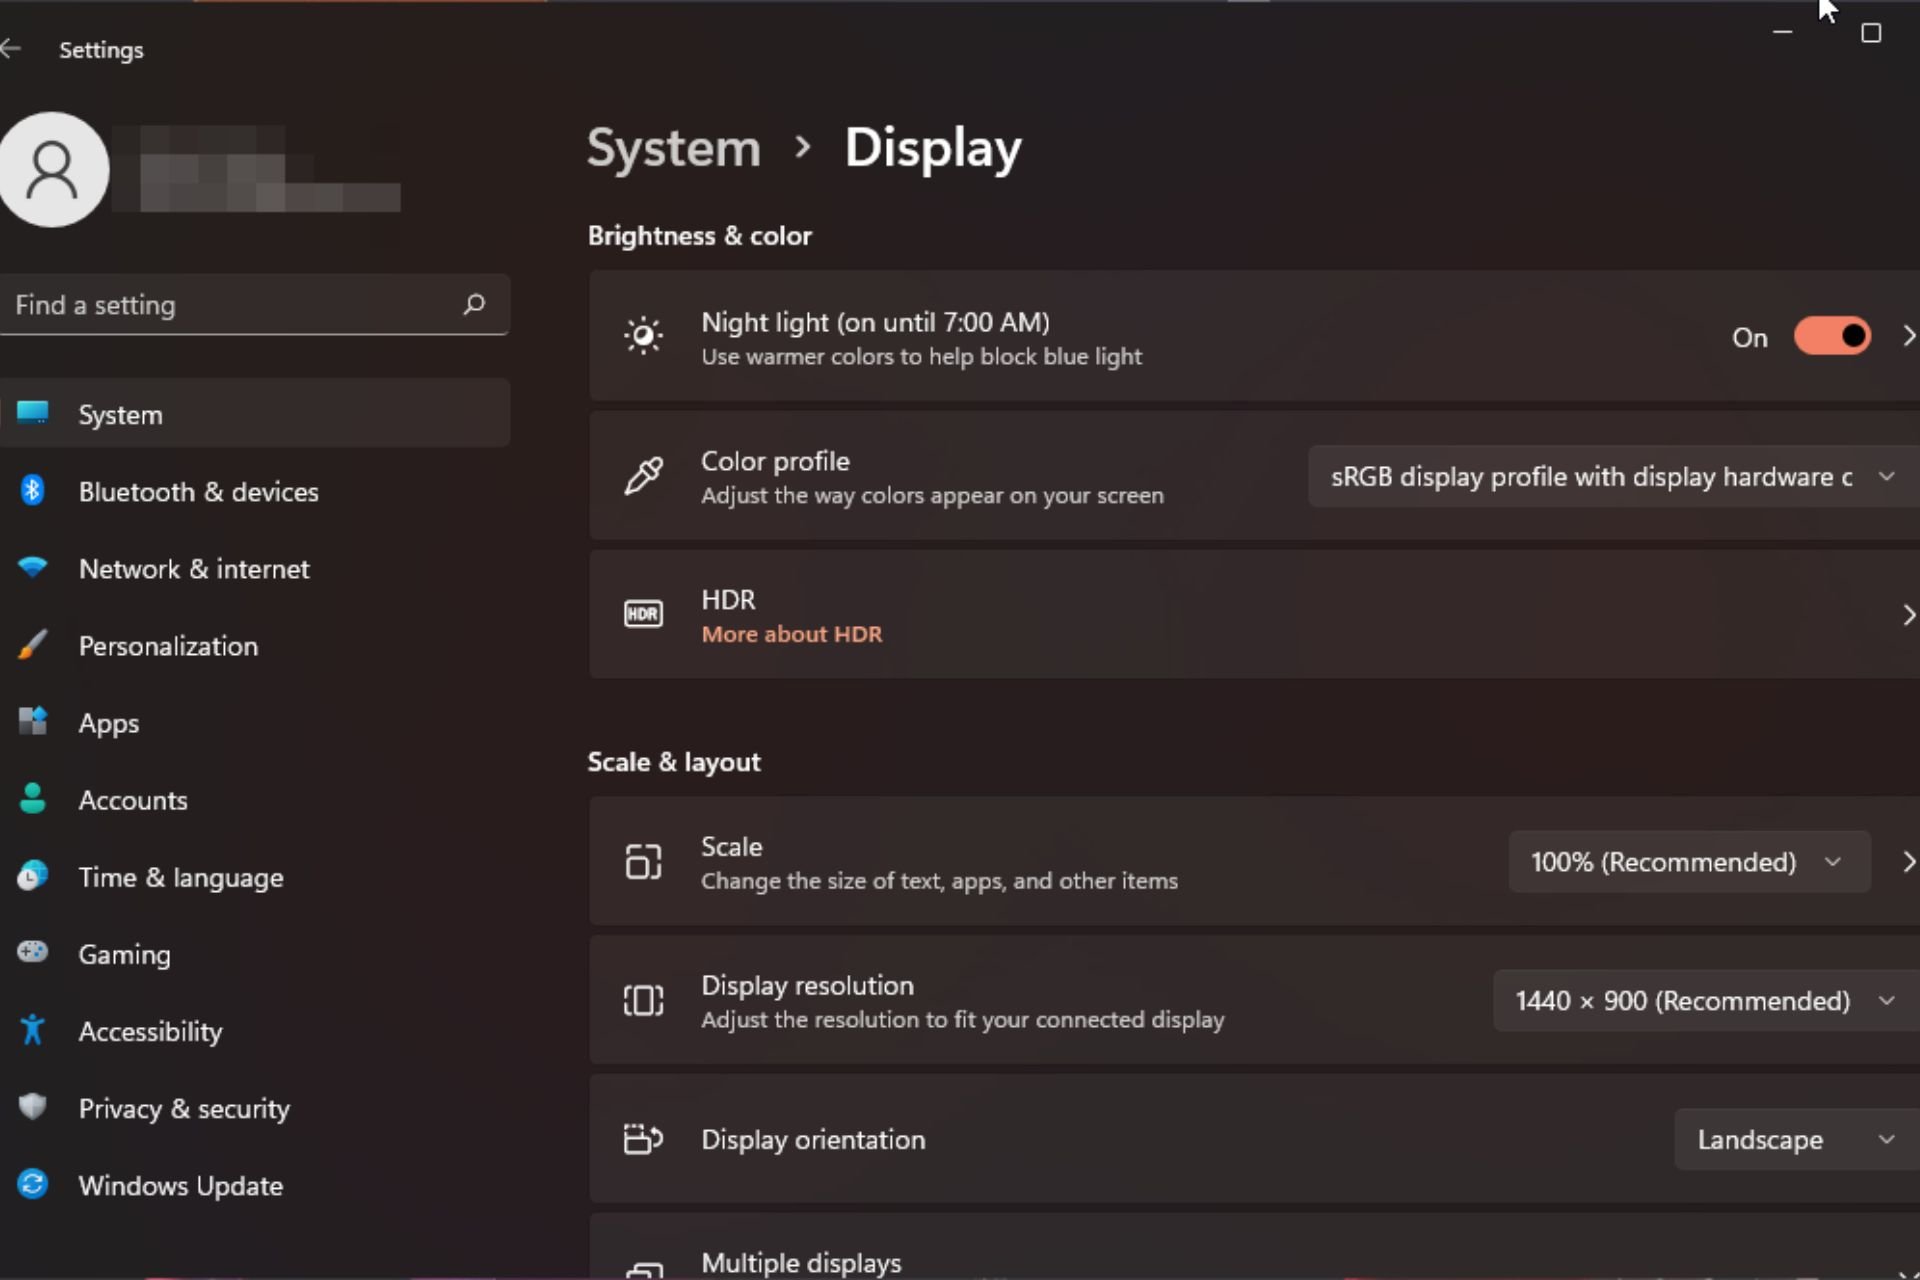 Windows 11 上的显示缩放比例调整指南Sep 19, 2023 pm 06:45 PM
在Windows11上的显示缩放方面,我们都有不同的偏好。有些人喜欢大图标,有些人喜欢小图标。但是,我们都同意拥有正确的缩放比例很重要。字体缩放不良或图像过度缩放可能是工作时真正的生产力杀手,因此您需要知道如何对其进行自定义以充分利用系统功能。自定义缩放的优点:对于难以阅读屏幕上的文本的人来说,这是一个有用的功能。它可以帮助您一次在屏幕上查看更多内容。您可以创建仅适用于某些监视器和应用程序的自定义扩展配置文件。可以帮助提高低端硬件的性能。它使您可以更好地控制屏幕上的内容。如何在Windows11
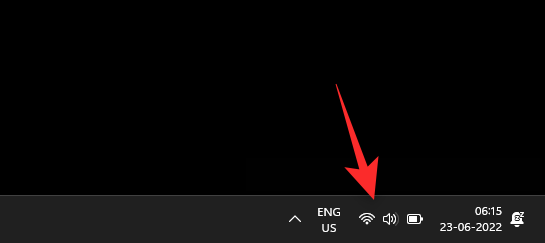 10种在 Windows 11 上调整亮度的方法Dec 18, 2023 pm 02:21 PM
屏幕亮度是使用现代计算设备不可或缺的一部分,尤其是当您长时间注视屏幕时。它可以帮助您减轻眼睛疲劳,提高易读性,并轻松有效地查看内容。但是,根据您的设置,有时很难管理亮度,尤其是在具有新UI更改的Windows11上。如果您在调整亮度时遇到问题,以下是在Windows11上管理亮度的所有方法。如何在Windows11上更改亮度[10种方式解释]单显示器用户可以使用以下方法在Windows11上调整亮度。这包括使用单个显示器的台式机系统以及笔记本电脑。让我们开始吧。方法1:使用操作中心操作中心是访问
 如何在Safari中关闭iPhone的隐私浏览身份验证?Nov 29, 2023 pm 11:21 PM
在iOS17中,Apple为其移动操作系统引入了几项新的隐私和安全功能,其中之一是能够要求对Safari中的隐私浏览选项卡进行二次身份验证。以下是它的工作原理以及如何将其关闭。在运行iOS17或iPadOS17的iPhone或iPad上,如果您在Safari浏览器中打开了任何“无痕浏览”标签页,然后退出会话或App,Apple的浏览器现在需要面容ID/触控ID认证或密码才能再次访问它们。换句话说,如果有人在解锁您的iPhone或iPad时拿到了它,他们仍然无法在不知道您的密码的情况下查看您的隐私


Hot AI Tools

Undresser.AI Undress
AI-powered app for creating realistic nude photos

AI Clothes Remover
Online AI tool for removing clothes from photos.

Undress AI Tool
Undress images for free

Clothoff.io
AI clothes remover

AI Hentai Generator
Generate AI Hentai for free.

Hot Article
Hot Tools

SAP NetWeaver Server Adapter for Eclipse
Integrate Eclipse with SAP NetWeaver application server.

EditPlus Chinese cracked version
Small size, syntax highlighting, does not support code prompt function

Dreamweaver Mac version
Visual web development tools

Notepad++7.3.1
Easy-to-use and free code editor

VSCode Windows 64-bit Download
A free and powerful IDE editor launched by Microsoft

