 Backend Development
 PHP Tutorial
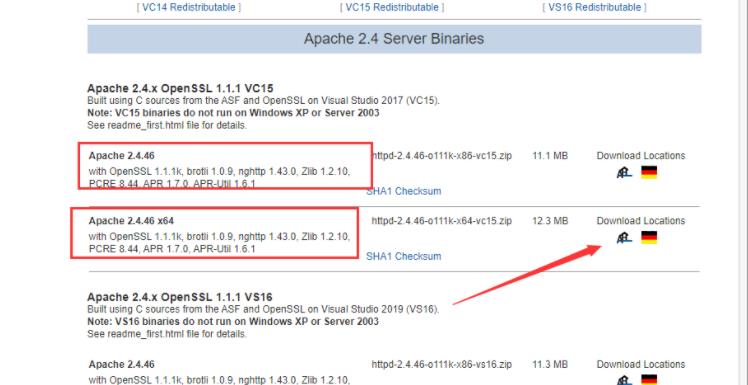
 Apache+MySQL+PHP development environment installation process under Mac apache download apache official website apache distribution
Max comes with its own Apache and PHP servers. No additional installation is required. This article will introduce the relevant configurations.
First: Apache
Enter in the terminal, the following command can start the Apache server:
 //启动
 sudo apachectl-k start
  //重新启动
 sudo apachectl -k restart
Verification:
Enter in the browser: http://127.0.0.1, it will show It Works! , which proves that the server has been started.
But since the default site is located in the system path, we modify it to a custom path. So you need to make relevant configurations
Modify the site location:
Enter
cd /etc/apache2/
 sudo vim httpd.conf // 会提示输入密码,输入后回车即可
 英文下输入: /DocumentRoot,查找,
 注:1:注意区分大小写;2:要修改两个地方,故要进行两次查找。
in the terminal. After the first search, modify:

After the second search, modify

After modification: wq Save and exit, restart the server, and place the html file in the customized path to access it.
Second: Configure the PHP server:
1: Enter the command in the terminal:
cd /etc/apache2 sudo vim httpd.conf 按 /php,进行搜索,把带有LoadModule php5…..这一行的#(注释符号)去掉即可。 
2: Enter the command in the terminal:
 cd /etc/
 sudo cp php.ini.default php.ini
Restart the server, place the php file under the customized site path, and you can access the php content.
Third: MySQ installation:
MySql download: http://dev.mysql.com/downloads/mysql/ MySqlWorkbench download: http://dev.mysql.com/downloads/workbench/
Just install it directly after downloading, just default all the way
MySql Configuration:
Open the terminal and enter:
vim ~/.bash_profile
Enter i to edit, then paste the following content
# mysql
alias mysql='/usr/local/mysql/bin/mysql'
alias mysqladmin='/usr/local/mysql/bin/mysqladmin'
# ls
alias ls='ls -G'
Press ESC key and enter: wq
In this way, you can enter mysql by directly typing mysql in the terminal. Enter exit to exit
Change the administrator password of MySql, enter in the terminal:
mysqladmin -u root password "root"

启动Mysql服务
     sudo /Library/StartupItems/MySQLCOM/MySQLCOM start
停止Mysql服务
     sudo /Library/StartupItems/MySQLCOM/MySQLCOM stop
重启Mysql服务
     sudo /Library/StartupItems/MySQLCOM/MySQLCOM restart
At this point, the installation and configuration of Apache+MySQL+PHP is completed.
Attachment: An introduction to the vim editor
vim has two modes:
1: Command mode
 shift+v -> 选中一行
 y -> 复制一行
 yy -> 复制当前行 (yank current line)
 p -> 在当前行的下一行复制粘贴的内容
 x -> 删除一个字符
 :wq -> 保存退出
 :q! -> 不保存退出
 i -> 进入编辑
 / -> 按/再输入字符可进行查找
2: Editing mode, you can edit the document directly, press the esc key to exit the editing mode
The above introduces the installation process of Apache+MySQL+PHP development environment under Mac, including the content of Apache and Mysql. I hope it will be helpful to friends who are interested in PHP tutorials.
 图文详解apache2.4+php8.0的安装配置方法Dec 06, 2022 pm 04:53 PM
本文给大家介绍如何安装apache2.4,以及如何配置php8.0,文中附有图文详细步骤,下面就带大家一起看看怎么安装配置apache2.4+php8.0吧~
 Linux apache怎么限制并发连接和下载速度May 12, 2023 am 10:49 AM
mod_limitipconn,这个是apache的一个非官方模块,根据同一个来源ip进行并发连接控制,bw_mod,它可以根据来源ip进行带宽限制,它们都是apache的第三方模块。1.下载:wgetwget2.安装#tar-zxvfmod_limitipconn-0.22.tar.gz#cdmod_limitipconn-0.22#vimakefile修改:apxs=“/usr/local/apache2/bin/apxs”#这里是自己apache的apxs路径,加载模块或者#/usr/lo
 apache版本怎么查看?Jun 14, 2019 pm 02:40 PM
查看apache版本的步骤:1、进入cmd命令窗口;2、使用cd命令切换到Apache的bin目录下,语法“cd bin目录路径”;3、执行“httpd -v”命令来查询版本信息,在输出结果中即可查看apache版本号。
 超细!Ubuntu20.04安装Apache+PHP8环境Mar 21, 2023 pm 03:26 PM
本篇文章给大家带来了关于PHP的相关知识,其中主要跟大家分享在Ubuntu20.04 LTS环境下安装Apache的全过程,并且针对其中可能出现的一些坑也会提供解决方案,感兴趣的朋友下面一起来看一下吧,希望对大家有帮助。
 nginx,tomcat,apache的区别是什么May 15, 2023 pm 01:40 PM
1.Nginx和tomcat的区别nginx常用做静态内容服务和代理服务器,直接外来请求转发给后面的应用服务器(tomcat,Django等),tomcat更多用来做一个应用容器,让javawebapp泡在里面的东西。严格意义上来讲,Apache和nginx应该叫做HTTPServer,而tomcat是一个ApplicationServer是一个Servlet/JSO应用的容器。客户端通过HTTPServer访问服务器上存储的资源(HTML文件,图片文件等),HTTPServer是中只是把服务器
 php站用iis乱码而apache没事怎么解决Mar 23, 2023 pm 02:48 PM
在使用 PHP 进行网站开发时,你可能会遇到字符编码问题。特别是在使用不同的 Web 服务器时,会发现 IIS 和 Apache 处理字符编码的方法不同。当你使用 IIS 时,可能会发现在使用 UTF-8 编码时出现了乱码现象;而在使用 Apache 时,一切正常,没有出现任何问题。这种情况应该怎么解决呢?
 如何在 RHEL 9/8 上设置高可用性 Apache(HTTP)集群Jun 09, 2023 pm 06:20 PM
Pacemaker是适用于类Linux操作系统的高可用性集群软件。Pacemaker被称为“集群资源管理器”,它通过在集群节点之间进行资源故障转移来提供集群资源的最大可用性。Pacemaker使用Corosync进行集群组件之间的心跳和内部通信,Corosync还负责集群中的投票选举(Quorum)。先决条件在我们开始之前,请确保你拥有以下内容:两台RHEL9/8服务器RedHat订阅或本地配置的仓库通过SSH访问两台服务器root或sudo权限互联网连接实验室详情:服务器1:node1.exa
 Linux下如何查看nginx、apache、mysql和php的编译参数May 14, 2023 pm 10:22 PM
快速查看服务器软件的编译参数:1、nginx编译参数:your_nginx_dir/sbin/nginx-v2、apache编译参数:catyour_apache_dir/build/config.nice3、php编译参数:your_php_dir/bin/php-i|grepconfigure4、mysql编译参数:catyour_mysql_dir/bin/mysqlbug|grepconfigure以下是完整的实操例子:查看获取nginx的编译参数:[root@www~]#/usr/lo


Hot AI Tools

Undresser.AI Undress
AI-powered app for creating realistic nude photos

AI Clothes Remover
Online AI tool for removing clothes from photos.

Undress AI Tool
Undress images for free

Clothoff.io
AI clothes remover

AI Hentai Generator
Generate AI Hentai for free.

Hot Article

Hot Tools

SublimeText3 Linux new version
SublimeText3 Linux latest version

EditPlus Chinese cracked version
Small size, syntax highlighting, does not support code prompt function

SublimeText3 Chinese version
Chinese version, very easy to use

Notepad++7.3.1
Easy-to-use and free code editor

Dreamweaver Mac version
Visual web development tools


