


I have frequently used jquery in my projects. This time I mainly learned to use extjs, but the existing tutorials are basically for 2.0, and the language used in the background is rarely C# under the .net platform. So I plan to use C# in the background for version 3.0 and record my learning process. I hope to discuss it with like-minded friends and make progress together.
The official website of extjs is http://www.extjs.com. The highest version currently is 3.0.2, but only version 3.0.0 has no download restrictions. You can click here to download version 3.0. The downloaded compressed package contains the compressed extjs library, libraries used for debugging, readable source code, documents and examples. Before you start, you might as well take a look at the examples in the examples folder to have a perceptual understanding of extjs. If you feel that the effects in the examples make you excited, then start the learning journey of extjs together.
First clarify the files we need to reference, including adpter/ext/ext-base-debug.js, ext-all-debug.js and the entire resource folder. Of course, in most cases, we also need ext-lang -zh_CN.js performs Chinese localization. The file is in the src/locale directory. Because it is the learning stage, we use the debug version. In actual projects, the compressed version should be used when publishing to reduce the file size. Next, we will adhere to the consistent tradition in the programming world and start our first Hello world program.
Create a new text file, change the file name to Hello.htm, open it with a text editor, and write the following code:
Hello.htm
daben.js is as follows:
/* *//*
*Author: Daben
*Date: 2009-10-10
*Version: 1.0
*/
Ext.onReady(function(){
Ext.MessageBox.alert("Message","Hello world");
});
Use ie or ff to open Hello.htm, you can see a pop-up dialog box, which is the same as the js alert dialog box, but much more beautiful.
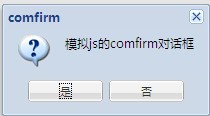
Let’s take a look at the code. In the HTML page, we first reference the relevant library files of extjs. Pay attention to the order of reference. Next, we reference our own js files. Let's take a brief look. Ext.onReady is triggered after the document is loaded. It has a parameter that is a function type, and the function is called when the event is triggered. Here we use an anonymous function. Of course, we can also define the function externally and pass the function name as a parameter. Ext.MessageBox.alert is a dialog box function that pops up a message. The first parameter is the title, and the second parameter is the content of the dialog box. There are also methods under the Ext.Message class to simulate the js prompt dialog box and the comfirm dialog box. Let's modify daben.js to see the effect of the confirm method:
Ext.onReady(function(){
//Ext.MessageBox.alert("Message","Hello world");
Ext.MessageBox.confirm("comfirm","Simulate js comfirm dialog box", function(btn){
alert("Clicked the "btn "button");
});
});
Just looking at the dialog box is not very interesting. In an actual web program, you need to submit data to the server and update the content on the page based on the server's response. Let's take a look at how extjs implements it. . In the example below, we will place an edit box and a button on the page. When the button is clicked, the server will convert the content entered in the edit box into uppercase and display it in a div on the page. Open vs2008, create a new web application ExtjsDemo, and delete the automatically added default.aspx file. Add our hello.htm and daben.js files and the extjs library we want to use. After the addition is completed, as shown in the figure:
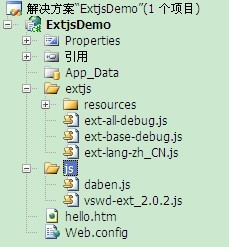
You can see that a vvswd- is added under the js directory. The file of ext_2.0.2.js can be downloaded from here. This file can implement vs2008’s smart prompt for the extjs library, which is convenient for programming (but I didn’t find one for version 3.0. If If any friend finds it, please send me a copy.) Let’s first look at Ext.Ajax.request, a function in extjs that implements communication with the server. This function accepts a json object as a parameter. This object has several commonly used attributes:
url: string type, indicating the request Address
params: parameters passed to the server segment when requesting, which can be objects, strings
method: request method, string type, "GET" or "POST", note that it must be capitalized
Success: Function type, the function that will be executed after the request is successful. The function has one parameter, which is an XMLHttpRequest object containing the server-side response data
Failure: Function type, the function that will be executed after the request fails. The function has one The parameter is an XMLHttpRequest object containing server-side response data
callback: function type, which will be executed regardless of the result of the request
Okay, let’s take a look at how extjs interacts with the server. First make the following changes to our hello.htm page:
body>
Then we change our daben.js file. The code after the change is as follows:
///
/** //*
*Author: Daben
*Date: 2009-10-10
*Version: 1.0
*/
Ext.onReady(function() {
//Ext.MessageBox.alert("Message","Hello world");
/**//*Ext.MessageBox.confirm("comfirm","Simulate js comfirm dialog box", function(btn){
alert("Clicked the "btn "button");
});* /
Ext.get("btn").on("click", function() {
var data = Ext.fly("txt").getValue();
if (data == "") {
Ext.Msg.alert("Warning", "Please enter a string");
}
else {
Ext.Ajax.request({
url: " hello.aspx",
params: { data: data },
method: "POST",
success: function(response) {
Ext.fly("div").update(response .responseText);
},
failure: function(response) {
Ext.Msg.alert("Error", "The request failed, the error code is: " response.status);
}
});
}
});
});
Let’s briefly analyze this file: The first line is to use the smart prompt of vs. Pay attention to writing the path correctly, and it must be added to the first line. Ext.onReady has already been introduced. Ext.fly is the abbreviation of Ext.Element.fly. This method can obtain the Element object based on the id. The Element class is a very important class in Ext. It encapsulates the Dom and adds some Operates for ease of use and is compatible with major browsers. getValue is a method of the Element class to obtain the value of the element. What is frustrating is that there is no corresponding setValue method, so the update method is used later to update the value of the element. It is a good programming habit to verify the client before passing the value to the server. Here we simply verify that the string is not empty, and then use the Ext.Ajax.request method mentioned earlier. Use this method Data is sent to the page hello.aspx in post mode. Here we send it in the form of a json object, or it can also be written in string form. For a successful response, the text of the response is displayed in the div. For a failed response, a pop-up A dialog box and error code are given.
The next step is to perform server-side programming. The server can accept the data passed by the client and respond in two ways: using aspx pages and web services. Let's first introduce how to use aspx pages for processing. Add a page Hello.aspx to the project, and add the page processing instructions in the first line of the page to Delete all. Press F7 to switch to the code page and start writing background code. We first obtain the data passed from the front desk through Request.Params["data"]. Similarly, before processing the data, we first verify the validity of the data. Here we simply determine whether it is empty or an empty string, and then We will send the processed results to the client using the Response.Write method. The background code is as follows:
using System;
/**//*
*Author: Daben
*Date: 2009-10-10
*Version: 1.0
*/
namespace ExtjsDemo
{
public partial class Hello : System.Web.UI.Page
{
Page loading #region Page loading
/ **////
/// Page loading
///
///
///
protected void Page_Load(object sender, EventArgs e)
{
string data = Request.Params["data"] ;
if(!string.IsNullOrEmpty(data))
{
Response.Write(data.ToUpper());
}
}
#endregion
}
}
After running, enter the string in the edit box. You can see that it is displayed in uppercase in the div below. Through FF's Firebug, we can see the interaction of the data.
In addition to using aspx pages to accept and process the data passed by the client, we can also use web services. Add a web service to the project, the code is as follows:
using System;
using System.Web.Services;
/**////
/// Summary description of HelloService
///
[WebService(Namespace = "http://tempuri.org/")]
[WebServiceBinding(ConformsTo = WsiProfiles.BasicProfile1_1)]
[System.ComponentModel.ToolboxItem(false)]
// To allow this web service to be called from scripts using ASP.NET AJAX, uncheck the following line annotation.
// [System.Web.Script.Services.ScriptService]
public class HelloService : System.Web.Services.WebService
{
Change the incoming string to uppercase #region will be passed Change the entered string to uppercase
/**/
namespace ExtjsDemo
{
/***////
/// Will be passed in Strings that need to be converted to uppercase
///
/// Strings that need to be converted to uppercase
// /
[WebMethod]
public string ToUpper(string data)
{
if(!string.IsNullOrEmpty(data))
return data.ToUpper();
throw new Exception("String cannot be empty!");
}
#endregion
}
}
Of course, by default, the web service delivers data in xml format, which we can see through Firebug. XML is very good and powerful, but sometimes we only need smaller JSON. So how do we make the web service deliver JSON format? We only need to set the Content-Type in the request header to application/json and encode the parameters using Ext.util.JSON.encode or use jsonData instead of params.

 PHP学习笔记:数据结构与算法Oct 09, 2023 pm 11:54 PM
PHP学习笔记:数据结构与算法概述:数据结构和算法是计算机科学中非常重要的两个概念,它们是解决问题和优化代码性能的关键。在PHP编程中,我们常常需要使用各种数据结构来存储和操作数据,同时也需要使用算法来实现各种功能。本文将介绍一些常用的数据结构和算法,并提供相应的PHP代码示例。一、线性结构数组(Array)数组是最常用的数据结构之一,可以用来存储有序的数据
 学习MySQL必看!详细讲解SQL语句基础知识Jun 15, 2023 pm 09:00 PM
MySQL是一个开源的关系型数据库管理系统,被广泛地应用于Web应用程序的开发和数据存储。学习MySQL的SQL语言对于数据管理员和开发者来说是非常必要的。SQL语言是MySQL中的核心部分,因此在学习MySQL之前,你需要对SQL语言有充分的了解,本文旨在为你详细讲解SQL语句基础知识,让你一步步了解SQL语句。SQL是结构化查询语言的简称,用于在关系型数
 从头学习:掌握Go语言的基础知识Feb 01, 2024 am 08:45 AM
从零开始:学习Go语言的基础知识简介Go语言,又称Golang,是一种由Google开发的开源编程语言。它于2009年发布,并迅速成为一种流行的语言,尤其是在Web开发、分布式系统和云计算等领域。Go语言以其简洁、高效、并发性强等特点而著称。基本语法1.变量和常量在Go语言中,变量和常量都是类型化的。变量可以存储数据,而常量则不能改变。变量的声明格式为:v
 PHP学习笔记:论坛与博客系统开发Oct 09, 2023 am 10:57 AM
PHP学习笔记:论坛与博客系统开发在Web开发领域中,论坛和博客系统是非常常见的应用程序。它们为用户提供了一个交流和分享信息的平台。在本篇文章中,我们将讨论如何使用PHP开发一个简单的论坛和博客系统,并附上具体的代码示例。环境设置首先,我们需要搭建一个适合PHP开发的开发环境。我们可以使用AMP(Apache、MySQL和PHP)软件包,如XAMPP或WAM
 如何使用PHP和ExtJS实现强大Web应用功能Jun 25, 2023 am 11:40 AM
随着Web应用的不断发展和普及,越来越多的企业和个人开始使用PHP和ExtJS来构建功能强大的Web应用。PHP作为一种流行的服务器端脚本语言,具有良好的跨平台性和易于学习的特点,而ExtJS则是一种流行的前端框架,可以帮助开发人员快速构建交互式Web应用界面。本文将介绍如何使用PHP和ExtJS实现强大Web应用功能。建立PHP和MySQL数据库连接在使用

 Yii框架的一些基础知识Jun 21, 2023 pm 07:07 PM
Yii是一款流行的面向对象PHP框架,它的全称是“YesItIs”,表示“是的,它就是这样的”。它的设计目标是高效、快速、安全和易于使用,因此被广泛应用于大型Web应用程序的开发中。在这篇文章中,我们将介绍Yii框架的一些基础知识,帮助新手更好地了解这个框架。MVC架构Yii框架采用了基于MVC(Model-View-Controller)的设计模式,这
 Go语言编程入门指南:基础知识与实际应用速成Jan 23, 2024 am 09:31 AM
快速入门Go语言编程:基础知识与实践指南Go语言作为一门新兴的编程语言,因其简洁、高效和并发性而备受开发者的青睐。无论你是初学者还是有一定编程经验的开发者,本文将带你快速入门Go语言编程,并提供一些实践指南和具体代码示例。一、安装Go语言环境要开始使用Go语言进行编程,首先需要在你的计算机上安装Go语言环境。你可以从Go官方网站(https://golang


Hot AI Tools

Undresser.AI Undress
AI-powered app for creating realistic nude photos

AI Clothes Remover
Online AI tool for removing clothes from photos.

Undress AI Tool
Undress images for free

Clothoff.io
AI clothes remover

AI Hentai Generator
Generate AI Hentai for free.

Hot Article
Hot Tools

Atom editor mac version download
The most popular open source editor

mPDF
mPDF is a PHP library that can generate PDF files from UTF-8 encoded HTML. The original author, Ian Back, wrote mPDF to output PDF files "on the fly" from his website and handle different languages. It is slower than original scripts like HTML2FPDF and produces larger files when using Unicode fonts, but supports CSS styles etc. and has a lot of enhancements. Supports almost all languages, including RTL (Arabic and Hebrew) and CJK (Chinese, Japanese and Korean). Supports nested block-level elements (such as P, DIV),

SublimeText3 Linux new version
SublimeText3 Linux latest version

VSCode Windows 64-bit Download
A free and powerful IDE editor launched by Microsoft

ZendStudio 13.5.1 Mac
Powerful PHP integrated development environment

