

 Web Front-endJS TutorialCreate a dynamic gradient button with jQuery Detailed graphic tutorial_jquery
Create a dynamic gradient button with jQuery Detailed graphic tutorial_jquery

本教程分为以下三步:
Step1 - Photoshop
Step2 - HTML/CSS
Step3 - JavaScript(jQuery)
Step4 - CSS修改
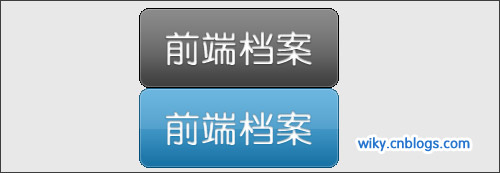
最终结果如下:

Step1 - Photoshop
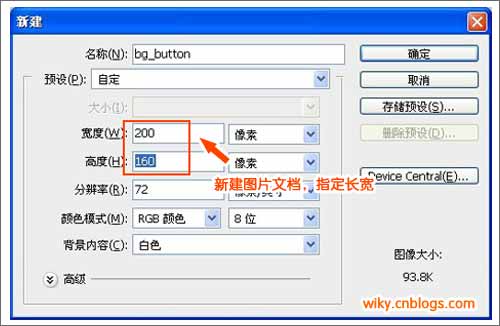
1. 新建文件
按钮的尺寸是100px X 80px,但由于我们需要创建一个有两种状态的CSS sprite背景图,所以我们在Photoshop中创建(Ctrl+N)一个长宽为200px X 160px的图片文件,如下图:
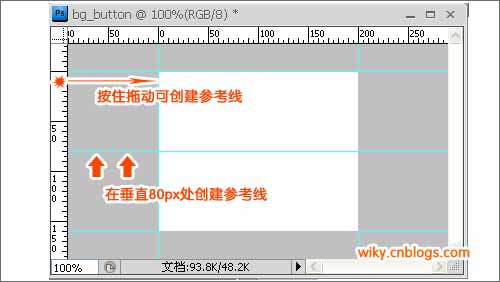
2. 创建参考线
为了使绘制按钮更容易,我们创建参考线,从标尺中拉出参考线,如果你找不到标尺,可以按Ctrl+R显示,如下图:
3. 绘制形状
选择工具面板中的矩形工具,设置圆角半径为10px,在画布上绘制形状,如下图:
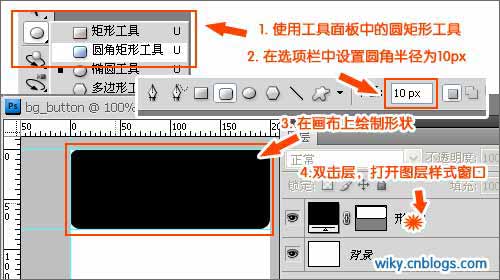
4. 设置形状样式
接上图最后一步,双击层,打开图层样式窗口,设置形状的样式,首先选择渐变叠加,设置渐变颜色从#3d3d3d到#8b8b8b,如下图:

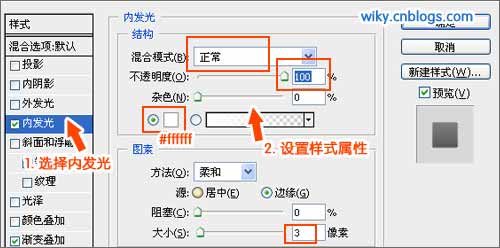
然后,选择“内发光”,设置混合模式为“正常”,不透明度为100%,颜色设置为#ffffff,图素大小设置为3像素,如下图:
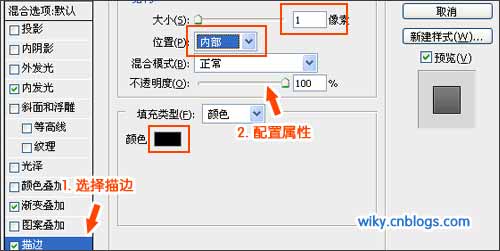
之后,再选择“描边”,设置大小为1像素,位置为“内部”,颜色为黑色#000000,如下图:
5. 添加字体
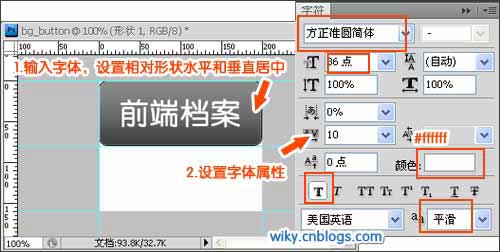
输入文本,设置文字相对水平和垂直居中,字体为方正准圆简体,字号36点,加粗平滑,颜色为白色(#FFFFFF),如下图:
6. 设置字体样式
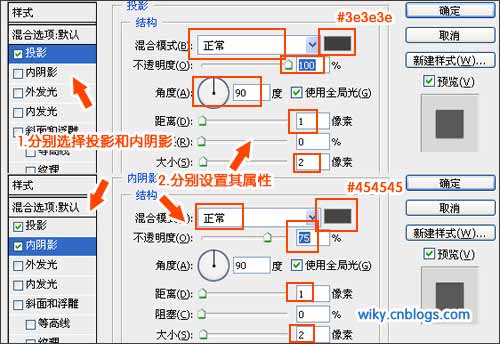
同样的双击文字图层,打开文字图层样式,设置字体样式,点击“投影”,设置混合模式为“正常”,颜色为#3e3e3e,不透明度为100%,角度为90度,距离为1像素,大小为2像素;点击“内阴影”,设置混合模式为“正常”,颜色为#454545,不透明度为75%,角度为90度,距离为1像素,大小为2像素,如下图所示:
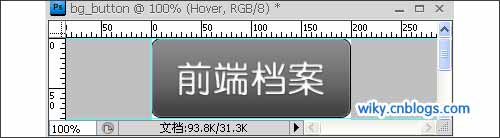
至此,我们就完成链接状态下的按钮背景图,效果如下:
7. 悬停背景图
制作鼠标悬停状态下的按钮背景图,把图层放入组内,复制组,移动,并重命名,如下图:

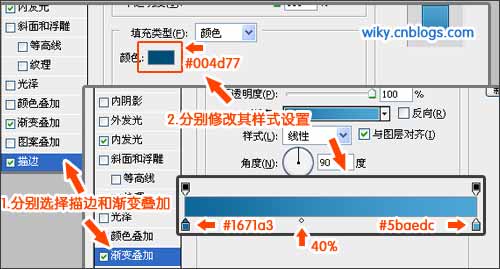
8.背景图属性
修改hover背景图的样式属性,打开背景图的图层样式窗口,选择“描边”,修改边框颜色为#004d77;选择“渐变叠加”,修改渐变从#1671a3到#5baedc,如下图:
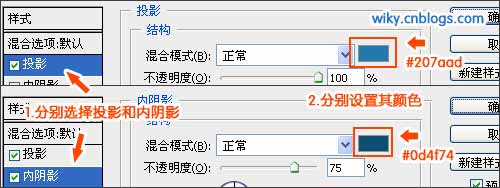
9. 设置字体样式
打开字体图层样式,选择“投影”,修改投影颜色为#207aad;选择“内阴影”,修改字体颜色为#0d4f74,如下图:
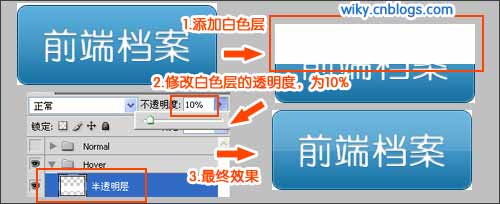
10. 图层半透明
添加图层半透明效果,按以上步骤修改,鼠标悬停背景图如下,最后是再加上一层半透明层,先添加一个200px X 40px的白色层,置顶并设置白色层的透明度为10%,如下图:
最后,我们完成的CSS sprite背景图如下,您也可以点击下载PSD文件。
Step2 - HTML/CSS
The HTML code of the button is very simple:
Front-end file
Then pass CSS Just set the background image. The CSS code is as follows:
/*Link button style*/
.button {
width:200px;
height:80px;
display:block;
background:url(bg_button.gif) top no-repeat;
text-indent:-9999px;
}
/*Button hover style*/
.button:hover{
background:url(bg_button.gif) bottom no-repeat;
}
According to the picture we designed earlier, the length and width of the button are 200px X 80px, and the background image is a black button. This piece of CSS can achieve the first effect in our example (Pure CSS effect).
Step3 - JavaScript/jQuery
Through JavaScript, we can make the button cooler. We need to add a element based on the previous one, as The background layer displayed when the mouse is hovering, then the HTML will be modified after the DOM is loaded:
view sourceprint?front end File
The element is completely transparent before the mouse hovers over it. When the mouse passes over it, it gradually becomes opaque to achieve a gradient effect. The animation process is as follows:

Through the above analysis, we can write the jQuery code as follows. After the DOM is loaded, add a layer to the button link as the background image when the mouse passes over it, and add a mouse hover event to the element. , when the mouse passes over, it will gradually change to opaque, and when the mouse leaves, it will gradually change to fully transparent.
//Include the text into the element , and then appended to .button
$('.jsbutton,.viewbutton,.downloadbutton').wrapInner('').css('textIndent' ,'0').each(function () {
//First set the element to be fully transparent, then add the mouse hover event
$('span.hover').css('opacity ', 0).hover(function () {
$(this).stop().fadeTo(650, 1); //Fade to opaque
}, function () {
$(this ).stop().fadeTo(650, 0); //Fade to fully transparent
});
});
At this point, we have completed the JS code, and we still need Pay attention to one step, CSS modification, see Step 4.
Step4 - CSS modification
In the example of pure CSS effect, we use the :hover pseudo-class to switch the sprite image. When we use jQuery, we introduce a layer as the mouse passes over it. Background image, so the CSS needs to be modified as follows:
/* Previous button hover style*/
.button:hover{
background:url(bg_button.gif) bottom no-repeat;
}
modified to
/*There is no need to set the :hover style, but set span .hover style*/
.button span.hover {
/*Note to use absolute positioning*/
position: absolute;
display: block;
width:200px;
height:80px;
background:url(bg_button.gif) bottom no-repeat;
text-indent:-9999px;
}
Summary
Above us Implemented a dynamic gradient button in 4 steps. In the demonstration, I also provided an extended example. You can follow along to implement one yourself, or you can download the source code to modify and customize it. Of course, do you have any good suggestions or questions? , welcome to leave me a message.
Demo addresshttp://demo.jb51.net/js/gcb_download/gradual-change-button.html
Download addresshttp://demo.jb51.net/ js/gcb_download/gcb_download.rar

 Understanding the JavaScript Engine: Implementation DetailsApr 17, 2025 am 12:05 AM
Understanding how JavaScript engine works internally is important to developers because it helps write more efficient code and understand performance bottlenecks and optimization strategies. 1) The engine's workflow includes three stages: parsing, compiling and execution; 2) During the execution process, the engine will perform dynamic optimization, such as inline cache and hidden classes; 3) Best practices include avoiding global variables, optimizing loops, using const and lets, and avoiding excessive use of closures.
 Python vs. JavaScript: The Learning Curve and Ease of UseApr 16, 2025 am 12:12 AM
Python is more suitable for beginners, with a smooth learning curve and concise syntax; JavaScript is suitable for front-end development, with a steep learning curve and flexible syntax. 1. Python syntax is intuitive and suitable for data science and back-end development. 2. JavaScript is flexible and widely used in front-end and server-side programming.
 Python vs. JavaScript: Community, Libraries, and ResourcesApr 15, 2025 am 12:16 AM
Python and JavaScript have their own advantages and disadvantages in terms of community, libraries and resources. 1) The Python community is friendly and suitable for beginners, but the front-end development resources are not as rich as JavaScript. 2) Python is powerful in data science and machine learning libraries, while JavaScript is better in front-end development libraries and frameworks. 3) Both have rich learning resources, but Python is suitable for starting with official documents, while JavaScript is better with MDNWebDocs. The choice should be based on project needs and personal interests.
 From C/C to JavaScript: How It All WorksApr 14, 2025 am 12:05 AM
The shift from C/C to JavaScript requires adapting to dynamic typing, garbage collection and asynchronous programming. 1) C/C is a statically typed language that requires manual memory management, while JavaScript is dynamically typed and garbage collection is automatically processed. 2) C/C needs to be compiled into machine code, while JavaScript is an interpreted language. 3) JavaScript introduces concepts such as closures, prototype chains and Promise, which enhances flexibility and asynchronous programming capabilities.
 JavaScript Engines: Comparing ImplementationsApr 13, 2025 am 12:05 AM
Different JavaScript engines have different effects when parsing and executing JavaScript code, because the implementation principles and optimization strategies of each engine differ. 1. Lexical analysis: convert source code into lexical unit. 2. Grammar analysis: Generate an abstract syntax tree. 3. Optimization and compilation: Generate machine code through the JIT compiler. 4. Execute: Run the machine code. V8 engine optimizes through instant compilation and hidden class, SpiderMonkey uses a type inference system, resulting in different performance performance on the same code.
 Beyond the Browser: JavaScript in the Real WorldApr 12, 2025 am 12:06 AM
JavaScript's applications in the real world include server-side programming, mobile application development and Internet of Things control: 1. Server-side programming is realized through Node.js, suitable for high concurrent request processing. 2. Mobile application development is carried out through ReactNative and supports cross-platform deployment. 3. Used for IoT device control through Johnny-Five library, suitable for hardware interaction.
 Building a Multi-Tenant SaaS Application with Next.js (Backend Integration)Apr 11, 2025 am 08:23 AM
I built a functional multi-tenant SaaS application (an EdTech app) with your everyday tech tool and you can do the same. First, what’s a multi-tenant SaaS application? Multi-tenant SaaS applications let you serve multiple customers from a sing
 How to Build a Multi-Tenant SaaS Application with Next.js (Frontend Integration)Apr 11, 2025 am 08:22 AM
This article demonstrates frontend integration with a backend secured by Permit, building a functional EdTech SaaS application using Next.js. The frontend fetches user permissions to control UI visibility and ensures API requests adhere to role-base


Hot AI Tools

Undresser.AI Undress
AI-powered app for creating realistic nude photos

AI Clothes Remover
Online AI tool for removing clothes from photos.

Undress AI Tool
Undress images for free

Clothoff.io
AI clothes remover

AI Hentai Generator
Generate AI Hentai for free.

Hot Article
Hot Tools

Atom editor mac version download
The most popular open source editor

PhpStorm Mac version
The latest (2018.2.1) professional PHP integrated development tool

Zend Studio 13.0.1
Powerful PHP integrated development environment

WebStorm Mac version
Useful JavaScript development tools

SublimeText3 Mac version
God-level code editing software (SublimeText3)

