
 Web Front-endJS TutorialDetailed explanation and error handling of JQuery upload plug-in Uploadify_jquery
Detailed explanation and error handling of JQuery upload plug-in Uploadify_jquery

Uploadify is an upload plug-in for JQuery that supports multiple file uploads and achieves very good results with progress display.
The official website provides a DEMO of PHP. Here I introduce its use under Asp.net in detail.
Download
Uploadify download address provided by Script House
How to use
1 Create a Web project, named JQueryUploadDemo, from the official website Download the latest version, unzip it and add it to the project
2 Add the UploadHandler.ashx file to the project to handle file uploads.
3 Add the UploadFile folder to the project to store uploaded files.
After completing the above three steps, the basic structure of the project is as follows:

4 The code of the html page of Default.aspx is modified as follows:
rel="stylesheet" type="text/css" />
rel="stylesheet" type="text/css" />
5 UploadHandler class The ProcessRequest method code is as follows:
public void ProcessRequest (HttpContext context)
{
context.Response.ContentType = "text/plain";
context.Response.Charset = "utf-8";
HttpPostedFile file = context.Request .Files["Filedata"];
string uploadPath =
HttpContext.Current.Server.MapPath(@context.Request["folder"]) "\";
if (file != null)
{
if (!Directory.Exists(uploadPath))
{
Directory.CreateDirectory(uploadPath);
}
file.SaveAs(uploadPath file.FileName);
//If the following code is missing, the display of the upload queue will not disappear automatically after the upload is successful
context.Response.Write("1");
}
else
{
context.Response.Write("0");
}
}
Note: You must pay attention here, and you must quote the using System.IO; namespace. This is also the reason why I made an error. The online tutorials basically did not mention this, so many netizens will encounter IOError. mistake.
6 The effect after running is as follows:
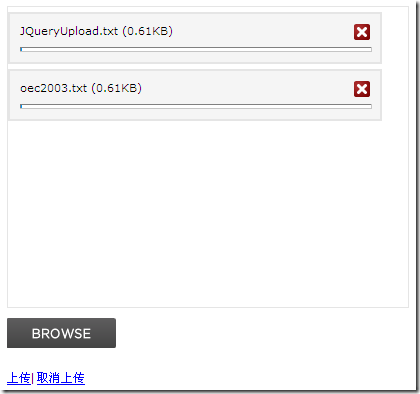
7 After selecting the two files, click Upload, and you will see that these two files will be added to the UploadFile folder.
The above code simply implements the upload function, relying on the function uploadify. The parameters of the uploadify function are in json format. You can modify the key value of the json object to make customized settings, such as setting multi to true or false. To control whether multiple files can be uploaded, let’s introduce the meaning of these key values:
uploader: The relative path of the uploadify.swf file. The swf file is a button with the text BROWSE. When clicked, the open file dialog box will fade out. Default value: uploadify.swf.
script: The relative path of the background handler. Default value: uploadify.php
checkScript: Relative path of the background processing program used to determine whether the uploaded selected file exists on the server
fileDataName: Set a name, In the server processing program, the data of the uploaded file is retrieved based on this name. Default is Filedata
method: Submission method Post or Get Default is Post
scriptAccess: Access mode of flash script file, if the local test is set to always, the default value :sameDomain
folder : The directory where uploaded files are stored.
queueID: The ID of the file queue, which is consistent with the ID of the div that stores the file queue.
queueSizeLimit: When multiple files are allowed to be generated, set the number of selected files, default value: 999.
multi: Multiple files can be uploaded when set to true.
auto: If set to true, it will be uploaded directly after selecting the file. If it is false, you need to click the upload button to upload.
fileDesc: This attribute value must be set with the fileExt attribute to be effective. It is used to set the prompt text in the file selection dialog box. For example, set fileDesc to "Please select rar doc pdf file" to open the file selection. The frame effect is as shown below:

fileExt: Set the type of file that can be selected, such as: '*.doc;*.pdf;*.rar'.
sizeLimit: Size limit for uploaded files.
simUploadLimit: The number of simultaneous uploads allowed. Default value: 1.
buttonText: The text of the browse button, default value: BROWSE.
buttonImg: Path to browse button image.
hideButton: Set to true to hide the image of the browse button.
rollover: The values are true and false. When set to true, it will have a reverse effect when the mouse moves over the browse button.
width: Set the width of the browse button, default value: 110.
height: Set the height of the browse button, default value: 30.
wmode: Setting this item to transparent can make the flash background file of the browse button transparent, and the flash file will be placed at the top level of the page. Default value: opaque.
cancelImg: Select the close button icon on each file after the file is placed in the file queue, as shown below:

The value of the key value introduced above is of string or Boolean type, which is relatively simple. The value of the key value introduced next is a function that can return some information when selecting a file, making an error, or other operations. to users.
onInit: Do some initialization work.
onSelect: Triggered when a file is selected. This function has three parameters
- event: event object.
- queueID: The unique identifier of the file, consisting of 6 random characters.
- fileObj: The selected file object has 5 attributes: name, size, creationDate, modificationDate, and type.
The code is as follows:
$(document).ready(function()
{
$("#uploadify").uploadify({
'uploader': 'JS/jquery.uploadify-v2. 1.0/uploadify.swf',
'script': 'UploadHandler.ashx',
'cancelImg': 'JS/jquery.uploadify-v2.1.0/cancel.png',
'folder': 'UploadFile',
'queueID': 'fileQueue',
'auto': false,
'multi': true,
'onInit':function(){alert("1") ;},
'onSelect': function(e, queueId, fileObj)
{
alert("Unique identifier:" queueId "rn"
"File name:" fileObj.name "rn"
"File size:" fileObj.size "rn"
"Creation time:" fileObj.creationDate "rn"
"Last modification time:" fileObj.modificationDate "rn"
"File type: " fileObj.type
);
}
});
});
当选择一个文件后弹出的消息如下图:
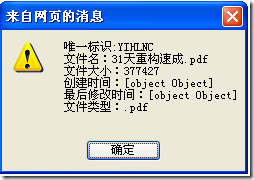
onSelectOnce :在单文件或多文件上传时,选择文件时触发。该函数有两个参数event,data,data对象有以下几个属性:
fileCount:选择文件的总数。
filesSelected:同时选择文件的个数,如果一次选择了3个文件该属性值为3。
filesReplaced:如果文件队列中已经存在A和B两个文件,再次选择文件时又选择了A和B,该属性值为2。
allBytesTotal:所有选择的文件的总大小。
onCancel : 当点击文件队列中文件的关闭按钮或点击取消上传时触发。该函数有event、queueId、fileObj、data四个参数,前三个参数同onSelect 中的三个参数,data对象有两个属性fileCount和allBytesTotal。
fileCount:取消一个文件后,文件队列中剩余文件的个数。
allBytesTotal:取消一个文件后,文件队列中剩余文件的大小。
onClearQueue :当调用函数fileUploadClearQueue时触发。有event和data两个参数,同onCancel 中的两个对应参数。
onQueueFull :当设置了queueSizeLimit并且选择的文件个数超出了queueSizeLimit的值时触发。该函数有两个参数event和queueSizeLimit。
onError :当上传过程中发生错误时触发。该函数有event、queueId、fileObj、errorObj四个参数,其中前三个参数同上,errorObj对象有type和info两个属性。
type:错误的类型,有三种‘HTTP', ‘IO', or ‘Security'
info:错误的描述
onOpen :点击上传时触发,如果auto设置为true则是选择文件时触发,如果有多个文件上传则遍历整个文件队列。该函数有event、queueId、fileObj三个参数,参数的解释同上。
onProgress :点击上传时触发,如果auto设置为true则是选择文件时触发,如果有多个文件上传则遍历整个文件队列,在onOpen之后触发。该函数有event、queueId、fileObj、data四个参数,前三个参数的解释同上。data对象有四个属性percentage、bytesLoaded、allBytesLoaded、speed:
percentage:当前完成的百分比
bytesLoaded:当前上传的大小
allBytesLoaded:文件队列中已经上传完的大小
speed:上传速率 kb/s
onComplete:文件上传完成后触发。该函数有四个参数event、queueId、fileObj、response、data五个参数,前三个参数同上。response为后台处理程序返回的值,在上面的例子中为1或0,data有两个属性fileCount和speed
fileCount:剩余没有上传完成的文件的个数。
speed:文件上传的平均速率 kb/s
注:fileObj对象和上面讲到的有些不太一样,onComplete 的fileObj对象有个filePath属性可以取出上传文件的路径。
onAllComplete:文件队列中所有的文件上传完成后触发。该函数有event和data两个参数,data有四个属性,分别为:
filesUploaded :上传的所有文件个数。
errors :出现错误的个数。
allBytesLoaded :所有上传文件的总大小。
speed :平均上传速率 kb/s
相关函数介绍
在上面的例子中已经用了uploadifyUpload和uploadifyClearQueue两个函数,除此之外还有几个函数:
uploadifySettings:可以动态修改上面介绍的那些key值,如下面代码
$('#uploadify').uploadifySettings('folder','JS');
如果上传按钮的事件写成下面这样,文件将会上传到uploadifySettings定义的目录中
a href="javascript:$('#uploadify').uploadifySettings('folder','JS');$('#uploadify').uploadifyUpload()">上传a>
uploadifyCancel:该函数接受一个queueID作为参数,可以取消文件队列中指定queueID的文件。
$('#uploadify').uploadifyCancel(id);
Okay, all configurations are completed. Here are some of the problems I encountered. span style="font-size: 18pt;">Possible problems 1. After I just started the configuration, it didn't work properly, flash (uploadify.swf' ) is not loading. Later, I checked jquery.uploadify.v2.1.0.js and found that the plug-in is a FLASH dynamically created using swfobject.js. Later, I tried it alone and still couldn't display the flash. After being impatient, I restarted the computer and it worked. Fainted~~~ 2. FLASH was finally loaded, but the upload failed again. Report IOError, as shown in the figure:

I was puzzled and searched all over the Internet, and finally saw this sentence on a foreign website: using System.IO; It suddenly became clear after adding it! !
No other problems have been encountered yet. We will add more problems if they are discovered later.
Uploadify download address provided by Script House

 Beyond the Browser: JavaScript in the Real WorldApr 12, 2025 am 12:06 AM
JavaScript's applications in the real world include server-side programming, mobile application development and Internet of Things control: 1. Server-side programming is realized through Node.js, suitable for high concurrent request processing. 2. Mobile application development is carried out through ReactNative and supports cross-platform deployment. 3. Used for IoT device control through Johnny-Five library, suitable for hardware interaction.
 Building a Multi-Tenant SaaS Application with Next.js (Backend Integration)Apr 11, 2025 am 08:23 AM
I built a functional multi-tenant SaaS application (an EdTech app) with your everyday tech tool and you can do the same. First, what’s a multi-tenant SaaS application? Multi-tenant SaaS applications let you serve multiple customers from a sing
 How to Build a Multi-Tenant SaaS Application with Next.js (Frontend Integration)Apr 11, 2025 am 08:22 AM
This article demonstrates frontend integration with a backend secured by Permit, building a functional EdTech SaaS application using Next.js. The frontend fetches user permissions to control UI visibility and ensures API requests adhere to role-base
 JavaScript: Exploring the Versatility of a Web LanguageApr 11, 2025 am 12:01 AM
JavaScript is the core language of modern web development and is widely used for its diversity and flexibility. 1) Front-end development: build dynamic web pages and single-page applications through DOM operations and modern frameworks (such as React, Vue.js, Angular). 2) Server-side development: Node.js uses a non-blocking I/O model to handle high concurrency and real-time applications. 3) Mobile and desktop application development: cross-platform development is realized through ReactNative and Electron to improve development efficiency.
 The Evolution of JavaScript: Current Trends and Future ProspectsApr 10, 2025 am 09:33 AM
The latest trends in JavaScript include the rise of TypeScript, the popularity of modern frameworks and libraries, and the application of WebAssembly. Future prospects cover more powerful type systems, the development of server-side JavaScript, the expansion of artificial intelligence and machine learning, and the potential of IoT and edge computing.
 Demystifying JavaScript: What It Does and Why It MattersApr 09, 2025 am 12:07 AM
JavaScript is the cornerstone of modern web development, and its main functions include event-driven programming, dynamic content generation and asynchronous programming. 1) Event-driven programming allows web pages to change dynamically according to user operations. 2) Dynamic content generation allows page content to be adjusted according to conditions. 3) Asynchronous programming ensures that the user interface is not blocked. JavaScript is widely used in web interaction, single-page application and server-side development, greatly improving the flexibility of user experience and cross-platform development.
 Is Python or JavaScript better?Apr 06, 2025 am 12:14 AM
Python is more suitable for data science and machine learning, while JavaScript is more suitable for front-end and full-stack development. 1. Python is known for its concise syntax and rich library ecosystem, and is suitable for data analysis and web development. 2. JavaScript is the core of front-end development. Node.js supports server-side programming and is suitable for full-stack development.
 How do I install JavaScript?Apr 05, 2025 am 12:16 AM
JavaScript does not require installation because it is already built into modern browsers. You just need a text editor and a browser to get started. 1) In the browser environment, run it by embedding the HTML file through tags. 2) In the Node.js environment, after downloading and installing Node.js, run the JavaScript file through the command line.


Hot AI Tools

Undresser.AI Undress
AI-powered app for creating realistic nude photos

AI Clothes Remover
Online AI tool for removing clothes from photos.

Undress AI Tool
Undress images for free

Clothoff.io
AI clothes remover

AI Hentai Generator
Generate AI Hentai for free.

Hot Article
Hot Tools

WebStorm Mac version
Useful JavaScript development tools

Dreamweaver Mac version
Visual web development tools

PhpStorm Mac version
The latest (2018.2.1) professional PHP integrated development tool

MantisBT
Mantis is an easy-to-deploy web-based defect tracking tool designed to aid in product defect tracking. It requires PHP, MySQL and a web server. Check out our demo and hosting services.

Zend Studio 13.0.1
Powerful PHP integrated development environment

