
 Web Front-endJS TutorialBootstrap must learn cascading drop-down menu every day_javascript skills
This article will introduce the customized bootstrap cascading drop-down menu. The main application scenarios include provincial and municipal context menus, etc. Let’s take this example first. Of course, context menus in other scenarios are also applicable. To be honest, it still takes a lot of effort and time to package a universal component. The so-called universal component naturally requires careful consideration, sigh! The Bootstrap related selection compiled this time also involves a lot of knowledge points such as jquery, ajax, springMVC, etc. It can be said to be all-inclusive!
First of all, please allow me to make a small introduction on behalf of this custom component.
"Hi, hello, my name is yunm.combox.js. The name given to me by the owner is actually quite vulgar. I mainly complete the corresponding data loading by adding two custom attributes to the select component. The data request uses ajax, and the back-end data processing uses springMVC (of course other methods are also possible, just return the corresponding json data). It is very, very simple to use! ”
1. Interface effect
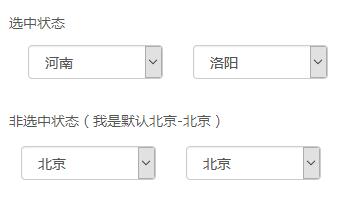
Of course, you can’t tell how well a component is packaged from the interface, but at least you feel it’s simple and beautiful. Well, with this impression, are you interested in continuing to read? I think the answer is yes.
2. How to use
①、procity.jsp
First, load yunm.combox.js on the page (will be introduced later. As for other bootstrap css and js, they are not within the scope of this chapter, so skip them). At the same time, create two selects. See the specific format. As follows:
<script type="text/javascript" src="${ctx}/components/yunm/yunm.combox.js"></script>
<div class="form-group">
<div class="row">
<div class="col-md-6">
<select name="province_code" class="form-control combox" ref="city_select"
refUrl="${ctx}/procity?pro_code={value}&city_code=HSLY">
</select>
</div>
<div class="col-md-6">
<select name="city_code" id="city_select" class="form-control">
</select>
</div>
</div>
</div>
<script type="text/javascript">
<!--
$(function() {
if ($.fn.combox) {
$("select.combox", $p).combox();
}
});
//-->
</script>
·Two select components, one is province_code and the other is city_code.
·Added two attributes to the provincial menu.
ref specifies that the associated menu is the city-level menu city_select
refUrl specifies the URL for the menu to obtain data
pro_codeas the key factor to obtain municipal data
{value} , then it is a passing match.
city_code=HSLY, mainly used to select the specified province and city menu, such as the above (Henan, Luoyang), if not selected, city_code= is empty
·class="combox" Add jquery selector for the provincial drop-down box
·The key method of executing the combox component after the page is loaded is introduced in detail below
②、yunm.combox.js Now let’s take a look at the key component content!
·通过$.extend($.fn, { combox : function() {为jquery增加一个叫combox的底层(可以查询jquery帮助文档)方法。
·通过(function($){_onchange、addHtml})(jQuery);为该组件在页面初始加载时创建两个方法onchange和addHtml,至于(function($) {})(jQuery);我想你如果不了解的话,赶紧百度吧!
·先来看combox 方法
获取ref、refUrl,通过ajax向refUrl请求省级菜单数据,当获取成功后,通过addHtml方法将json转换后的option绑定到省级菜单select上
然后呢,为省级菜单select绑定change事件,传递的参数为ref(市级菜单)、refUrl(市级数据获取的url)、$this(省级菜单,便于change事件获取对应选中项,如效果图中的河南)
通过trigger方法立即执行change事件,便于获取对应的市级菜单内容。
·再来看_onchange方法,主要是点击省级菜单时触发,用于获取市级菜单列表
refUrl,向服务端请求的URL
value,用于获取省级菜单的选中项目,然后通过该value值获取省级对应的市级菜单
$ref.empty();用于清空市级菜单
通过ajax继续获取市级菜单内容,然后通过addHtml方法添加到市级菜单中。
·addHtml方法
通过jsonEval方法对服务端传递回来的数据进行eval(eval('(' + data + ')'),如有不懂,可百度)方法处理,否则会出错。
$.each(json, function(i) {遍历json,通过jquery创建option对象,然后加入到select中。
③、ProcityController
前端介绍完了,我们回到后端进行介绍,当然了,你也可以忽略本节,因为不是所用的关联数据都通过springMVC这种方法获取,那么先预览一下代码吧!
package com.honzh.spring.controller;
import java.util.ArrayList;
import java.util.List;
import javax.servlet.http.HttpServletResponse;
import org.apache.log4j.Logger;
import org.springframework.stereotype.Controller;
import org.springframework.web.bind.annotation.RequestMapping;
import org.springframework.web.bind.annotation.RequestParam;
import com.honzh.biz.database.entity.City;
import com.honzh.biz.database.entity.Option;
import com.honzh.biz.database.entity.Provincial;
import com.honzh.common.util.JsonUtil;
import com.honzh.spring.service.CityService;
import com.honzh.spring.service.ProvincialService;
@Controller
@RequestMapping(value = "/procity")
public class ProcityController extends BaseController {
private static Logger logger = Logger.getLogger(ProcityController.class);
/**
* 当传递city_code,则表明下拉框要被选中,否则不选中
*/
@RequestMapping("")
public void index(@RequestParam(value = "city_code", required = false) String city_code,
@RequestParam(value = "pro_code", required = false) String pro_code, HttpServletResponse response) {
try {
logger.debug("获取所在地区" + city_code + ", 省" + pro_code);
// 如果pro_code为””,则表明要获取城市菜单,否则获取市级菜单
if (!pro_code.equals("")) {
Integer pro_id = ProvincialService.getInstance().getByProvincialcode(pro_code).getId();
List<City> citys = CityService.getInstance().getCitysByProvincialId(pro_id);
List<Option> coptions = new ArrayList<Option>(citys.size());
for (City city : citys) {
Option coption = new Option();
coption.setId(city.getId());
coption.setName(city.getCname());
coption.setValue(city.getCode());
// 市级菜单被选中
if (city_code != null && !city_code.equals("")) {
if (city.getCode().equals(city_code)) {
coption.setSelected("selected");
}
}
coptions.add(coption);
}
renderJson(response, coptions);
} else {
List<Provincial> provincials = ProvincialService.getInstance().getProvincials();
// 转换成标准的option属性(name,value,selected)
List<Option> options = new ArrayList<Option>(provincials.size());
// 被选中的省市
// 则说明是展示页面,此时需要为省级菜单和市级菜单设置选择项
if (city_code != null && !city_code.equals("")) {
Provincial selected_provincial = ProvincialService.getInstance().getProvincialByCitycode(city_code);
pro_code = selected_provincial.getProcode();
} else {
pro_code = provincials.get(0) == null ? "" : provincials.get(0).getProcode();
}
for (Provincial provincial : provincials) {
Option option = new Option();
option.setId(provincial.getId());
option.setName(provincial.getProname());
option.setValue(provincial.getProcode());
if (!pro_code.equals("") && provincial.getProcode().equals(pro_code)) {
option.setSelected("selected");
}
options.add(option);
}
renderJson(response, JsonUtil.toJson(options));
}
} catch (Exception e) {
logger.error(e.getMessage());
logger.error(e.getMessage(), e);
renderJson(response, null);
}
}
}
@RequestParam(value = "city_code", required = false) String city_code,对于RequestParam注解,其实非常好用,这里就不多做解释,只是推广一下,固定个数的参数,用该注解更易于代码的维护。
ProvincialService类、CityService类就是两个单例,尽量把数据放置在内存当中,减少查询数据库的次数,稍候贴出来一个例子。
Option类就是单纯的封装前端option组件的关键属性,便于组件的通用化。
renderJson(response, JsonUtil.toJson(options));将数据json化后返回,稍候贴上详细代码。
④、ProvincialService.java
只贴出来代码例子,不做详细解释,毕竟不是本章重点。
package com.honzh.spring.service;

import java.util.ArrayList;
import java.util.List;

import com.honzh.biz.database.entity.City;
import com.honzh.biz.database.entity.Provincial;
import com.honzh.biz.database.mapper.ProvincialMapper;
import com.honzh.common.spring.SpringContextHolder;

public class ProvincialService {

  private static Object lock = new Object();
  private static ProvincialService config = null;

  private ProvincialService() {
    provincials = new ArrayList<Provincial>();

    ProvincialMapper mapper = SpringContextHolder.getBean(ProvincialMapper.class);
    provincials.addAll(mapper.getProvincials());
  }

  public static ProvincialService getInstance() {
    synchronized (lock) {
      if (null == config) {
        config = new ProvincialService();
      }
    }
    return (config);
  }

  public Provincial getByProvincialcode(String provincial_code) {
    for (Provincial provincial : provincials) {
      if (provincial.getProcode().equals(provincial_code)) {
        return provincial;
      }
    }
    return null;
  }

  private List<Provincial> provincials = null;

  public List<Provincial> getProvincials() {
    return provincials;
  }

  public Provincial getProvincialByCitycode(String city_code) {
    City city = CityService.getInstance().getCityByCode(city_code);

    for (Provincial provincial : provincials) {
      if (provincial.getId().intValue() == city.getProid().intValue()) {
        return provincial;
      }
    }
    return null;
  }

  public Provincial getProvincialByCode(String province_code) {
    for (Provincial provincial : provincials) {
      if (provincial.getProcode().equals(province_code)) {
        return provincial;
      }
    }
    return null;
  }

}
⑤、renderJson方法
  /**
   * 如果出错的话,response直接返回404
   */
  protected void renderJson(HttpServletResponse response, Object responseObject) {
    PrintWriter out = null;
    try {
      if (responseObject == null) {
        response.sendError(404);
        return;
      }
      // 将实体对象转换为JSON Object转换
      String responseStr = JsonUtil.toJson(responseObject);
      response.setCharacterEncoding("UTF-8");
      response.setContentType("application/json; charset=utf-8");

      out = response.getWriter();
      out.append(responseStr);

      logger.debug("返回是:" + responseStr);
    } catch (IOException e) {
      logger.error(e.getMessage());
      logger.error(e.getMessage(), e);
    } finally {
      if (out != null) {
        out.close();
      }
    }
  }
以上就是本文的全部内容,希望对大家的学习有所帮助。

 Python vs. JavaScript: The Learning Curve and Ease of UseApr 16, 2025 am 12:12 AM
Python is more suitable for beginners, with a smooth learning curve and concise syntax; JavaScript is suitable for front-end development, with a steep learning curve and flexible syntax. 1. Python syntax is intuitive and suitable for data science and back-end development. 2. JavaScript is flexible and widely used in front-end and server-side programming.
 Python vs. JavaScript: Community, Libraries, and ResourcesApr 15, 2025 am 12:16 AM
Python and JavaScript have their own advantages and disadvantages in terms of community, libraries and resources. 1) The Python community is friendly and suitable for beginners, but the front-end development resources are not as rich as JavaScript. 2) Python is powerful in data science and machine learning libraries, while JavaScript is better in front-end development libraries and frameworks. 3) Both have rich learning resources, but Python is suitable for starting with official documents, while JavaScript is better with MDNWebDocs. The choice should be based on project needs and personal interests.
 From C/C to JavaScript: How It All WorksApr 14, 2025 am 12:05 AM
The shift from C/C to JavaScript requires adapting to dynamic typing, garbage collection and asynchronous programming. 1) C/C is a statically typed language that requires manual memory management, while JavaScript is dynamically typed and garbage collection is automatically processed. 2) C/C needs to be compiled into machine code, while JavaScript is an interpreted language. 3) JavaScript introduces concepts such as closures, prototype chains and Promise, which enhances flexibility and asynchronous programming capabilities.
 JavaScript Engines: Comparing ImplementationsApr 13, 2025 am 12:05 AM
Different JavaScript engines have different effects when parsing and executing JavaScript code, because the implementation principles and optimization strategies of each engine differ. 1. Lexical analysis: convert source code into lexical unit. 2. Grammar analysis: Generate an abstract syntax tree. 3. Optimization and compilation: Generate machine code through the JIT compiler. 4. Execute: Run the machine code. V8 engine optimizes through instant compilation and hidden class, SpiderMonkey uses a type inference system, resulting in different performance performance on the same code.
 Beyond the Browser: JavaScript in the Real WorldApr 12, 2025 am 12:06 AM
JavaScript's applications in the real world include server-side programming, mobile application development and Internet of Things control: 1. Server-side programming is realized through Node.js, suitable for high concurrent request processing. 2. Mobile application development is carried out through ReactNative and supports cross-platform deployment. 3. Used for IoT device control through Johnny-Five library, suitable for hardware interaction.
 Building a Multi-Tenant SaaS Application with Next.js (Backend Integration)Apr 11, 2025 am 08:23 AM
I built a functional multi-tenant SaaS application (an EdTech app) with your everyday tech tool and you can do the same. First, what’s a multi-tenant SaaS application? Multi-tenant SaaS applications let you serve multiple customers from a sing
 How to Build a Multi-Tenant SaaS Application with Next.js (Frontend Integration)Apr 11, 2025 am 08:22 AM
This article demonstrates frontend integration with a backend secured by Permit, building a functional EdTech SaaS application using Next.js. The frontend fetches user permissions to control UI visibility and ensures API requests adhere to role-base
 JavaScript: Exploring the Versatility of a Web LanguageApr 11, 2025 am 12:01 AM
JavaScript is the core language of modern web development and is widely used for its diversity and flexibility. 1) Front-end development: build dynamic web pages and single-page applications through DOM operations and modern frameworks (such as React, Vue.js, Angular). 2) Server-side development: Node.js uses a non-blocking I/O model to handle high concurrency and real-time applications. 3) Mobile and desktop application development: cross-platform development is realized through ReactNative and Electron to improve development efficiency.


Hot AI Tools

Undresser.AI Undress
AI-powered app for creating realistic nude photos

AI Clothes Remover
Online AI tool for removing clothes from photos.

Undress AI Tool
Undress images for free

Clothoff.io
AI clothes remover

AI Hentai Generator
Generate AI Hentai for free.

Hot Article
Hot Tools

SAP NetWeaver Server Adapter for Eclipse
Integrate Eclipse with SAP NetWeaver application server.

Dreamweaver CS6
Visual web development tools

Zend Studio 13.0.1
Powerful PHP integrated development environment

EditPlus Chinese cracked version
Small size, syntax highlighting, does not support code prompt function

MinGW - Minimalist GNU for Windows
This project is in the process of being migrated to osdn.net/projects/mingw, you can continue to follow us there. MinGW: A native Windows port of the GNU Compiler Collection (GCC), freely distributable import libraries and header files for building native Windows applications; includes extensions to the MSVC runtime to support C99 functionality. All MinGW software can run on 64-bit Windows platforms.

