
 Web Front-endJS TutorialThoughts caused by implementing native js drag and drop effect based on React.js_javascript skills
Thoughts caused by implementing native js drag and drop effect based on React.js_javascript skills

1. Causes & Ideas
I’ve always wanted to write a native js drag and drop effect, and I’ve been having fun learning react recently. So I used react to achieve this drag and drop effect.
First of all, the idea of drag effect is actually very simple. There are mainly three steps:
1. When onmousedown, start the draggable event and record the original coordinate parameters of the dragged element.
2. When onmousemove, record the distance moved by the mouse in real time, and calculate and set the new coordinate value based on the coordinate parameters of the first stage of the dragged element.
3. During onmouseup, close the draggable event and record the new coordinate value.
Note: The position of the element is mainly determined by the absolute positioning of top and left, so the css of the dragged element must be set to absolute positioning.
2. Auxiliary tools
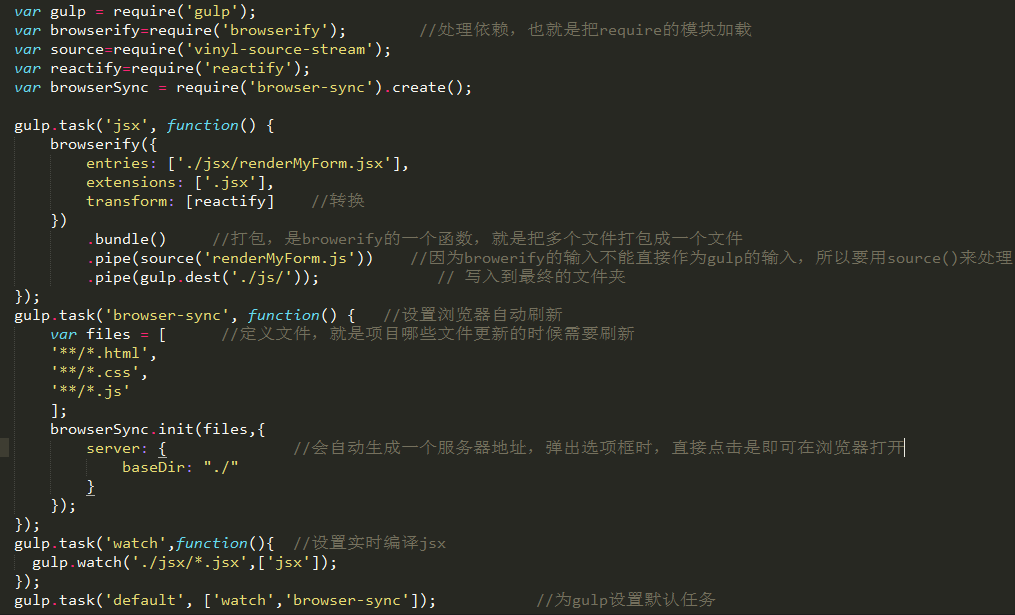
Auxiliary tools mainly make the development process efficient and cool. In this demo, I would like to recommend a gulp+browser-sync development tool to everyone. Gulp has many functions. In this demo, the main function of gulp is to set up real-time compilation of jsx files in react. Of course, if you write css, It is sass, and you can also set up real-time compilation of sass. Using browser-sync, the main thing is to automatically refresh the page in real time. When we usually make pages and see the effect, we usually refresh the browser through F5, and then see the page. But with this plug-in, when you finish writing the code, just press ctrl+s to save, and the new effect will automatically refresh in the browser, and then you can see it.
Detailed explanation of usage:
Installation:
1. Install gulp in the node environment. I won’t go into details here. For the specific process, please refer to my blog post "Things You Must Know to Get Started with React.js"
2. To install gulp-livereload, on the command line or git bash, enter npm install --save-dev gulp-livereload
3. Install gulp-watch, on the command line or git bash, enter npm install --save-dev gulp-watch
4. To install browser-sync, on the command line or git bash, enter npm install --save-dev browser-sync
Configuration and explanation are as shown in the figure:
3. Define component construction page
Note: The code instructions here are all after the react-related modules are installed. For the installation process, please see my blog post "Things You Must Know to Get Started with react.js".
Rendering:

Component splitting ideas:
I thought it would be better to split the components into smaller parts, so I made input and button into one component respectively:
var React=require('react');

var MyInput=React.createClass({
 render:function(){
  return (
  <div className="form-group">
    <label htmlFor={this.props.labelId} className="col-sm-2 control-label{this.props.labelTip</label>
    <div className="col-sm-10">
       <input name={this.props.name} type={this.props.type} onChange={this.props.onChange} className="form-control" id={this.props.labelId} placeholder={this.props.placeholder}/>
    </div>
  </div>
 );
 }
});

module.exports=MyInput;
var React=require('react');

var Button=React.createClass({

  render:function(){
    return (
      <button type={this.props.type} className="loginButton">{this.props.ButtonTip}</button>
    );
  }
})
module.exports=Button;
Since there are many inputs that need to be specified, in this case, if you define it like me, you need to pass too many parameters, and in fact, most of the logged in inputs are fixed and there is no need to reuse them, so this is actually not a good idea. . It is better to write the input here directly.
The parent component after writing:
render:function(){
  return (
  <form className="form-horizontal" id="form" ref="dragBox" onSubmit={this.submitHandler} onMouseMove={this.move} onMouseUp={this.endDrag}>
  <DragArea callbackParent={this.onChildChanged} />
  <div id="form-wrap">
  <MyInput name="username" labelId={"userId"} labelTip={"用户名"} type={"text"} placeholder={"请输入用户名"} value={this.state.username} onChange={this.handleChange}/>
  <MyInput name="password" labelId={"pw"} labelTip={"密码"} type={"password"} placeholder={"请输入密码"} value={this.state.password} onChange={this.handleChange}/>
  <div className="form-group">
  <div className="col-sm-offset-2 col-sm-10">
  <div className="checkbox">
  <label>
  <input name="checked" type="checkbox" checked={this.state.checked} onChange={this.handleChange} /> 记住我
  </label>
  </div>
  </div>
  </div>
  <MyButton type={"submit"} ButtonTip={"登陆"}/>
  </div>
  </form>
  );
Note: Because the real dom node needs to be obtained in the demo, ref is defined.
Add css style and the page is complete! Finally, here comes the point! ! !
4. Communication between parent and child components to implement drag and drop
Note: Since the effect I want to achieve is that when the mouse is pressed on the sub-component DragArea, the entire form is dragged, so the DragArea starts the dragging and the form responds. Therefore, some state properties of the parent component must be passed to the child component at the beginning. Then when the mouse is pressed on the DragArea, the original coordinate parameters of the parent component must be found through the child component DragArea, and then the state properties in the parent component must be updated, and Tells the parent component that dragging is available. Parameters passed from the parent component to the child component are passed directly. The child component needs to pass events to pass parameters to the parent component. So define such a function in the parent component:
onChildChanged:function(newState){ //因为参数过多,所以把参数放到对象里面,通过对象来传
  this.setState(newState);
},
The sub-component needs to bind this function, such as the above code: callbackParent={this.onChildChanged}
In the child component, the response function is:
startDrag:function(e){
  var dragBox=document.getElementById('form');
    var newState={};
    var event=e||window.event;
    event.preventDefault();
    var computedStyle=document.defaultView.getComputedStyle(dragBox,null);
    newState.left=computedStyle.left;
    newState.top=computedStyle.top;
    newState.currentX=event.clientX;
    newState.currentY=event.clientY;
    newState.flag=true;
  <span style="color: #0000ff;">  this.props.callbackParent(newState);</span>
}
In this way, the drag switch is activated in the sub-component, and the relevant parameters of from have been updated. The two other events of from, move and endDrag, are:
move:function(event){
  var e = event ? event : window.event; //兼容IE的写法
  if (this.state.flag) {
    var nowX = e.clientX, nowY = e.clientY;
    var disX = nowX - this.state.currentX, disY = nowY - this.state.currentY;
    ReactDOM.findDOMNode(this.refs.dragBox).style.left = parseInt(this.state.left) + disX + "px";
    ReactDOM.findDOMNode(this.refs.dragBox).style.top = parseInt(this.state.top) + disY + "px";
  }
},
endDrag:function(){
  var computedStyle=document.defaultView.getComputedStyle(ReactDOM.findDOMNode(this.refs.dragBox),null);
  this.setState({
    left:computedStyle.left,
    top:computedStyle.top,
    flag:false
  });
}
At this point, drag and drop is implemented!
5. Reflection and Review
1. Theoretically, the drag effect can be realized in any element, and the idea of drag is the same, so theoretically, the functions of each drag process can be extracted and made into a Mixin, and then Can be called repeatedly. This was my initial idea, but I always made mistakes when passing parameters, responding, and binding elements. After searching for information, I couldn't find information on the simple writing methods of react and drag and drop. There were only some special plug-ins for react, and they were written in ES6. I can't understand them at my current level. So I gave up this way of writing for the time being. I hope that experts who have relevant ideas can share with me.
2. When the subcomponent in the article obtains the parameters from, it uses var dragBox=document.getElementById('form'); to find the dom, which seems to violate some concepts of react. But I'm not very familiar with how to get the dom of the parent component from the child component. I've tried defining refs=this.refs.dragBox in the parent component. Then it is passed to the sub-component, but I don’t know why the browser keeps reporting an error saying that this is not a dom node. Ask God for guidance.
3. The general way to write drag events is to define mousemove and mouseup events on the document, but these two events are associated with the parameters of from. In this case, if I define them in the document in react, I cannot track the related events. parameter. So I defined it on from. Is there a better way? Please share!
4. The revolution has not yet succeeded, comrades still need to work hard!
This demo has been uploaded to: https://github.com/LuckyWinty/dragDemo
The above is the entire content of this article, I hope it will be helpful to everyone’s study.

 Understanding the JavaScript Engine: Implementation DetailsApr 17, 2025 am 12:05 AM
Understanding how JavaScript engine works internally is important to developers because it helps write more efficient code and understand performance bottlenecks and optimization strategies. 1) The engine's workflow includes three stages: parsing, compiling and execution; 2) During the execution process, the engine will perform dynamic optimization, such as inline cache and hidden classes; 3) Best practices include avoiding global variables, optimizing loops, using const and lets, and avoiding excessive use of closures.
 Python vs. JavaScript: The Learning Curve and Ease of UseApr 16, 2025 am 12:12 AM
Python is more suitable for beginners, with a smooth learning curve and concise syntax; JavaScript is suitable for front-end development, with a steep learning curve and flexible syntax. 1. Python syntax is intuitive and suitable for data science and back-end development. 2. JavaScript is flexible and widely used in front-end and server-side programming.
 Python vs. JavaScript: Community, Libraries, and ResourcesApr 15, 2025 am 12:16 AM
Python and JavaScript have their own advantages and disadvantages in terms of community, libraries and resources. 1) The Python community is friendly and suitable for beginners, but the front-end development resources are not as rich as JavaScript. 2) Python is powerful in data science and machine learning libraries, while JavaScript is better in front-end development libraries and frameworks. 3) Both have rich learning resources, but Python is suitable for starting with official documents, while JavaScript is better with MDNWebDocs. The choice should be based on project needs and personal interests.
 From C/C to JavaScript: How It All WorksApr 14, 2025 am 12:05 AM
The shift from C/C to JavaScript requires adapting to dynamic typing, garbage collection and asynchronous programming. 1) C/C is a statically typed language that requires manual memory management, while JavaScript is dynamically typed and garbage collection is automatically processed. 2) C/C needs to be compiled into machine code, while JavaScript is an interpreted language. 3) JavaScript introduces concepts such as closures, prototype chains and Promise, which enhances flexibility and asynchronous programming capabilities.
 JavaScript Engines: Comparing ImplementationsApr 13, 2025 am 12:05 AM
Different JavaScript engines have different effects when parsing and executing JavaScript code, because the implementation principles and optimization strategies of each engine differ. 1. Lexical analysis: convert source code into lexical unit. 2. Grammar analysis: Generate an abstract syntax tree. 3. Optimization and compilation: Generate machine code through the JIT compiler. 4. Execute: Run the machine code. V8 engine optimizes through instant compilation and hidden class, SpiderMonkey uses a type inference system, resulting in different performance performance on the same code.
 Beyond the Browser: JavaScript in the Real WorldApr 12, 2025 am 12:06 AM
JavaScript's applications in the real world include server-side programming, mobile application development and Internet of Things control: 1. Server-side programming is realized through Node.js, suitable for high concurrent request processing. 2. Mobile application development is carried out through ReactNative and supports cross-platform deployment. 3. Used for IoT device control through Johnny-Five library, suitable for hardware interaction.
 Building a Multi-Tenant SaaS Application with Next.js (Backend Integration)Apr 11, 2025 am 08:23 AM
I built a functional multi-tenant SaaS application (an EdTech app) with your everyday tech tool and you can do the same. First, what’s a multi-tenant SaaS application? Multi-tenant SaaS applications let you serve multiple customers from a sing
 How to Build a Multi-Tenant SaaS Application with Next.js (Frontend Integration)Apr 11, 2025 am 08:22 AM
This article demonstrates frontend integration with a backend secured by Permit, building a functional EdTech SaaS application using Next.js. The frontend fetches user permissions to control UI visibility and ensures API requests adhere to role-base


Hot AI Tools

Undresser.AI Undress
AI-powered app for creating realistic nude photos

AI Clothes Remover
Online AI tool for removing clothes from photos.

Undress AI Tool
Undress images for free

Clothoff.io
AI clothes remover

AI Hentai Generator
Generate AI Hentai for free.

Hot Article
Hot Tools

SublimeText3 Mac version
God-level code editing software (SublimeText3)

PhpStorm Mac version
The latest (2018.2.1) professional PHP integrated development tool

Safe Exam Browser
Safe Exam Browser is a secure browser environment for taking online exams securely. This software turns any computer into a secure workstation. It controls access to any utility and prevents students from using unauthorized resources.

SublimeText3 Linux new version
SublimeText3 Linux latest version

MinGW - Minimalist GNU for Windows
This project is in the process of being migrated to osdn.net/projects/mingw, you can continue to follow us there. MinGW: A native Windows port of the GNU Compiler Collection (GCC), freely distributable import libraries and header files for building native Windows applications; includes extensions to the MSVC runtime to support C99 functionality. All MinGW software can run on 64-bit Windows platforms.

