
 Web Front-endJS TutorialExclusive for Valentine's Day, pure js script 1k size 3D rose effect_javascript skills
前年圣诞节上,西班牙程序员Roman Cortes带来了用纯javascript脚本编写的神奇3D圣诞树,令人印象深刻。2月14日情人节就要来临了,还是Roman Cortes,这次他又带来了用javascript脚本编写的红色玫瑰花。用代码做出的玫瑰花,这才是牛逼程序员送给女友的最好情人节礼物呢!(提示:在不同浏览器下观看效果、速度会有很大的不同)
图片是由代码生成,用户可以刷新该页面,重复观看这朵玫瑰的呈现过程。
3D玫瑰花的实现代码如下:
|
with(m=Math)C=cos,S=sin,P=pow,R=random;c.width=c.height=f=500;h=-250;function p(a,b,c){if(c>60)return[S(a*7)*(13+5/(.2+P(b*4,4)))-S(b)*50,b*f+50,625+C(a*7)*(13+5/(.2+P(b*4,4)))+b*400,a*1-b/2,a];A=a*2-1;B=b*2-1;if(A*A+B*B37){n=(j=c&1)?6:4;o=.5/(a+.01)+C(b*125)*3-a*300;w=b*h;return[o*C(n)+w*S(n)+j*610-390,o*S(n)-w*C(n)+550-j*350,1180+C(B+A)*99-j*300,.4-a*.1+P(1-B*B,-h*6)*.15-a*b*.4+C(a+b)/5+P(C((o*(a+1)+(B>0?w:-w))/25),30)*.1*(1-B*B),o/1e3+.7-o*w*3e-6]}if(c>32){c=c*1.16-.15;o=a*45-20;w=b*b*h;z=o*S(c)+w*C(c)+620;return[o*C(c)-w*S(c),28+C(B*.5)*99-b*b*b*60-z/2-h,z,(b*b*.3+P((1-(A*A)),7)*.15+.3)*b,b*.7]}o=A*(2-b)*(80-c*2);w=99-C(A)*120-C(b)*(-h-c*4.9)+C(P(1-b,7))*50+c*2;z=o*S(c)+w*C(c)+700;return[o*C(c)-w*S(c),B*99-C(P(b, 7))*50-c/3-z/1.35+450,z,(1-b/1.2)*.9+a*.1, P((1-b),20)/4+.05]}}setInterval('for(i=0;iz)m[q]=z,a.fillStyle="rgb("+~(s[3]*h)+","+~(s[4]*h)+","+~(s[3]*s[3]*-80)+")",a.fillRect(x,y,1,1)}',0) |
当然,感兴趣的人可以了解下面的实现过程与相关理论:
这朵三维代码玫瑰的呈现效果采用了蒙特卡罗方法,创造者对蒙特卡罗方法非常推崇,他表示在功能优化和采样方面,蒙特卡罗方法是“令人难以置信的强大工具”。关于蒙特卡罗方法可以参考:Monte Carlo method 。
具体操作:
外观采样呈现效果绘制
我用了多个不同的形状图来组成这朵代码玫瑰。共使用了31个形状:24个花瓣,4个萼片,2个叶子和1根花茎,其中每一个形状图都用代码进行描绘。
首先,来定义一个采样范围:
|
function surface(a, b) { // I'm using a and b as parameters ranging from 0 to 1. return { x: a*50, y: b*50 }; // this surface will be a square of 50x50 units of size } |
然后,编写形状描绘代码:
|
var canvas = document.body.appendChild(document.createElement("canvas")), context = canvas.getContext("2d"), a, b, position; // Now I'm going to sample the surface at .1 intervals for a and b parameters: for (a = 0; a for (b = 0; b position = surface(a, b); context.fillRect(position.x, position.y, 1, 1); } } |
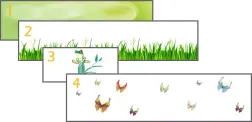
这时,看到的效果是这样的:

现在,尝试一下更密集的采样间隔:
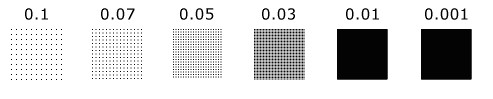
正如现在所看到的,因为采样间隔越来越密集,点越来越接近,到最高密度时,相邻点之间的距离小于一个像素,肉眼就看不到间隔(见0.01)。为了不造成太大的视觉差,再进一步缩小采样间隔,此时,绘制区已经填满(比较结果为0.01和0.001)。
接下来,我用这个公式来绘制一个圆形:(X-X0)^ 2 +(Y-Y0)^ 2
|
function surface(a, b) { var x = a * 100, y = b * 100, radius = 50, x0 = 50, y0 = 50; if ((x - x0) * (x - x0) + (y - y0) * (y - y0) // inside the circle return { x: x, y: y }; } else { // outside the circle return null; } } |
为了防止溢出,还要加上一个采样条件:
|
if (position = surface(a, b)) { context.fillRect(position.x, position.y, 1, 1); } |
结果如下:

有不同的方法来定义一个圆,其中一些并不需要拒绝采样。我并无一定要使用哪一种来定义圆圈的意思,所以下面用另一种方法来定义一个圆:
|
function surface(a, b) { // Circle using polar coordinates var angle = a * Math.PI * 2, radius = 50, x0 = 50, y0 = 50; return { x: Math.cos(angle) * radius * b + x0, y: Math.sin(angle) * radius * b + y0 }; } |
如图:

(此方法相比前一个方法需要密集采样以进行填充。)
好了,现在让圆变形,以使它看起来更像是一个花瓣:
|
function surface(a, b) { var x = a * 100, y = b * 100, radius = 50, x0 = 50, y0 = 50; if ((x - x0) * (x - x0) + (y - y0) * (y - y0) return { x: x, y: y * (1 + b) / 2 // deformation }; } else { return null; } } |
结果:

这看起来已经很像一个玫瑰花瓣的形状了。在这里也可以试试通过修改一些函数数值,将会出现很多有趣的形状。
接下来应该给它添加色彩了:
|
function surface(a, b) { var x = a * 100, y = b * 100, radius = 50, x0 = 50, y0 = 50; if ((x - x0) * (x - x0) + (y - y0) * (y - y0) return { x: x, y: y * (1 + b) / 2, r: 100 + Math.floor((1 - b) * 155), // this will add a gradient g: 50, b: 50 }; } else { return null; } } for (a = 0; a for (b = 0; b if (point = surface(a, b)) { context.fillStyle = "rgb(" + point.r + "," + point.g + "," + point.b + ")"; context.fillRect(point.x, point.y, 1, 1); } } } |
结果:

一片带色的花瓣就出现了。
3D曲面和透视投影
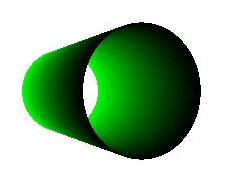
定义三维表面很简单,比如,来定义一个管状物体:
|
function surface(a, b) { var angle = a * Math.PI * 2, radius = 100, length = 400; return { x: Math.cos(angle) * radius, y: Math.sin(angle) * radius, z: b * length - length / 2, // by subtracting length/2 I have centered the tube at (0, 0, 0) r: 0, g: Math.floor(b * 255), b: 0 }; } |
接着添加投影透视图,首先需要我们定义一个摄像头:

如上图,将摄像头放置在(0,0,Z)位置,画布在X / Y平面。投影到画布上的采样点为:
|
var pX, pY, // projected on canvas x and y coordinates perspective = 350, halfHeight = canvas.height / 2, halfWidth = canvas.width / 2, cameraZ = -700; for (a = 0; a for (b = 0; b if (point = surface(a, b)) { pX = (point.x * perspective) / (point.z - cameraZ) + halfWidth; pY = (point.y * perspective) / (point.z - cameraZ) + halfHeight; context.fillStyle = "rgb(" + point.r + "," + point.g + "," + point.b + ")"; context.fillRect(pX, pY, 1, 1); } } } |
效果为:

z-buffer
z-buffer在计算机图形学中是一个相当普遍的技术,在为物件进行着色时,执行“隐藏面消除”工作,使隐藏物件背后的部分就不会被显示出来。

上图是用z-buffer技术处理后的玫瑰。(可以看到已经具有立体感了)
代码如下:
|
var zBuffer = [], zBufferIndex; for (a = 0; a for (b = 0; b if (point = surface(a, b)) { pX = Math.floor((point.x * perspective) / (point.z - cameraZ) + halfWidth); pY = Math.floor((point.y * perspective) / (point.z - cameraZ) + halfHeight); zBufferIndex = pY * canvas.width + pX; if ((typeof zBuffer[zBufferIndex] === "undefined") || (point.z zBuffer[zBufferIndex] = point.z; context.fillStyle = "rgb(" + point.r + "," + point.g + "," + point.b + ")"; context.fillRect(pX, pY, 1, 1); } } } } |
旋转
你可以使用任何矢量旋转的方法。在代码玫瑰的创建中,我使用的是欧拉旋转。现在将之前编写的管状物进行旋转,实现绕Y轴旋转:
|
function surface(a, b) { var angle = a * Math.PI * 2, radius = 100, length = 400, x = Math.cos(angle) * radius, y = Math.sin(angle) * radius, z = b * length - length / 2, yAxisRotationAngle = -.4, // in radians! rotatedX = x * Math.cos(yAxisRotationAngle) + z * Math.sin(yAxisRotationAngle), rotatedZ = x * -Math.sin(yAxisRotationAngle) + z * Math.cos(yAxisRotationAngle); return { x: rotatedX, y: y, z: rotatedZ, r: 0, g: Math.floor(b * 255), b: 0 }; } |
Effect:
Monte Carlo method
Regarding the sampling time, if the interval is too large or too small, it will cause a very poor visual experience. Therefore, it is necessary to set a reasonable sampling interval. The Monte Carlo method is used here.
window.setInterval(function () {
for (i = 0; i if (point = surface(Math.random(), Math.random())) {
pX = Math.floor((point.x * perspective) / (point.z - cameraZ) halfWidth); pY = Math.floor((point.y * perspective) / (point.z - cameraZ) halfHeight);
zBufferIndex = pY * canvas.width pX;
if ((typeof zBuffer[zBufferIndex] === "undefined") || (point.z
zBuffer[zBufferIndex] = point.z; context.fillStyle = "rgb(" point.r "," point.g "," point.b ")";
context.fillRect(pX, pY, 1, 1); }
} }
}, 0); |

 Replace String Characters in JavaScriptMar 11, 2025 am 12:07 AM
Detailed explanation of JavaScript string replacement method and FAQ This article will explore two ways to replace string characters in JavaScript: internal JavaScript code and internal HTML for web pages. Replace string inside JavaScript code The most direct way is to use the replace() method: str = str.replace("find","replace"); This method replaces only the first match. To replace all matches, use a regular expression and add the global flag g: str = str.replace(/fi
 8 Stunning jQuery Page Layout PluginsMar 06, 2025 am 12:48 AM
Leverage jQuery for Effortless Web Page Layouts: 8 Essential Plugins jQuery simplifies web page layout significantly. This article highlights eight powerful jQuery plugins that streamline the process, particularly useful for manual website creation
 Build Your Own AJAX Web ApplicationsMar 09, 2025 am 12:11 AM
So here you are, ready to learn all about this thing called AJAX. But, what exactly is it? The term AJAX refers to a loose grouping of technologies that are used to create dynamic, interactive web content. The term AJAX, originally coined by Jesse J
 10 Mobile Cheat Sheets for Mobile DevelopmentMar 05, 2025 am 12:43 AM
This post compiles helpful cheat sheets, reference guides, quick recipes, and code snippets for Android, Blackberry, and iPhone app development. No developer should be without them! Touch Gesture Reference Guide (PDF) A valuable resource for desig
 Improve Your jQuery Knowledge with the Source ViewerMar 05, 2025 am 12:54 AM
jQuery is a great JavaScript framework. However, as with any library, sometimes it’s necessary to get under the hood to discover what’s going on. Perhaps it’s because you’re tracing a bug or are just curious about how jQuery achieves a particular UI
 10 jQuery Fun and Games PluginsMar 08, 2025 am 12:42 AM
10 fun jQuery game plugins to make your website more attractive and enhance user stickiness! While Flash is still the best software for developing casual web games, jQuery can also create surprising effects, and while not comparable to pure action Flash games, in some cases you can also have unexpected fun in your browser. jQuery tic toe game The "Hello world" of game programming now has a jQuery version. Source code jQuery Crazy Word Composition Game This is a fill-in-the-blank game, and it can produce some weird results due to not knowing the context of the word. Source code jQuery mine sweeping game
 How do I create and publish my own JavaScript libraries?Mar 18, 2025 pm 03:12 PM
Article discusses creating, publishing, and maintaining JavaScript libraries, focusing on planning, development, testing, documentation, and promotion strategies.
 jQuery Parallax Tutorial - Animated Header BackgroundMar 08, 2025 am 12:39 AM
This tutorial demonstrates how to create a captivating parallax background effect using jQuery. We'll build a header banner with layered images that create a stunning visual depth. The updated plugin works with jQuery 1.6.4 and later. Download the


Hot AI Tools

Undresser.AI Undress
AI-powered app for creating realistic nude photos

AI Clothes Remover
Online AI tool for removing clothes from photos.

Undress AI Tool
Undress images for free

Clothoff.io
AI clothes remover

AI Hentai Generator
Generate AI Hentai for free.

Hot Article
Hot Tools

SublimeText3 Linux new version
SublimeText3 Linux latest version

WebStorm Mac version
Useful JavaScript development tools

Dreamweaver CS6
Visual web development tools

SAP NetWeaver Server Adapter for Eclipse
Integrate Eclipse with SAP NetWeaver application server.

SublimeText3 Chinese version
Chinese version, very easy to use

