 Web Front-end
 JS Tutorial
 Learn to use bootstarp basic controls (table, form, button)_javascript skills
Bootstrap defines simple and easy-to-use styles for us. We only need a few style specifications to complete a simple and elegant page display.
This article mainly introduces the following basic controls:
1. table
2. form
3. button
1. Table still uses
| . There are the following classes to control table attributes. By default, the table style will occupy the parent container
 <div class="container">
    <div class="row">
      <div class="col-md-8 col-md-offset-2">
        <table class="table table-bordered table-striped table-hover">
      <tr>
        <th>标题一</th>
        <th>标题二</th>
        <th>标题三</th>
      </tr>
      <tr>
        <td>1</td>
        <td>2</td>
        <td>3</td>
      </tr>
      <tr>
        <td>4</td>
        <td>5</td>
        <td>6</td>
      </tr>
    </table>
      </div>
    </div>
  </div>
Wrap any .table in .table-responsive to create a responsive table that will scroll horizontally on small screen devices (less than 768px). When the screen is 768px wider, the horizontal scrollbar disappears. 2. Form, there are several style definitions
Lables and controls should be wrapped in divs of form-group type. The default form is as follows
 <div class="container">
    <form>
      <div class="form-group">
        <label for="exampleInputEmail1">Email address</label>
        <input type="email" class="form-control" id="exampleInputEmail1"
          placeholder="Enter email">
      </div>
      <div class="form-group">
        <label for="exampleInputPassword1">Password</label>
        <input type="password" class="form-control"
          id="exampleInputPassword1" placeholder="Password">
      </div>
      <div class="checkbox">
        <label> <input type="checkbox"> Check me out
        </label>
      </div>
      <button type="submit" class="btn btn-default">Submit</button>
    </form>
  </div>
Inline form, Specify sr-only category for label, you can hide the label, but label must not be omitted.
  <div class="container">
    <form class="form-inline">
      <div class="form-group">
        <label for="exampleInputEmail1" class="sr-only">Email address</label>
        <input type="email" class="form-control" id="exampleInputEmail1"
          placeholder="Enter email">
      </div>
      <div class="form-group">
        <label for="exampleInputPassword1">Password</label>
        <input type="password" class="form-control"
          id="exampleInputPassword1" placeholder="Password">
      </div>
      <div class="checkbox">
        <label> <input type="checkbox"> Check me out
        </label>
      </div>
      <button type="submit" class="btn btn-default">Submit</button>
    </form>
  </div>
Horizontal form requires specifying the length of the label and label group, and adopting a grid system layout. The label is aligned to the right and the label group is aligned to the left.
 <div class="container">
    <form class="form-horizontal">
      <div class="form-group">
          <label for="exampleInputEmail1" class="col-md-2 control-label">Email
            address</label>
        <div class="col-md-8">
          <input type="email" class="form-control" id="exampleInputEmail1"
            placeholder="Enter email">
        </div>
      </div>
      <div class="form-group" >
          <label for="exampleInputPassword1" class="col-md-2 control-label">Password</label>
        <div class="col-md-8">
          <input type="password" class="form-control"
            id="exampleInputPassword1" placeholder="Password">
        </div>
      </div>
      <div class="checkbox col-md-offset-2">
        <label> <input type="checkbox"> Check me out
        </label>
      </div>
      <button type="submit" class="btn btn-default col-md-offset-2">Submit</button>
    </form>
  </div>
form form validation, bootstrap3 supports custom validation of forms. Adding req uired indicates that the form is required, node.setCustomValidity can set the custom validation of the form
<div class="container">
    <form class="form-horizontal">
      <div class="form-group">
        <label for="exampleInputEmail1" class="col-md-2 control-label">Email
          address</label>
        <div class="col-md-8">
          <input type="email" class="form-control" id="exampleInputEmail1"
            placeholder="Enter email" required>
        </div>
      </div>
      <div class="form-group">
        <label for="password1" class="col-md-2 control-label">Password</label>
        <div class="col-md-8">
          <input type="password" class="form-control"
            id="password1" placeholder="Password" required onchange="checkPassword()">
        </div>
      </div>
<div class="form-group">
        <label for="password2" class="col-md-2 control-label" onchange="checkPassword()"> Password2</label>
        <div class="col-md-8">
          <input type="password" class="form-control"
            id="password2" placeholder="Password2" required>
        </div>
      </div>
      <div class="checkbox col-md-offset-2">
        <label> <input type="checkbox"> Check me out
        </label>
      </div>
      <button type="submit" class="btn btn-default col-md-offset-2">Submit</button>
    </form>
  </div>

  <script>
    function checkPassword() {
      var pwd1 = $("#password1").val();
      var pwd2 = $("#password2").val();
      if (pwd1 != pwd2) {
        document.getElementById("password1").setCustomValidity("两次输入的密码不一致");
      } else {
        document.getElementById("password1").setCustomValidity("");
      }

    }
  </script>
3. button style
Use .btn-lg, .btn-sm, .btn-xs to get buttons of different sizes. Adding .btn-block to the button can make it fill 100% of the width of the parent node, and the button also becomes block level. (block) element, ,
  <div class="container">
    <button type="button" class="btn btn-default btn-block">Default</button>
    <button type="button" class="btn btn-primary btn-block">Primary</button>
    <button type="button" class="btn btn-success">Success</button>
    <button type="button" class="btn btn-info">Info</button>
    <button type="button" class="btn btn-warning">Warning</button>
    <button type="button" class="btn btn-danger">Danger</button>
    <button type="button" class="btn btn-link">链接</button>
    <a class="btn btn-default" href="#" role="button">Link</a>
    <button class="btn btn-default" type="submit">Button</button>
    <input class="btn btn-default" type="button" value="Input">
    <input class="btn btn-default" type="submit" value="Submit">
  </div>
The above is the entire content of this article, I hope it will be helpful to everyone’s study. |
 html怎么设置button大小及颜色Mar 05, 2021 pm 05:16 PM
在html中,可以使用width和height属性来设置button元素的大小,使用background-color属性来设置button元素的颜色,具体语法为“button{width:宽度值;height:高度值;background-color: 颜色值;}”。
 BinaryX再次更名FORM,还给社区的FOUR即将暴涨?Mar 04, 2025 pm 12:00 PM
BinaryX的代币更名:从BNX到FOUR,再到FORM,战略调整背后的深层含义BinaryX近期将代币符号从$FOUR更改为$FORM,引发业界广泛关注。这并非BinaryX首次更名,其代币符号曾经历BNX到FOUR的转变。本文将深入探讨这一系列更名背后的战略意图。一、代币更名历程与战略考量BinaryX最初于2021年推出基于BNB链的$BNX代币,用于支持其Play-to-Earn(P2E)游戏生态。2024年初,为优化经济模型,BinaryX对$BNX进行了分割,并逐渐拓展至GameF
 vue3 table组件怎么使用May 12, 2023 pm 09:40 PM
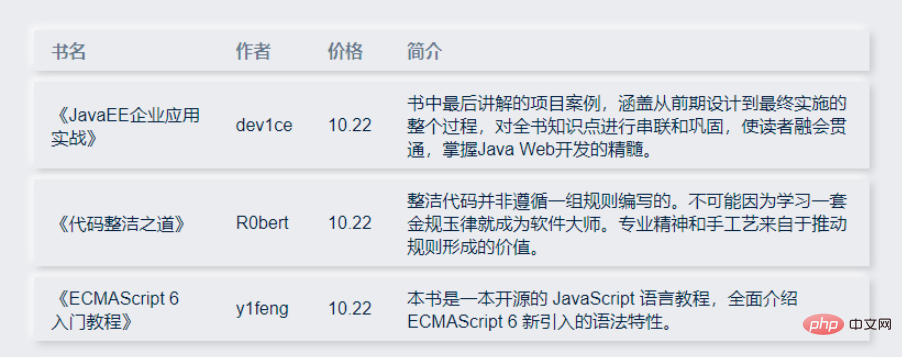
基础表格首先开发table组件之前,先想好要用什么样式的api,因为笔者在生产工作中用的都是element,所以前面几个组件风格和element类似,但是这次不打算用element的风格了,打算换一种,直接展示:我们期望用户这样使用:constdataList=[{id:1,name:'《JavaEE企业应用实战》',author:'dev1ce',price:'10.22',desc:
 react中怎么禁止button渲染Jan 19, 2023 pm 01:58 PM
react中禁止button渲染的方法:1、打开相应的js代码文件;2、找到“const flags = true;<Button disabled={flags}/>”并将其中的“true”值修改为“false”即可禁止button。
 html5定义表单的标签是什么Jul 26, 2022 pm 04:26 PM
html5定义表单的标签是“<form>”。form标签用于创建供用户输入的HTML表单(表单域),以实现用户信息的收集和传递,form中的所有内容都会被提交给服务器;语法“<form action="提交地址" method="提交方式" name="表单名称">表单控件</form>”。form表单中可包含一个或多个表单元素,比如input、select、textarea。
 html5中可以有多个form吗Aug 01, 2022 pm 05:28 PM
html5中可以有多个form。在同一个HTML的页面中规则上允许可以用到多个form标签,但是为了防止提交时后台无法识别,需要给表单加上不同的ID或者class,语法“<from action="url" id="id值1">表单元素</from><from action="url" id="id值2">表单元素</from>.....”。
 html中button标签的用法Feb 24, 2021 pm 02:16 PM
在html中,button标签用于定义一个按钮,在元素内部可以放置内容,比如文本或图像等;使用语法为“<button type="button" onclick="js代码">按钮</button>”,button标签的属性和js代码结合可以实现交换效果。


Hot AI Tools

Undresser.AI Undress
AI-powered app for creating realistic nude photos

AI Clothes Remover
Online AI tool for removing clothes from photos.

Undress AI Tool
Undress images for free

Clothoff.io
AI clothes remover

AI Hentai Generator
Generate AI Hentai for free.

Hot Article

Hot Tools

SublimeText3 Linux new version
SublimeText3 Linux latest version

WebStorm Mac version
Useful JavaScript development tools

Dreamweaver CS6
Visual web development tools

SAP NetWeaver Server Adapter for Eclipse
Integrate Eclipse with SAP NetWeaver application server.

SublimeText3 Chinese version
Chinese version, very easy to use


