


在任何一个快速迭代的工程下,如何保证开发和生产(现网)数据库同步是一个很头疼的事情。Magento提供了一个创建资源迁移版本的系统,可以帮助我们处理开发过程中不断遇到的这个问题。www.2cto.com
上次我们创建了weblogpost的模型。这次,我们执行直接执行CREATE TABLE。我们将未我们的module创建一个Setup Resource,而该资源会创建一个表格。我们同时也会创建一个升级的脚本,它能升级已经安装的module。总的来说
1. 在config里增加SetupResource
2. 创建resourceclass文件
3. 创建installerscript
4. 创建升级script
增加Setup Resource
我们在
增加完配置后,清除cache,并且加载Magento Site,你会发现出异常了
Fatalerror: Class 'XStarX_Weblog_Model_Resource_Mysql4_Setup' not found in
Magento试图实例化我们在config里声明的类,但是没有找到。我们需要创建这样的类文件app/code/local/XStarX/Weblog/Model/Resource/Mysql4/Setup.php
classXStarX_Weblog_Model_Resource_Mysql4_Setup extendsMage_Core_Model_Resource_Setup { }
现在重新加载Magento网站,异常就消失了。
创建安装脚本
接下来,我们要创建安装脚本。脚本包含了之前的CREATETABLE语句。
首先,先看一下config.xml
这个部分在配置文件中是必备的,标示了module的同时也告诉了版本。安装脚本要基于版本好。在下列位置创建文件
app/code/local/XStarX/Weblog/sql/weblog_setup/mysql4-install-0.1.0.php
echo 'Running This Upgrade: '.get_class($this)."\n
\n";
die("Exit for now");
路径的weblog_setup部分匹配了config.xml文件
Running This Upgrade:Alanstormdotcom_Weblog_Model_Resource_Mysql4_Setup Exit for now ...
这意味着我们的update脚本执行了。最终我们把SQL更新文件放在这里,但是暂时我们把精力放在setup机制上。把die声明去掉,
echo 'Running This Upgrade:'.get_class($this)."\n
\n";
重新加载页面,可以看到升级消息在页面的首部分展示。重新加载,页面将恢复正常。因为setup就一次嘛。不可能总setup。
创建安装脚本
MagenoSetup Resources容许我们简单的放置安装脚本和升级脚本,然后系统就会自动执行。这容许我们系统中的数据迁移脚本保持一次。
使用database client,查看core_resroucetable
mysql> select * from core_resource;
+-------------------------+---------+ |code | version |+-------------------------+-----+
|adminnotification_setup | 1.0.0 |
| admin_setup | 0.7.1 |
| amazonpayments_setup | 0.1.2 |
| api_setup | 0.8.1 |
| backup_setup | 0.7.0 |
| bundle_setup | 0.1.7 |
| catalogindex_setup | 0.7.10 |
| cataloginventory_setup | 0.7.5 |
| catalogrule_setup | 0.7.7 |
| catalogsearch_setup | 0.7.6 |
| catalog_setup | 0.7.69 |
| checkout_setup | 0.9.3 |
| chronopay_setup | 0.1.0 |
| cms_setup | 0.7.8 |
| compiler_setup | 0.1.0 |
| contacts_setup | 0.8.0 |
| core_setup | 0.8.13 |
| cron_setup | 0.7.1 |
| customer_setup | 0.8.11 |
| cybermut_setup | 0.1.0 |
| cybersource_setup | 0.7.0 |
| dataflow_setup | 0.7.4 |
| directory_setup | 0.8.5 |
| downloadable_setup | 0.1.14 |
| eav_setup | 0.7.13 |
| eway_setup | 0.1.0 |
| flo2cash_setup | 0.1.1 |
| giftmessage_setup |0.7.2 |
| googleanalytics_setup | 0.1.0 |
| googlebase_setup | 0.1.1 |
| googlecheckout_setup | 0.7.3 |
| googleoptimizer_setup | 0.1.2 |
| ideal_setup | 0.1.0 |
| log_setup | 0.7.6 |
| newsletter_setup | 0.8.0 |
| oscommerce_setup | 0.8.10 |
| paybox_setup | 0.1.3 |
| paygate_setup | 0.7.0 |
| payment_setup | 0.7.0 |
| paypaluk_setup | 0.7.0 |
| paypal_setup | 0.7.2 |
| poll_setup | 0.7.2 |
| productalert_setup | 0.7.2 |
| protx_setup | 0.1.0 |
| rating_setup | 0.7.2 |
| reports_setup | 0.7.7 |
| review_setup | 0.7.4 |
| salesrule_setup | 0.7.7 |
| sales_setup | 0.9.38 |
| sendfriend_setup | 0.7.2 |
| shipping_setup | 0.7.0 |
| sitemap_setup | 0.7.2 |
| strikeiron_setup | 0.9.1 |
| tag_setup | 0.7.2 |
| tax_setup | 0.7.8 |
| usa_setup | 0.7.0 |
| weblog_setup | 0.1.0 |
| weee_setup | 0.13 |
| wishlist_setup | 0.7.4 |
+-------------------------+---------+ 59 rowsin set (0.00 sec)
这个表格包含了所有安装module的list,同时还有对应的版本。在表的结尾部分看到了
| weblog_setup | 0.1.0 |
这个就是Magento如何知道要不要重新执行脚本。如果都成功,页面就会加载。Weblog_setup已经安装了,所以不需要更新。如果想重装脚本,需要删除表里的改行。我们现在可以删除
DELETE from core_resource where code = 'weblog_setup';
然后删除对应的table
DROP TABLE blog_posts;
接着在setup脚本里增加
$installer = $this;
$installer->startSetup();
$installer->run("
CREATE TABLE `{
$installer->getTable('weblog/blogpost')}`(
`blogpost_id`int(11) NOT NULL auto_increment,
`title`text,
`post`text,
`date`datetime default NULL,
`timestamp`timestamp NOT NULL default CURRENT_TIMESTAMP, PRIMARY KEY (`blogpost_id`) )
ENGINE=InnoDBDEFAULT CHARSET=utf8;
INSERTINTO `{$installer->getTable('weblog/blogpost')}` VALUES (1,'My NewTitle','This is a blog post','2009-07-01 00:00:00','2009-07-02 23:12:30'); ");
$installer->endSetup();
清除cache,加载页面,你可以看到blog_posts又创建了,并且有一条数据。
创建安装脚本---问题
上面的安装可能不会那么顺利,在magento1.7下面会报错
Mage_Eav_Exception: Can't create table: module_entity
如何解决呢?
Debug createEntityTables()方法,可以在结尾处看到
$connection->beginTransaction(); try { foreach ($tables as $tableName => $table) { $connection->createTable($table); } $connection->commit(); } catch (Exception $e) { Zend_Debug::dump($e->getMessage()); $connection->rollBack(); throw Mage::exception('Mage_Eav', Mage::helper('eav')->__('Can\'t create table: %s', $tableName)); }
查看底层错误是:UserError: DDL statements are not allowed in transactions
然后跟进commit函数
/** * Check transaction level in case of DDL query * * @param string|Zend_Db_Select $sql * @throws Zend_Db_Adapter_Exception */ protected function _checkDdlTransaction($sql) { if (is_string($sql) && $this->getTransactionLevel() > 0) { $startSql = strtolower(substr(ltrim($sql), 0, 3)); if (in_array($startSql, $this->_ddlRoutines)) { trigger_error(Varien_Db_Adapter_Interface::ERROR_DDL_MESSAGE, E_USER_ERROR); } } }
结论是Mysql不支持DDL Transaction。
因此在app/code/local/{CompanyName}/{ModuleName}/Setup/Helper.php里重写createEntityTable方法
{ ... /** * Remove transaction code due to issues with errors. */ //$connection->beginTransaction(); try { foreach ($tables as $tableName => $table) { $connection->createTable($table); } $connection->commit(); } catch (Exception $e) { //$connection->rollBack(); throw Mage::exception('Mage_Eav', Mage::helper('eav')->__('Can\'t create table: %s', $tableName)); } } }
然后问题解决。
Setup脚本剖析
让我们一行一行的解释。首先
$installer = $this;
每个安装脚本都是从SetResource类开始执行的(就是我们上面创建的)。这意味着脚本中的$this引用是这个类实例化的引用。如果不是必须,core系统里大部分安装脚本都是把$this命名未installer,此处我们也是这样。
接下来我们看到了两个方法
$installer->startSetup();
//...
$installer->endSetup();
如果查看Mage_Core_Model_Resource_Setup类(在目录app/code/core/Mage/Core/Resource/Setup.php),你可以看到如下的内容
public function startSetup()
{
$this->_conn->multi_query("
SET SQL_MODE='';
SET @OLD_FOREIGN_KEY_CHECKS=@@FOREIGN_KEY_CHECKS, FOREIGN_KEY_CHECKS=0;
SET @OLD_SQL_MODE=@@SQL_MODE, SQL_MODE='NO_AUTO_VALUE_ON_ZERO'; ");
return $this;
}
public function endSetup()
{
$this->_conn->multi_query("
SET SQL_MODE=IFNULL(@OLD_SQL_MODE,'');
SET FOREIGN_KEY_CHECKS=IFNULL(@OLD_FOREIGN_KEY_CHECKS,0); ");
return $this;
}
最后我们执行
$installer->run(...);
这个接受了一个包含创建数据库的SQL。你可定义任意的查询,通过分号隔开就好。同时,也要注意
$installer->getTable('weblog/blogpost')
getTable方法容许我们把Magento Model URI传入,然后得到它的表名。如果不是必要,就用次方法执行。Mage_Core_Model_Resource_Setup类包含了很多有用的Helper方法。最有效的学习是研究Magento core的installer scripts。
Module升级
上面讲述了如何初始化数据表,但是如何改变现有墨香的结构呢?Magento的Setup Resources支持一个简单的版本策略,可以让我们自动的执行脚本来升级我们的模块。
一旦Magento执行一个安装脚本后,它就不会再次执行另外一个安装脚本。这个时候,我们应该创建一个升级脚本。升级脚本跟安装脚本非常类似,只有有些关键处不一样。
作为开始,我们在下列位置创建一个脚本,
XStarX/Weblog/sql/weblog_setup/mysql4-upgrade-0.1.0-0.2.0.php
echo 'Testing our upgrade script (mysql4-upgrade-0.1.0-0.2.0.php) and halting execution to avoid updating the system version number
';
die();
升级脚本和安装脚本在同一个目录,但是略有不同。首先,文件名要包含upgrade。其次,要有两个版本号,并用“-”分隔。第一个是升级的源版本,第二个是升级的目标版本。
清除cache后,重新加载页面,但这个时候脚本并没有执行。我们需要更新config.xml里面的版本信息来触发升级
写入新的版本号后,如果清除缓存,加载网站,就可以看到输出了。这个时候还有一个关键点需要注意,所以先不慌做这一步。我们在同样的目录创建另外一个文件
XStarX/Weblog/sql/weblog_setup/mysql4-upgrade-0.1.0-0.1.5.php
echo 'Testing our upgrade script (mysql4-upgrade-0.1.0-0.1.5.php) and NOT halting execution
';
这个时候再清除缓存,加载页面,可以看到两个信息。当Magento发现版本号信息变更后,他会执行所有可执行的脚本来更新模块。尽管我们从没有创建0.1.5版本,但是Magento会看到升级脚本,然后尝试执行。脚本一般按照从低到高的顺序执行。下面的数据会说明这个
mysql> select * from core_resource where code = 'weblog_setup'; +--------------+---------+
| code | version | +--------------+---------+
| weblog_setup | 0.1.5 | +--------------+---------+
1 row in set (0.00 sec)
我们看到数据表里的版本是1.5。这是因为我们从1.0到1.5升级,但是没有执行1.0到2.0的升级。好了,说明了这个关键问题后,我们言归正传。回到脚本上来,先修改升级脚本0.1.0-0.2.0
$installer = $this;
$installer->startSetup();
$installer->run("
ALTER TABLE `{$installer->getTable('weblog/blogpost')}`
CHANGE post post text not null; ");
$installer->endSetup();
die("You'll see why this is here in a second");
刷新页面,但是什么也不会发生。升级脚本为什么没有执行?
1. weblog_setup resource是版本0.1.0
2. 我们要升级模块到0.2.0
3. Magento看到升级模块,有两个脚本要执行,0.1.0-0.1.5 和0.1.0-0.2.0
4. Magento载入队列,然后执行
5. Magento执行0.1.0到0.1.5的脚本
6. Weblog_setup resource现在是0.1.5了
7. Magento执行0.1.0到0.2.0的脚本,执行停止
8. 在下一个页面加载的时候,Magento看到了weblog_set在版本0.1.5,但是并没有看到任何从0.1.5开始执行的脚本(之前的都是0.1.0开始)
正确的方式如下,重新命名文件
mysql4-upgrade-0.1.0-0.1.5.php #This goes from 0.1.0 to 0.1.5
mysql4-upgrade-0.1.5-0.2.0.php #This goes 0.1.5 to 0.2.0
Magento是能够完成一次加载两次升级的。你可以清除core_resource表信息,来完成最后的test
update core_resource set version = '0.1.0' where code = 'weblog_setup';
Magento是根据配置文件来执行升级的,所以在协同开发时要注意脚本的添加。

 Nuitka简介:编译和分发Python的更好方法Apr 13, 2023 pm 12:55 PM
译者 | 李睿审校 | 孙淑娟随着Python越来越受欢迎,其局限性也越来越明显。一方面,编写Python应用程序并将其分发给没有安装Python的人员可能非常困难。解决这一问题的最常见方法是将程序与其所有支持库和文件以及Python运行时打包在一起。有一些工具可以做到这一点,例如PyInstaller,但它们需要大量的缓存才能正常工作。更重要的是,通常可以从生成的包中提取Python程序的源代码。在某些情况下,这会破坏交易。第三方项目Nuitka提供了一个激进的解决方案。它将Python程序编
 ChatGPT 的五大功能可以帮助你提高代码质量Apr 14, 2023 pm 02:58 PM
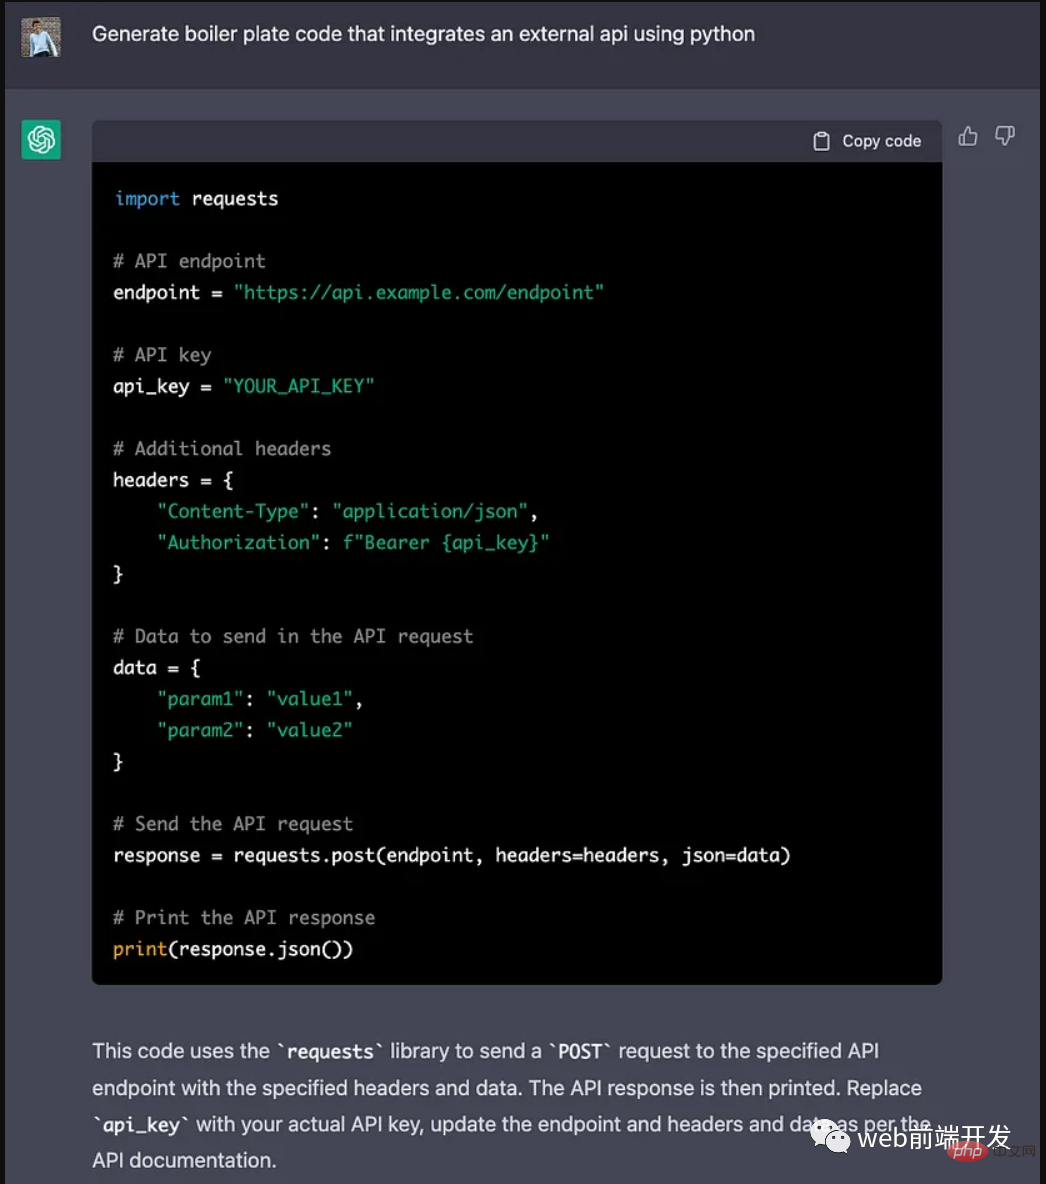
ChatGPT 目前彻底改变了开发代码的方式,然而,大多数软件开发人员和数据专家仍然没有使用 ChatGPT 来改进和简化他们的工作。这就是为什么我在这里概述 5 个不同的功能,以提高我们的日常工作速度和质量。我们可以在日常工作中使用它们。现在,我们一起来了解一下吧。注意:切勿在 ChatGPT 中使用关键代码或信息。01.生成项目代码的框架从头开始构建新项目时,ChatGPT 是我的秘密武器。只需几个提示,它就可以生成我需要的代码框架,包括我选择的技术、框架和版本。它不仅为我节省了至少一个小时
 我创建了一个由 ChatGPT API 提供支持的语音聊天机器人,方法请收下Apr 07, 2023 pm 11:01 PM
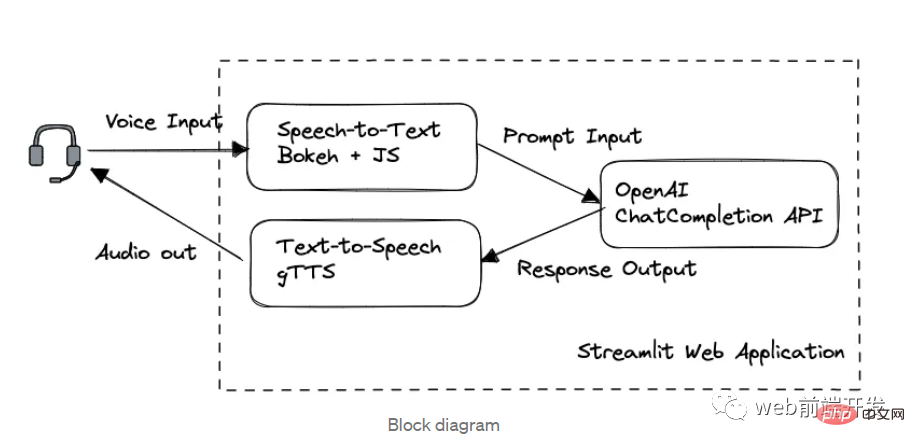
今天这篇文章的重点是使用 ChatGPT API 创建私人语音 Chatbot Web 应用程序。目的是探索和发现人工智能的更多潜在用例和商业机会。我将逐步指导您完成开发过程,以确保您理解并可以复制自己的过程。为什么需要不是每个人都欢迎基于打字的服务,想象一下仍在学习写作技巧的孩子或无法在屏幕上正确看到单词的老年人。基于语音的 AI Chatbot 是解决这个问题的方法,就像它如何帮助我的孩子要求他的语音 Chatbot 给他读睡前故事一样。鉴于现有可用的助手选项,例如,苹果的 Siri 和亚马
 摔倒检测-完全用ChatGPT开发,分享如何正确地向ChatGPT提问Apr 07, 2023 pm 03:06 PM
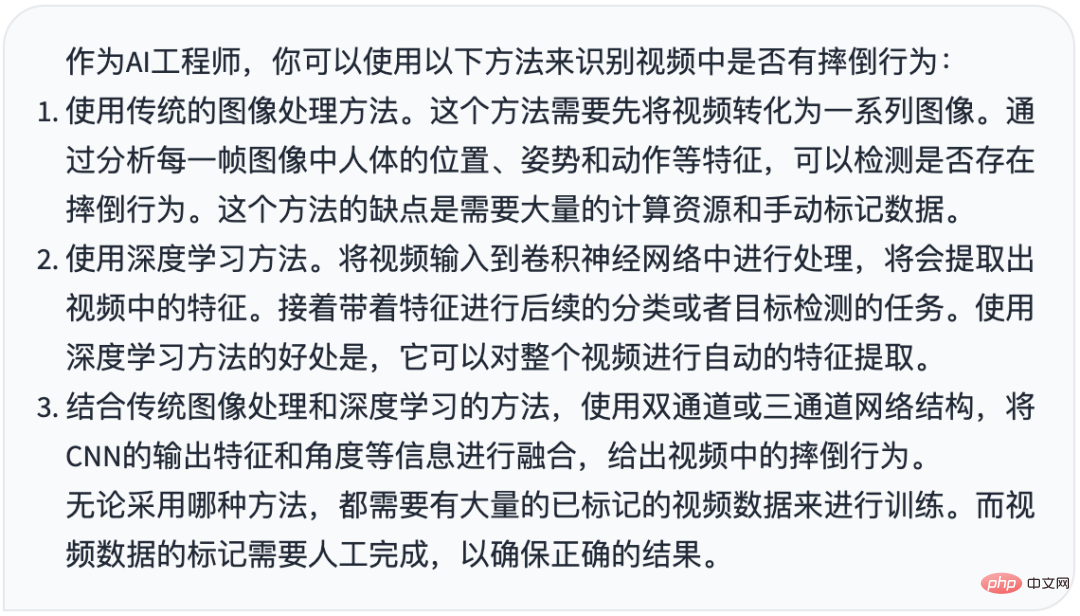
哈喽,大家好。之前给大家分享过摔倒识别、打架识别,今天以摔倒识别为例,我们看看能不能完全交给ChatGPT来做。让ChatGPT来做这件事,最核心的是如何向ChatGPT提问,把问题一股脑的直接丢给ChatGPT,如:用 Python 写个摔倒检测代码 是不可取的, 而是要像挤牙膏一样,一点一点引导ChatGPT得到准确的答案,从而才能真正让ChatGPT提高我们解决问题的效率。今天分享的摔倒识别案例,与ChatGPT对话的思路清晰,代码可用度高,按照GPT返回的结果完全可以开
 17 个可以实现高效工作与在线赚钱的 AI 工具网站Apr 11, 2023 pm 04:13 PM
自 2020 年以来,内容开发领域已经感受到人工智能工具的存在。1.Jasper AI网址:https://www.jasper.ai在可用的 AI 文案写作工具中,Jasper 作为那些寻求通过内容生成赚钱的人来讲,它是经济实惠且高效的选择之一。该工具精通短格式和长格式内容均能完成。Jasper 拥有一系列功能,包括无需切换到模板即可快速生成内容的命令、用于创建文章的高效长格式编辑器,以及包含有助于创建各种类型内容的向导的内容工作流,例如,博客文章、销售文案和重写。Jasper Chat 是该
 为什么特斯拉的人形机器人长得并不像人?一文了解恐怖谷效应对机器人公司的影响Apr 14, 2023 pm 11:13 PM
1970年,机器人专家森政弘(MasahiroMori)首次描述了「恐怖谷」的影响,这一概念对机器人领域产生了巨大影响。「恐怖谷」效应描述了当人类看到类似人类的物体,特别是机器人时所表现出的积极和消极反应。恐怖谷效应理论认为,机器人的外观和动作越像人,我们对它的同理心就越强。然而,在某些时候,机器人或虚拟人物变得过于逼真,但又不那么像人时,我们大脑的视觉处理系统就会被混淆。最终,我们会深深地陷入一种对机器人非常消极的情绪状态里。森政弘的假设指出:由于机器人与人类在外表、动作上相似,所以人类亦会对
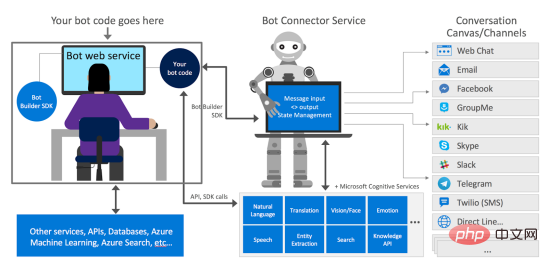 如何使用Azure Bot Services创建聊天机器人的分步说明Apr 11, 2023 pm 06:34 PM
译者 | 李睿审校 | 孙淑娟信使、网络服务和其他软件都离不开机器人(bot)。而在软件开发和应用中,机器人是一种应用程序,旨在自动执行(或根据预设脚本执行)响应用户请求创建的操作。在本文中, NIX United公司的.NET开发人员Daniil Mikhov介绍了使用微软Azure Bot Services创建聊天机器人的一个例子。本文将对想要使用该服务开发聊天机器人的开发人员有所帮助。 为什么使用Azure Bot Services? 在Azure Bot Services上开发聊
 Python面向对象里常见的内置成员介绍Apr 12, 2023 am 09:10 AM
好嘞,今天我们继续剖析下Python里的类。[[441842]]先前我们定义类的时候,使用到了构造函数,在Python里的构造函数书写比较特殊,他是一个特殊的函数__init__,其实在类里,除了构造函数还有很多其他格式为__XXX__的函数,另外也有一些__xx__的属性。下面我们一一说下:构造函数Python里所有类的构造函数都是__init__,其中根据我们的需求,构造函数又分为有参构造函数和无惨构造函数。如果当前没有定义构造函数,那么系统会自动生成一个无参空的构造函数。例如:在有继承关系


Hot AI Tools

Undresser.AI Undress
AI-powered app for creating realistic nude photos

AI Clothes Remover
Online AI tool for removing clothes from photos.

Undress AI Tool
Undress images for free

Clothoff.io
AI clothes remover

AI Hentai Generator
Generate AI Hentai for free.

Hot Article
Hot Tools

SublimeText3 Chinese version
Chinese version, very easy to use

SAP NetWeaver Server Adapter for Eclipse
Integrate Eclipse with SAP NetWeaver application server.

VSCode Windows 64-bit Download
A free and powerful IDE editor launched by Microsoft

Dreamweaver CS6
Visual web development tools

SublimeText3 Mac version
God-level code editing software (SublimeText3)

