

 Web Front-endJS TutorialUse the jQuery fancybox plug-in to create a practical data transmission modal pop-up form_jquery
Use the jQuery fancybox plug-in to create a practical data transmission modal pop-up form_jquery

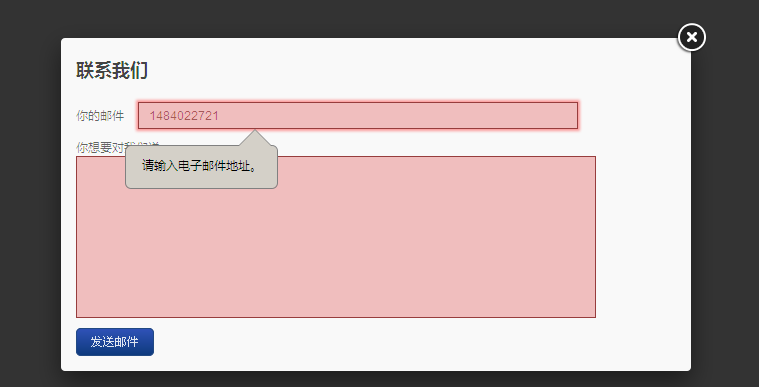
Modal forms have become a method often used by web developers to transmit data when designing interfaces. With modal windows, you can improve the usability of your website. Just in line with the needs of the project, a customer wanted a modal pop-up form to submit feedback on the website. After some testing, it was implemented. I used jQuery fancybox plug-in to create a beautiful modal form, submit the form data and implement Ajax calls on the server side. You can receive feedback messages from users in your email
html code
The main JS file in the header part is as follows: jquery code and fancybox code are introduced
Demo
First, download the latest Fancybox from the official website , and unzip it. The core HTML page code is very simple. There is a hidden DIV here. When the user clicks the href link, a modal window opens.
Send us a message
> ;

Set the text box color, size, style under focus, etc. Use :hover and :active to display the status.
.txt {
display: inline-block;
color: #676767;
width: 420px;
font-family: Arial, Tahoma, sans-serif;
margin-bottom: 10px;
border: 1px dotted #ccc;
padding: 5px 9px;
font-size: 1.2em;
line-height: 1.4em;
}
.txtarea {
display: block;
resize: none;
color: #676767;
font-family: Arial, Tahoma, sans-serif;
margin-bottom: 10px;
width: 500px;
height: 150px;
border: 1px dotted #ccc;
padding: 5px 9px;
font-size: 1.2em;
line-height: 1.4em;
}
.txt :focus,
.txtarea:focus {
border-style: solid;
border-color: #bababa;
color: #444;
}
input. error,
textarea.error {
border-color: #973d3d;
border-style: solid;
background: #f0bebe;
color: #a35959;
}
input.error:focus,
textarea.error:focus {
border-color: #973d3d;
color: #a35959;
}
我定义了一个错误的css类,结合jquery用来检测用户输入的数据是否正确,输入错误数据会使字段文字,边框和背景变成深色。直到用户输入有效的数据字段颜色将恢复正常。

#send {
color: #dee5f0;
display: block;
cursor: pointer;
padding: 5px 11px;
font-size: 1.2em;
border: solid 1px #224983;
border-radius: 5px;
background: #1e4c99;
background: -webkit-gradient(linear, left top, left bottom, from(#2f52b7), to(#0e3a7d));
background: -moz-linear-gradient(top, #2f52b7, #0e3a7d);
background: -webkit-linear-gradient(top, #2f52b7, #0e3a7d);
background: -o-linear-gradient(top, #2f52b7, #0e3a7d);
background: -ms-linear-gradient(top, #2f52b7, #0e3a7d);
background: linear-gradient(top, #2f52b7, #0e3a7d);
filter: progid:DXImageTransform.Microsoft.gradient(startColorstr='#2f52b7', endColorstr='#0e3a7d');
}
#send:hover {
background: #183d80;
background: -webkit-gradient(linear, left top, left bottom, from(#284f9d), to(#0c2b6b));
background: -moz-linear-gradient(top, #284f9d, #0c2b6b);
background: -webkit-linear-gradient(top, #284f9d, #0c2b6b);
background: -o-linear-gradient(top, #284f9d, #0c2b6b);
background: -ms-linear-gradient(top, #284f9d, #0c2b6b);
background: linear-gradient(top, #284f9d, #0c2b6b);
filter: progid:DXImageTransform.Microsoft.gradient(startColorstr='#284f9d', endColorstr='#0c2b6b');
}
#send:active {
color: #8c9dc0;
background: -webkit-gradient(linear, left top, left bottom, from(#0e387d), to(#2f55b7));
background: -moz-linear-gradient(top, #0e387d, #2f55b7);
background: -webkit-linear-gradient(top, #0e387d, #2f55b7);
background: -o-linear-gradient(top, #0e387d, #2f55b7);
background: -ms-linear-gradient(top, #0e387d, #2f55b7);
background: linear-gradient(top, #0e387d, #2f55b7);
filter: progid:DXImageTransform.Microsoft.gradient(startColorstr='#0e387d', endColorstr='#2f55b7');
}
CSS 按钮我使用 CSS3来创建线型渐变,代码如上
页面加载元素完成之后,调用Fancybox默认代码
$(document).ready(function() {
$(".modalbox").fancybox();
$("#contact").submit(function() { return false; });//禁用默认的窗体提交
代码的第二行禁用默认的联系人表单提交动作。为什么呢?因此这样我们可以处理自己的单击事件,并通过 Ajax 传递数据。在用户提交表单后,我们需要得到 (电子邮件和消息) 两个字段的当前值。我们还想要检查电子邮件地址是否有效和消息长度是否超过规定的长度值
$("#send").on("click", function(){
var emailval = $("#email").val();
var msgval = $("#msg").val();
var msglen = msgval.length;
var mailvalid = validateEmail(emailval);
if(mailvalid == false) {
$("#email").addClass("error");
}
else if(mailvalid == true){
$("#email").removeClass("error");
}
if(msglen $("#msg").addClass("error");
}
else if(msglen >= 4){
$("#msg").removeClass("error");
}
上面jquery代码使用一些逻辑语句。直到电子邮件有效和消息的长度超过 4 个字母,才会提交表单。
// If the two fields are verified, send the message next
//After clicking the send button, the button is replaced with a text prompt such as "Sending". The purpose is to prevent users from clicking submit and the prompt is more user-friendly
$("# send").replaceWith("Sending...");
$.ajax({
type: 'POST',
url: 'sendmessage.php ',
data: $("#contact").serialize(),
success: function(data) {
if(data == "true") {
$("#contact ").fadeOut("fast", function(){
$(this).before("
Submission successful! Your message has been sent, thank you:)< ;/p>");
setTimeout("$.fancybox.close()", 1000);
});
}
}
});
}
});
The serialize() method is used here to serialize the submitted ajax data, so that standard URL encoding is generated
The server responds successfully Afterwards, hide the popup form and display a success message. I use the setTimeout() method to close fancybox, here I set the form to be hidden after one second. The JS code to do this is $.fancybox.close().


$sendto = "2495371937@qq.com";//Define the recipient of the email
$usermail = $_POST['email'];//Get the email
$content = nl2br($_POST['msg']);//Get the message
$subject = "You have a new message";
$headers = "From: " . strip_tags($usermail ) . "rn";
$headers .= "Reply-To: ". strip_tags($usermail) . "rn";
$headers .= "MIME-Version: 1.0raan";
$ headers .= "Content-Type: text/html;charset=utf-8 rn";
$msg = "";
$msg .= "
You have new messages
rn";$msg .= "From: ".$usermail ."rn";
$msg .= "Content: ".$content."rn";
$msg .= "";
if(@mail ($sendto, $subject, $msg, $headers)) {
echo "true";
} else {
echo "false";
}
Demo

 Python vs. JavaScript: The Learning Curve and Ease of UseApr 16, 2025 am 12:12 AM
Python is more suitable for beginners, with a smooth learning curve and concise syntax; JavaScript is suitable for front-end development, with a steep learning curve and flexible syntax. 1. Python syntax is intuitive and suitable for data science and back-end development. 2. JavaScript is flexible and widely used in front-end and server-side programming.
 Python vs. JavaScript: Community, Libraries, and ResourcesApr 15, 2025 am 12:16 AM
Python and JavaScript have their own advantages and disadvantages in terms of community, libraries and resources. 1) The Python community is friendly and suitable for beginners, but the front-end development resources are not as rich as JavaScript. 2) Python is powerful in data science and machine learning libraries, while JavaScript is better in front-end development libraries and frameworks. 3) Both have rich learning resources, but Python is suitable for starting with official documents, while JavaScript is better with MDNWebDocs. The choice should be based on project needs and personal interests.
 From C/C to JavaScript: How It All WorksApr 14, 2025 am 12:05 AM
The shift from C/C to JavaScript requires adapting to dynamic typing, garbage collection and asynchronous programming. 1) C/C is a statically typed language that requires manual memory management, while JavaScript is dynamically typed and garbage collection is automatically processed. 2) C/C needs to be compiled into machine code, while JavaScript is an interpreted language. 3) JavaScript introduces concepts such as closures, prototype chains and Promise, which enhances flexibility and asynchronous programming capabilities.
 JavaScript Engines: Comparing ImplementationsApr 13, 2025 am 12:05 AM
Different JavaScript engines have different effects when parsing and executing JavaScript code, because the implementation principles and optimization strategies of each engine differ. 1. Lexical analysis: convert source code into lexical unit. 2. Grammar analysis: Generate an abstract syntax tree. 3. Optimization and compilation: Generate machine code through the JIT compiler. 4. Execute: Run the machine code. V8 engine optimizes through instant compilation and hidden class, SpiderMonkey uses a type inference system, resulting in different performance performance on the same code.
 Beyond the Browser: JavaScript in the Real WorldApr 12, 2025 am 12:06 AM
JavaScript's applications in the real world include server-side programming, mobile application development and Internet of Things control: 1. Server-side programming is realized through Node.js, suitable for high concurrent request processing. 2. Mobile application development is carried out through ReactNative and supports cross-platform deployment. 3. Used for IoT device control through Johnny-Five library, suitable for hardware interaction.
 Building a Multi-Tenant SaaS Application with Next.js (Backend Integration)Apr 11, 2025 am 08:23 AM
I built a functional multi-tenant SaaS application (an EdTech app) with your everyday tech tool and you can do the same. First, what’s a multi-tenant SaaS application? Multi-tenant SaaS applications let you serve multiple customers from a sing
 How to Build a Multi-Tenant SaaS Application with Next.js (Frontend Integration)Apr 11, 2025 am 08:22 AM
This article demonstrates frontend integration with a backend secured by Permit, building a functional EdTech SaaS application using Next.js. The frontend fetches user permissions to control UI visibility and ensures API requests adhere to role-base
 JavaScript: Exploring the Versatility of a Web LanguageApr 11, 2025 am 12:01 AM
JavaScript is the core language of modern web development and is widely used for its diversity and flexibility. 1) Front-end development: build dynamic web pages and single-page applications through DOM operations and modern frameworks (such as React, Vue.js, Angular). 2) Server-side development: Node.js uses a non-blocking I/O model to handle high concurrency and real-time applications. 3) Mobile and desktop application development: cross-platform development is realized through ReactNative and Electron to improve development efficiency.


Hot AI Tools

Undresser.AI Undress
AI-powered app for creating realistic nude photos

AI Clothes Remover
Online AI tool for removing clothes from photos.

Undress AI Tool
Undress images for free

Clothoff.io
AI clothes remover

AI Hentai Generator
Generate AI Hentai for free.

Hot Article
Hot Tools

SAP NetWeaver Server Adapter for Eclipse
Integrate Eclipse with SAP NetWeaver application server.

Dreamweaver CS6
Visual web development tools

Zend Studio 13.0.1
Powerful PHP integrated development environment

EditPlus Chinese cracked version
Small size, syntax highlighting, does not support code prompt function

MinGW - Minimalist GNU for Windows
This project is in the process of being migrated to osdn.net/projects/mingw, you can continue to follow us there. MinGW: A native Windows port of the GNU Compiler Collection (GCC), freely distributable import libraries and header files for building native Windows applications; includes extensions to the MSVC runtime to support C99 functionality. All MinGW software can run on 64-bit Windows platforms.

