


macOS Ventura is not perfect: a complete guide to downgrade to Monterey
For some users, macOS Ventura is undoubtedly a disappointment. Errors and performance issues such as slow Mac running may make you want to downgrade from Ventura to Monterey. This is completely understandable. Let us guide you through this process.
Preparation before downgrade
Before explaining how to downgrade macOS, you need to know the following:
Have you checked out the most common problems with Ventura? This is a very important step, especially if you have specific problems such as some applications that don't work or Bluetooth can't connect to the device. Maybe there is an easy solution! You can find solutions to all known Ventura problems here.
Have you tried optimizing Ventura's performance? If your Mac runs very slowly or frozen on macOS 13, downgrade is not the only solution. You can use CleanMyMac X to update outdated applications, clear cluttered files, and run some maintenance tasks. This will most likely optimize your Mac performance!

- Have you accumulated any new data on Ventura? If you still decide to downgrade from Ventura and you want to bring the files to the old system, take a moment to back up the files. You can upload it to the cloud using Dropshare, or create a backup on an external hard drive using Get Backup Pro.

Three main ways to downgrade from Ventura
Once you weigh all the options and decide you want to downgrade macOS, it's time to choose how to downgrade. There are three options:
- Time Machine Backup
- macOS recovery mode
- Start the installer
View each process and choose the method that best suits your current situation.
Note: You will notice that the instructions for downgrading from Ventura on an Intel Mac are different from the instructions for downgrading from Ventura on an Apple Silicon Mac. We will cover all the steps in both cases.
Downgrade to Monterey using Time Machine backup
Please tell us if you have backed up your Mac before installing Ventura. If you have backed up, you don't need to worry, as all data is safe, waiting to be migrated to your new macOS. By the way, Time Machine setup looks pretty concise on macOS Ventura!

Although Time Machine is not the best way to do backups and we prefer Get Backup Pro, Time Machine users have a big benefit – they can downgrade to previous versions of macOS using this backup utility. Here is how it works:
- Connect Time Machine Drive to Mac
- Restart your Mac
- Go to the startup screen:
On Intel Mac: Hold down the Command R key until you see the Apple logo
On an Apple Silicon Mac: Press and hold the power button until you see the boot screen. Then, select Options > Continue
- Select "Restore from Time Machine Backup" > "Continue"
- Select Backup Source > Continue
- Select your Monterey backup > Continue
- Wait for the downgrade process to be completed. This can take a while.
How to uninstall macOS Ventura using recovery mode
It doesn't matter if you don't want to restore the backup when you downgrade. You can still roll back to Monterey or any other macOS you used before. macOS recovery mode is best for this situation. Before you begin, make sure you have a stable internet connection.
Downgrade from Ventura using macOS recovery mode:
- Close your Mac
- Press the power button to turn on your Mac, and then press and hold one of the following key combinations:
Command R returns to macOS before you installed Ventura
Option Command R Install the latest version that is compatible with your Mac
Shift Option Command R Install the macOS or the latest available version that comes with your Mac
- Enter your password and click Continue
- Select Next > Reinstall macOS.
As usual, you can have a cup of coffee as it takes some time for your Mac to finish it.
How to use the bootable installer to return to previous macOS
Senior users who like to try beta often take precautions. One of the precautions is to keep a USB around you with a bootable macOS installer. If any issues occur, they can always install their previous stable version of macOS from this USB.
Good news: Even if you didn't do this before installing Ventura, you can create a bootable Monterey installer. This process involves the following steps:
- Download the macOS Monterey installer
- Format your drive
- Create a bootable installer drive
- Install macOS Monterey using the bootable installer.
If you're ready to install the program, that's great! You can skip the first three steps and start installing Monterey now. Here is a complete step-by-step guide.
Step 1. Download the macOS Monterey installer
- Open the Mac App Store and enter Monterey
- Click "Get" next to macOS Monterey
- Find the installer in your application folder. But don't open it now!

Step 2. Format your drive
Next, you need to format the external drive that will be used as a bootable installer. This means you should erase it completely. Likewise, if your external drive has been formatted, you can skip this step. Otherwise, continue reading:
- Connect your external drive to your Mac
- Open the Disk Utility and find the drive in the list of devices under External
- Select the drive and click "Erase"
- Set Format to Mac OS Extended and Set Scheme to GUID Partition Map (if Scheme is available)
- Make sure you want to erase the drive.
Step 3. Create a bootable installer drive
It's time to add some terminal magic to the process! Let's create our bootable installer:
- Open the terminal on your Mac
- Paste the following command: sudo /Applications/Install\ macOS\ Monterey.app/Contents/Resources/createinstallmedia --volume /Volumes/USB
- Press Enter
- When prompted, enter your password and press Enter again
- If the terminal asks you to allow you to continue, please press Y
- If the terminal requires you to allow access to your external drive, click OK.

When your terminal copy the Monterey installer to an external drive, you will have a minute or two to check the Setapp and find the tools you may be missing on Monterey. For example, Setapp gives you access to Mission Control Plus, Yoink, Workspaces, and Mosaic, which will make up for the lack of Stage Manager on Monterey!
Step 4. Install macOS Monterey using the bootable installer
OK, let's go to the final stage. We will now downgrade from Ventura to Monterey using our bootable installer.
Note: You may need to erase the boot drive first, because some drives cannot be downgraded unless formatted first. If you have saved any important files on Ventura, now is the best time to put them in Get Backup Pro and create a secure backup, saving them to any external drive.

Is everything safe? Let's install Monterey now:
- Insert a drive with a bootable installer into your Mac
- Enter recovery mode:
On an Apple Silicon Mac: Press and hold the power button until you see the boot options screen. Click Options > Continue
On Intel Mac: Hold down the Command R key until you see the Apple logo
- Select Disk Utility, then select your boot disk and click Erase. Set Format to APFS and Set Scheme to GUID Partition Map. Click "Erase"
- Once the process is complete, exit the Disk Utility and close your Mac
On Apple Silicon Mac: Press and hold the power button to boot your Mac
On Intel Mac: Hold down the Option key to start your Mac
- Select your bootable drive from the available options and click Continue
- Select the drive where Monterey should be installed and click Next
- Confirm that you want to install macOS Monterey.
After a few cups of tea, you can enjoy your old Monterey again!
Safe macOS updates
Get the Setapp toolkit to update or downgrade your macOS without losing any data.
Try the necessary tools for free and safely downgrade to Monterey
Now that you know how to downgrade from Ventura, let's applaud the tools that make this process so smooth—Get Backup Pro, Dropshare, and CleanMyMac X mentioned in this article can help you back up important files, free up disk space, and check your Mac's performance at any stage. All three apps are part of a single app subscription Setapp and offer a 7-day free trial.
After downgrading to Monterey, these apps are still very useful! For example, after the downgrade is complete, open CleanMyMac X and run a comprehensive check of the system—from malware threats to CPU load to disk activity. This will help you understand if Monterey is really better than Ventura.
The above is the detailed content of How to downgrade from macOS Ventura (version 13). For more information, please follow other related articles on the PHP Chinese website!

 Second Release Candidate of MacOS Sequoia 15.4 Available for TestingApr 30, 2025 am 10:26 AM
Apple has released a second Release Candidate (RC) build of macOS Sequoia 15.4 for its beta testing program. This follows the initial release candidate builds of Sequoia 15.4, iOS 18.4, and iPadOS 18.4, released just days prior. Release Candidates a
 Easily Create MacOS Virtual Machines with VirtualBuddyApr 30, 2025 am 10:14 AM
VirtualBuddy: Easily virtualize macOS and Linux on Apple Silicon Mac VirtualBuddy provides a simple and fast way to virtualize macOS (and Linux) on any Apple Silicon Mac, providing developers, enthusiasts, and curious users with a way to easily run multiple instances of macOS. VirtualBuddy is fast, performs well, and it is free and open source, so you can easily explore the virtual machine world without any commitment, just prepare enough disk storage and bandwidth to set up a macOS or Linux virtual machine. Whether it is testing different versions
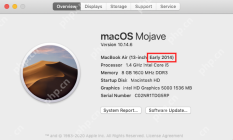 12 Things to Check Before Buying Second-hand MacBookApr 30, 2025 am 10:01 AM
Buying a used Mac on a budget? This guide ensures you avoid a lemon. We'll cover essential checks before you buy, including diagnostics you can perform on the spot. Remember to bring a bootable macOS USB drive and headphones. Step 1: Physical Insp
 How Long Does Updating MacOS Take? Why Is MacOS Update Taking So Long?Apr 30, 2025 am 09:53 AM
How long does it take to update the MacOS system software? Why does it take so long to update? Many Mac users will have this question when they see the software update of the new MacOS system. Both of these questions are very reasonable, and it is important to remember that the answers may vary. However, with modern MacOS, you can make a fairly accurate estimate of the time it takes to install updates to your MacOS system. Let's dive into this topic so you can better understand and prepare to install MacOS updates on your Mac. How long does it take for MacOS updates to be downloaded, installed and completed? MacOS updates can take between 15-20 minutes to several hours to complete, especially if you are considering downloading updates and installing updates to completion
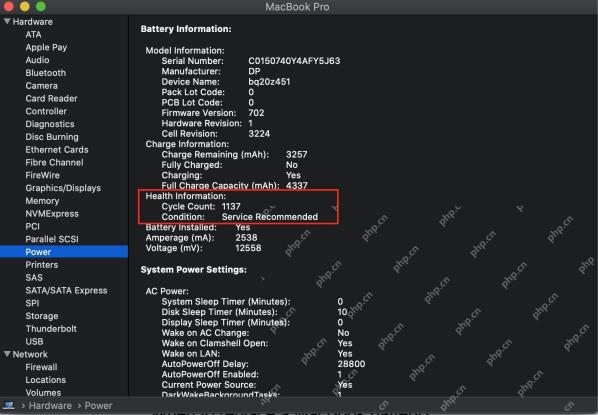 How Long Do MacBook Batteries Last? Here's How You Can Check ItApr 30, 2025 am 09:50 AM
Understanding MacBook Battery Life: Maximizing Your Mac's Power Concerned about your MacBook's battery performance, or planning a purchase? This guide clarifies MacBook battery lifespan and offers tips for extending it. Most Mac batteries endure appr
 Fixing Safari for Mac Error “This webpage was reloaded because a problem occurred”Apr 30, 2025 am 09:45 AM
Although the Safari browser under the Mac system is excellent, it is not perfect. Safari users occasionally encounter situations where the page refreshes and displays an error message "This page has reloaded because of a problem". You may also see variant information like "repeated problems". Since the error message is quite general, you may be wondering the root cause of the error in Safari and how to fix this on your Mac. Causes causing Safari for Mac to have a "This web page reloaded because a problem occurred" error Usually, if there is a memory problem, a website crash, or an incompatible with Safari, a software error, or other similar issues, you will see this error message in Safari on your Mac
 Get Googly Eyes in Your Mac Menu Bar to Follow Your Cursor AroundApr 30, 2025 am 09:42 AM
Nostalgic Mac users may remember an interesting application in the classic Mac OS system: it will place a pair of moving eyes in the Mac menu bar and move with your cursor. While classic Mac OS is long gone, you can still experience this fun on a modern Mac, just use an app called "Googly Eyes". Google Eyes resides in your Mac menu bar, and its pupils will follow your cursor like an older version of the app. When clicking on the mouse/trackpad, the little eyes will blink. Will this revolutionize your computing experience? Probably not. But is it interesting? Absolutely fun! Sometimes, just being fun is enough, right? So, enjoy it, in your Ma
 MacOS Sonoma 14.7.5 & MacOS Ventura 13.7.5 Security Updates ReleasedApr 30, 2025 am 09:40 AM
Apple has released macOS Sonoma 14.7.5 and macOS Ventura 13.7.5 security updates for Mac users running Sonoma and Ventura operating systems. These updates focus on security patches and do not include other new features available in the latest macOS Sequoia 15.4 update (sequoia 15.4 update is released simultaneously). Additionally, you'll find software updates for new and older iPhones and iPads, as well as updates for Apple TV, Apple Watch, and Apple Vision Pro


Hot AI Tools

Undresser.AI Undress
AI-powered app for creating realistic nude photos

AI Clothes Remover
Online AI tool for removing clothes from photos.

Undress AI Tool
Undress images for free

Clothoff.io
AI clothes remover

Video Face Swap
Swap faces in any video effortlessly with our completely free AI face swap tool!

Hot Article
Hot Tools

Dreamweaver CS6
Visual web development tools

EditPlus Chinese cracked version
Small size, syntax highlighting, does not support code prompt function

DVWA
Damn Vulnerable Web App (DVWA) is a PHP/MySQL web application that is very vulnerable. Its main goals are to be an aid for security professionals to test their skills and tools in a legal environment, to help web developers better understand the process of securing web applications, and to help teachers/students teach/learn in a classroom environment Web application security. The goal of DVWA is to practice some of the most common web vulnerabilities through a simple and straightforward interface, with varying degrees of difficulty. Please note that this software

MantisBT
Mantis is an easy-to-deploy web-based defect tracking tool designed to aid in product defect tracking. It requires PHP, MySQL and a web server. Check out our demo and hosting services.

Safe Exam Browser
Safe Exam Browser is a secure browser environment for taking online exams securely. This software turns any computer into a secure workstation. It controls access to any utility and prevents students from using unauthorized resources.

