


Target Disk Mode (TDM) for Mac: A Comprehensive Guide
Ever experienced a Mac malfunction or a failing internal drive requiring urgent data rescue? Target Disk Mode (TDM) is your solution. This guide details TDM setup and usage, including pro tips for smoother data management.

Enhance Mac file management with PathFinder
Need a more powerful alternative to Finder? PathFinder offers a dual-pane interface and advanced tools. Available on Setapp.
Understanding Target Disk Mode
TDM is a boot mode transforming a Mac into an external drive accessible by another Mac. Once connected, the target Mac appears in the Finder, enabling data transfer, formatting, and partitioning. Under specific conditions (detailed below), the target Mac's OS can even boot the host Mac.
TDM setup varies:
- Apple Silicon Macs (M1-M4): Uses "Share Disk" or "Mac Sharing Mode," with a different process.
- macOS 11 Big Sur and later: Requires a Thunderbolt cable.
- Older macOS versions and Macs: Compatible with Thunderbolt, USB, or FireWire.
Learn more about macOS version compatibility
Tip: Before transferring, declutter your Mac. CleanMyMac efficiently removes old installers, unused documents, and unnecessary files, speeding up the transfer process.

Entering Target Disk Mode
The process differs slightly between Intel and Apple Silicon Macs.
Intel-based Macs:
- Connect Macs using a USB, USB-C, or Thunderbolt cable.
- Enter TDM on the external drive Mac:
- Mac off: Hold the 'T' key during startup.
- Mac on: Apple menu > System Settings > General > Startup Disk > Restart, select Target Disk Mode.
- Open Finder on the host Mac.
- The target Mac appears as an external disk. Double-click to access files.
- Transfer files by dragging and dropping.
- Power off and disconnect.
Troubleshooting unrecognized external drives
Tip: For large file transfers, Path Finder's dual-pane view and drag-and-drop functionality are significantly more efficient than Finder.

Apple Silicon Macs (M1/M2/M3/M4):
- Connect Macs.
- Shut down the target Mac.
- Press and hold the power button until "Loading startup options" appears.
- Click Options > Continue.
- Select a startup disk > Next (macOS Recovery). Password may be required.
- Choose Utilities > Share Disk.
- Select disk/volume > Start Sharing.
- Open Finder on the host Mac > Network under Locations.
- Double-click the shared Mac.
Learn more about M1, M2, M3, and M4 chip differences
Tip: On Silicon Macs, power on the host Mac before putting the target Mac into TDM to prevent restart loops.
Data Transfer using Target Disk Mode
Transferring data is straightforward:
- Prepare Macs: Use the correct cable (or adapter).
- Enter TDM: Connect Macs.
- Access the drive: On Intel Macs, the target Mac appears as an external disk (Macintosh HD). On Silicon Macs, access via Network in Finder.
- Move files: Drag and drop.
- Eject safely: Right-click and select Eject.
- Power off: Power off the source Mac before disconnecting.
Transfer speeds vary; DCommander offers a faster, more controlled alternative for large file transfers.

Booting using Target Disk Mode
TDM also allows OS repair and booting another Mac (useful for OS issues or internal drive problems). Requirements:
- Identical Macs (year and model).
- Same OS version.
If these conditions are met:
- Shut down both Macs.
- Connect via Thunderbolt, USB-C, or FireWire.
- Enter TDM on the source Mac.
- Hold Option on the target Mac during startup.
- Select the source Mac's drive (Macintosh HD).
- Press Return to boot.
Alternatives to Target Disk Mode
While powerful, TDM isn't the only option:
- File Sharing: Apple's built-in file sharing is suitable for small file transfers over a network.

- Dropshare: Cloud file sharing app managing multiple cloud services.

- CloudMounter: Mounts cloud storage directly in Finder for easy access.

Conclusion
TDM remains a valuable macOS feature for data transfer and troubleshooting. CleanMyMac, Path Finder, DCommander, and CloudMounter enhance the process. All are available on Setapp with a 7-day free trial.
FAQ
- Do Macs still have TDM? Yes, although it's "Share Disk" on Apple Silicon Macs.
- Is TDM safe? Yes, but avoid disconnecting during transfers. Back up your data with Get Backup Pro.
- Do M1 Macs support TDM? They support the equivalent "Share Disk" mode.
Remember to replace the bracketed link-to... placeholders with actual links.
The above is the detailed content of How to use Target Disk Mode on Mac: Easy step-by-step guide. For more information, please follow other related articles on the PHP Chinese website!

 Second Release Candidate of MacOS Sequoia 15.4 Available for TestingApr 30, 2025 am 10:26 AM
Apple has released a second Release Candidate (RC) build of macOS Sequoia 15.4 for its beta testing program. This follows the initial release candidate builds of Sequoia 15.4, iOS 18.4, and iPadOS 18.4, released just days prior. Release Candidates a
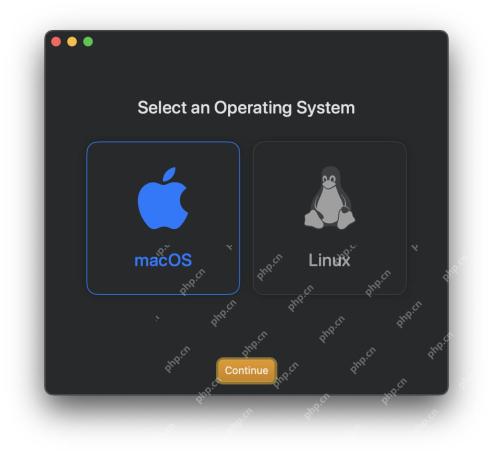 Easily Create MacOS Virtual Machines with VirtualBuddyApr 30, 2025 am 10:14 AM
VirtualBuddy: Easily virtualize macOS and Linux on Apple Silicon Mac VirtualBuddy provides a simple and fast way to virtualize macOS (and Linux) on any Apple Silicon Mac, providing developers, enthusiasts, and curious users with a way to easily run multiple instances of macOS. VirtualBuddy is fast, performs well, and it is free and open source, so you can easily explore the virtual machine world without any commitment, just prepare enough disk storage and bandwidth to set up a macOS or Linux virtual machine. Whether it is testing different versions
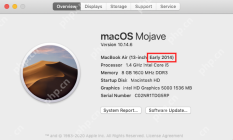 12 Things to Check Before Buying Second-hand MacBookApr 30, 2025 am 10:01 AM
Buying a used Mac on a budget? This guide ensures you avoid a lemon. We'll cover essential checks before you buy, including diagnostics you can perform on the spot. Remember to bring a bootable macOS USB drive and headphones. Step 1: Physical Insp
 How Long Does Updating MacOS Take? Why Is MacOS Update Taking So Long?Apr 30, 2025 am 09:53 AM
How long does it take to update the MacOS system software? Why does it take so long to update? Many Mac users will have this question when they see the software update of the new MacOS system. Both of these questions are very reasonable, and it is important to remember that the answers may vary. However, with modern MacOS, you can make a fairly accurate estimate of the time it takes to install updates to your MacOS system. Let's dive into this topic so you can better understand and prepare to install MacOS updates on your Mac. How long does it take for MacOS updates to be downloaded, installed and completed? MacOS updates can take between 15-20 minutes to several hours to complete, especially if you are considering downloading updates and installing updates to completion
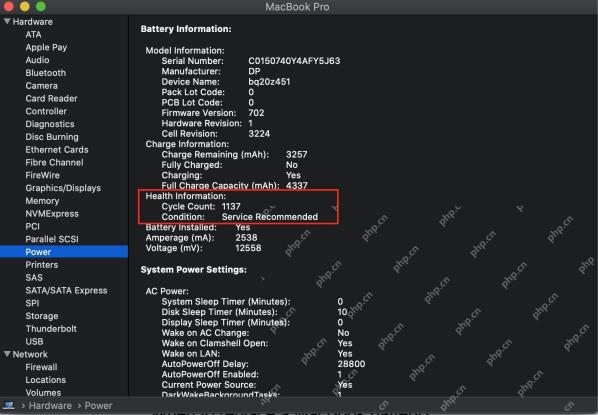 How Long Do MacBook Batteries Last? Here's How You Can Check ItApr 30, 2025 am 09:50 AM
Understanding MacBook Battery Life: Maximizing Your Mac's Power Concerned about your MacBook's battery performance, or planning a purchase? This guide clarifies MacBook battery lifespan and offers tips for extending it. Most Mac batteries endure appr
 Fixing Safari for Mac Error “This webpage was reloaded because a problem occurred”Apr 30, 2025 am 09:45 AM
Although the Safari browser under the Mac system is excellent, it is not perfect. Safari users occasionally encounter situations where the page refreshes and displays an error message "This page has reloaded because of a problem". You may also see variant information like "repeated problems". Since the error message is quite general, you may be wondering the root cause of the error in Safari and how to fix this on your Mac. Causes causing Safari for Mac to have a "This web page reloaded because a problem occurred" error Usually, if there is a memory problem, a website crash, or an incompatible with Safari, a software error, or other similar issues, you will see this error message in Safari on your Mac
 Get Googly Eyes in Your Mac Menu Bar to Follow Your Cursor AroundApr 30, 2025 am 09:42 AM
Nostalgic Mac users may remember an interesting application in the classic Mac OS system: it will place a pair of moving eyes in the Mac menu bar and move with your cursor. While classic Mac OS is long gone, you can still experience this fun on a modern Mac, just use an app called "Googly Eyes". Google Eyes resides in your Mac menu bar, and its pupils will follow your cursor like an older version of the app. When clicking on the mouse/trackpad, the little eyes will blink. Will this revolutionize your computing experience? Probably not. But is it interesting? Absolutely fun! Sometimes, just being fun is enough, right? So, enjoy it, in your Ma
 MacOS Sonoma 14.7.5 & MacOS Ventura 13.7.5 Security Updates ReleasedApr 30, 2025 am 09:40 AM
Apple has released macOS Sonoma 14.7.5 and macOS Ventura 13.7.5 security updates for Mac users running Sonoma and Ventura operating systems. These updates focus on security patches and do not include other new features available in the latest macOS Sequoia 15.4 update (sequoia 15.4 update is released simultaneously). Additionally, you'll find software updates for new and older iPhones and iPads, as well as updates for Apple TV, Apple Watch, and Apple Vision Pro


Hot AI Tools

Undresser.AI Undress
AI-powered app for creating realistic nude photos

AI Clothes Remover
Online AI tool for removing clothes from photos.

Undress AI Tool
Undress images for free

Clothoff.io
AI clothes remover

Video Face Swap
Swap faces in any video effortlessly with our completely free AI face swap tool!

Hot Article
Hot Tools

SecLists
SecLists is the ultimate security tester's companion. It is a collection of various types of lists that are frequently used during security assessments, all in one place. SecLists helps make security testing more efficient and productive by conveniently providing all the lists a security tester might need. List types include usernames, passwords, URLs, fuzzing payloads, sensitive data patterns, web shells, and more. The tester can simply pull this repository onto a new test machine and he will have access to every type of list he needs.

Safe Exam Browser
Safe Exam Browser is a secure browser environment for taking online exams securely. This software turns any computer into a secure workstation. It controls access to any utility and prevents students from using unauthorized resources.

Atom editor mac version download
The most popular open source editor

Dreamweaver CS6
Visual web development tools

MantisBT
Mantis is an easy-to-deploy web-based defect tracking tool designed to aid in product defect tracking. It requires PHP, MySQL and a web server. Check out our demo and hosting services.

