


The First Berserker: Khazan is a long, grueling, and enriching adventure. It gives you the complete soulslike treatment with intense boss encounters, thrilling combat, and fantastic exploration that rewards you for checking every nook and cranny. And all of this is present from the very first mission of Khazan's journey.
4:12
Being the first mission, Banished Hero does a fantastic job of introducing the core gameplay elements of the game, with punishing encounters, exhilarating combat, and lots of powerful items you can find by poking around the world and exploring. There's lots to see and do here, so strap in!
How To Complete Banished Hero

At the mission start, Khazan will be battered and beaten and will be moving extremely slowly, so just hold forward and follow the winding pathway until you see a glowing red light in the distance. As you approach the red light, a cutscene will play, giving you access to the Dual Wield weapon and activating the Blade Nexus, serving as your checkpoint.
Now that you have your weapons continue following the pathway until you run into an Imperial Soldier and take them down. From here, you will reach a path that splits off to the left and right, giving you a decision to make. For now, let's take the right path!
Right Pathway

Following the right path will lead you to a Yeti, which will be a pretty challenging fight but not impossible by any stretch. The best way to deal with it is by Reflecting its attacks by perfectly guarding them just before they hit you and punishing them after they perform heavy attacks that leave them vulnerable.
With the Yeti defeated, make your way over to the Chest and crack it open to receive a Hunter's Ring, Gem Dust, and 960 Gold. From here, you can walk forward off the cliffside and land beside the Blade Nexus you activated earlier, allowing you to level your Stats up!
Left Pathway

The left path is the critical route and will lead you to two Imperial Soldiers. One is a swordsman, and the other an archer. Fortunately, a large rock is in the middle of the area, allowing you to use it as cover and deal with the swordsman first. After defeating the swordsman, focus on the archer, then loot the item to receive a Fire Enhancer!
Continuing Onward

Continue onward, and you will see a point where you have to drop down to continue. So, drop into the area below and slowly walk behind the Soldier to one-hit him when you attack. From here, drop even further down to find another Soldier below you and perform a plunging attack to take them out.
Keep following the pathway until you run into a Soldier with a shield in front of a cave, make quick work of him, and then head inside. Once here, you will see a corpse on the ground. Absorb it to receive some Lacrima and Soul Tear Dust. An item will be slightly ahead, and to the left, pick it up to receive a Vitality Sphere.
Just slightly ahead of the Vitality Sphere will be another Blade Nexus, marking a new checkpoint in the level and allowing you to level your Stats even further!
Exploring Heinmach

From the Blade Nexus, take the trail to find two paths: one leading to the left and another to the right. Take the left path to stumble upon a Soldier kneeling in front of an item. Sneak up behind him and swiftly take him down, then loot the item to receive a Concentrated Fire Essence!
Follow The Right Pathway

Taking the right path will lead you to two Soldiers. One will be an archer, and the other will have a sword and shield. Focus on the archer first, then finish the other one off. After you take both Soldiers down, Absorb the corpse to receive a decent chunk of Lacrima and Soul Tear Dust!
Further Into Heinmach

Push forward and enter a sizable cave to find an Imperial Centurion awaiting in the center. This encounter can be challenging, just like the Yeti from earlier, as it requires you to land Reflections by perfectly guarding incoming attacks, which can be tricky to get. This enemy will leave themselves vulnerable after many attacks, allowing you to take that opportunity to attack.
With the Imperial Centurion defeated, you can explore the cave further. To the left of the entrance will be a Chest. Make your way over to it and throw it open to receive an Imperial Soldier's Dual Wield, Hound Pants, and Gem Dust!
Upper Right Section Of The Cave

If you stand from where the entrance is and look where the Imperial Centurion was standing, you will see a pathway that leads up to the left and another that leads up to the right. Before continuing your journey, take the pathway to the right to find a Tear Summon Stone, an extremely good item, as it recovers the Lacrima from your most recent death!
Upper Left Section Of The Cave

After grabbing your Tear Summon Stone, take the upper left pathway to find a pair of Soldiers. Make quick work of them, and then look to the right to find a small hole that leads into an area below. The hole will be where one of the Soldiers was standing if you're having trouble locating it.
Drop down into the area below to find a Mysterious Ore. Smash it with your weapon and continue onward. These will be extremely useful later, but you can't do anything with it at the moment!
Navigating Further Inside

From the Mysterious Ore, drop back down to the central area, then take the pathway back up to where the guards were and follow it the entire way through. Loot the purple item for a Fire Spirit's Fuel, then proceed up the spiraling walkway. There will be a few Soldiers here, but they shouldn't be too much trouble.
With the Soldiers taken care of, continue following the pathway until you reach another Blade Nexus, marking yet another checkpoint for you, allowing you to cash in all the Lacrima you've accumulated!
Back Into The Cold

After spending your precious Lacrima at the Blade Nexus, continue until you're finally back outside. You will see a purple item and a Wild Monkey in the distance. As you approach them, the ground beneath you will begin the break, so quickly run across to the other side.
Once here, approach the Monkey to have another one leap up from the cliffside and quickly take them out. Loot the purple item to obtain the Fire Enhancer, which will come in handy a bit later on!
Navigating The Mountainside

Following that, continue making your way to the right to run into another pair of Wild Monkeys and deal with them the same way you did the others. Navigate the pathway around the large hole in the ground until you see an item on the very edge of the cliffside.
Grab the item to obtain Soul Tear Dust, then look down to see a tree trunk. Drop down onto the tree trunk, then look down again to see a Wild Monkey on the ground below. Perform a plunging attack on the Monkey to eliminate it instantly. Beneath this platform will be another one and a few Wild Monkeys.
Perform a plunging attack on one of the Monkeys and then eliminate the other. There will be an item you can loot here, which will give you x2 Fire Resistance Elixir and x3 Stone. From here, continue dropping down until you reach solid ground, and pick up the Soul Tear Dust at the bottom!
Trudging Through The Snow

Once you're finally on solid ground again, follow the path forward until you see a Yeti walking in the distance. Before engaging with it, take a hard left and follow the elevated pathway that leads back to where you came from. There will be another Mysterious Ore here. Smash it with your weapon.
After this, it's time to fight the Yeti. This encounter will be handled the same way as the one at the start of the mission, so you're more than capable of taking it down now. After eliminating the Yeti, head toward the far right side of the arena to find a corpse. Absorb it to receive Lacrima and Soul Tear Dust!
Follow The Left Pathway

From where the corpse was, head to the left and begin walking along the cliffside. You will see a Soldier in the distance. Before reaching him, there will be a small alcove on your left with an item. Swoop in, grab the Water Cleanse Potion and proceed toward the Soldier.
As you approach the Soldier, another one will try to ambush you from the side. Dispatch both Soldiers and continue pushing forward. As you get near the top of the cliffside, an Imperial Knight will be waiting for you and is a very challenging foe. Create distance and charge up your heavy attack to carve off large chunks of its health.
With the Imperial Knight taken care of, proceed to the top of the cliffside and Absorb the body to obtain more Lacrima and Soul Tear Dust. From here, make your way back to the central hub of the area, where you fought the Yeti!
Upper Right Cliffside

Moving along the upper right pathway of the cliffside will have you stumble upon a purple item and Wild Monkey in the distance. However, as you approach the Wild Monkey, two more will drop in, having you fight three Monkeys simultaneously.
Deal with the three Wild Monkeys, loot the purple item to obtain a Fire Spirit's Fuel, and then continue following the path until you reach another Blade Nexus. Activate it for another checkpoint and cash in the boatload of Lacrima you've obtained!
The Final Stretch

Head forward from the Blade Nexus and follow the pathway until you run into a pair of Soldiers. Deal with them and keep on the path until another Soldier stumbles around the corner with most of his health depleted. Finish him off to see that you can either keep going straight ahead or go into the cave on the right. Of course, we're going into the cave first!
Into The Bear's Den

Head into the cave on your right and keep walking straight ahead until you run into a Wild Bear. As you likely guessed, this encounter is very difficult, but it shouldn't be too bad if you've taken care of the Yeti and Imperial Knight. The key to victory is landing Reflections and focusing on draining its Stamina Gauge to exhaust it.
With the Wild Bear defeated, head toward the backside of the cave to find a Chest. Open it up to obtain the Imperial Soldier's Dual Wield, Necklace of Commitment, and Gem Dust. From here, you can exit the cave and follow the critical path!
Almost There

Exit the cave and begin following the critical path to run into even more Soldiers. However, this time, a random Yeti will crash the party and start attacking them. It will likely eviscerate the Soldiers, so quickly run to the right and deal with the archer, as they will focus on you over the Yeti.
After eliminating the archer, focus on the Yeti and take it down like you did the others. From here, follow the narrow pathway up and around until you reach a cart. Interact with the cart to kick it down toward the Blade Nexus, creating a ramp that serves as a shortcut. Spend your accumulated Lacrima and prepare for battle!
Defeat The Yetuga

Finally, your last obstacle will be the Yetuga, the mission's boss encounter. The Yetuga is an oversized Yeti that deals tremendous damage and has many unique moves. This is a pretty challenging encounter, but if you made it this far, you are more than ready to take it down.
For more information and strategies on how to defeat this beast, we have a complete guide that covers all its attacks and how to deal substantial damage to it!

The above is the detailed content of The First Berserker: Khazan - Banished Hero Walkthrough. For more information, please follow other related articles on the PHP Chinese website!

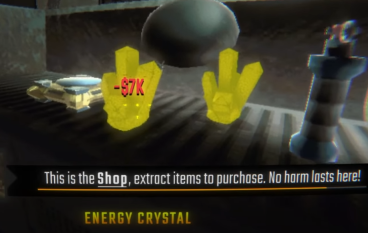 R.E.P.O. Energy Crystals Explained and What They Do (Yellow Crystal)Mar 18, 2025 am 12:07 AM
I bought expensive weapons or drones in R.E.P.O. but found that the energy was exhausted and became useless? Don't worry, you don't have to spend $50,000 on replacements, just charge your gear! That strange machine at the back of your truck is not a decoration. Here are how to get energy crystals and use them to keep your gear running continuously to avoid bankruptcy. More Reads: All R.E.P.O. Items How to get energy crystal You can buy energy crystals from the service store between levels. They usually cost between $7,000 and $9,000 — while expensive, they are far cheaper than repurchasing gear. In the first few levels, no purchase is required. You don't need them for the time being, so
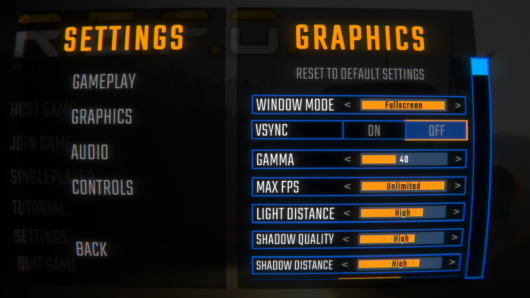 R.E.P.O. Best Graphic SettingsMar 18, 2025 am 01:33 AM
R.E.P.O. Game Screen Setting Guide: How to improve frame rate while ensuring picture quality? This article will guide you to optimize game settings and find the best balance point. Step 1: Full Screen Mode and Frame Rate Adjustment Before adjusting other settings, make sure the game is running in the best mode: Display Mode: Full Screen - Always use Full Screen Mode for optimal performance. Window mode will reduce the frame rate. Vertical Sync (V-Sync): Off - Unless a screen tear occurs, turn off vertical synchronization for a smoother gaming experience. Maximum FPS: Unlimited - If your computer is configured strongly, you can set it to Unlimited. Otherwise, it is recommended to limit it to 60 frames or match your monitor refresh rate. second
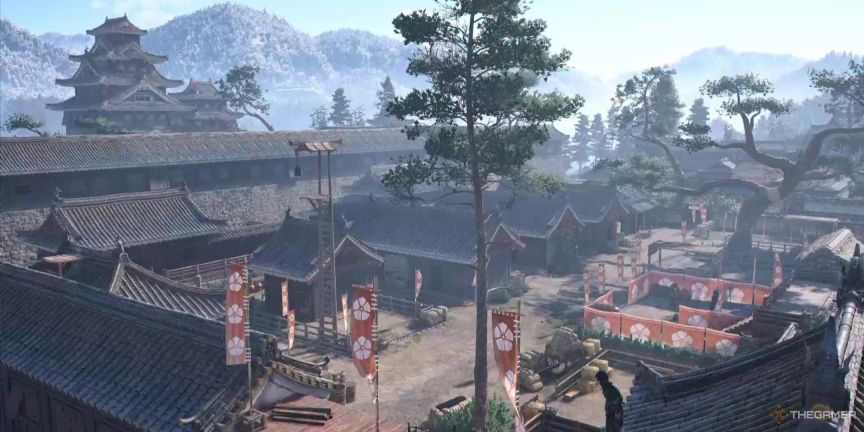 Assassin's Creed Shadows: Seashell Riddle SolutionMar 28, 2025 am 01:58 AM
Assassin's Creed: Shadows boasts a vast world brimming with activities beyond the main storyline. Side missions and various encounters significantly enrich the immersive experience of in-game Japan. One particularly memorable encounter is the Seashe
 R.E.P.O. How to Fix Audio if You Can't Hear AnyoneMar 17, 2025 pm 06:10 PM
Can't hear other players' voices in the R.E.P.O. game? Even if your microphone is working properly, it can be a problem caused by audio settings or device conflicts. Here are some effective solutions to help you restore your voice chat functionality. 1. Check the output device Open the audio settings of R.E.P.O. and check the output device settings. If set to "Default", manually select your headset or speaker. Restart the game and test voice chat again. 2. Adjust Windows sound settings If R.E.P.O. does not output the sound to the correct device, check the Windows Sound Settings: Right-click the speaker icon in the taskbar and select Sound Settings. Under "Output",
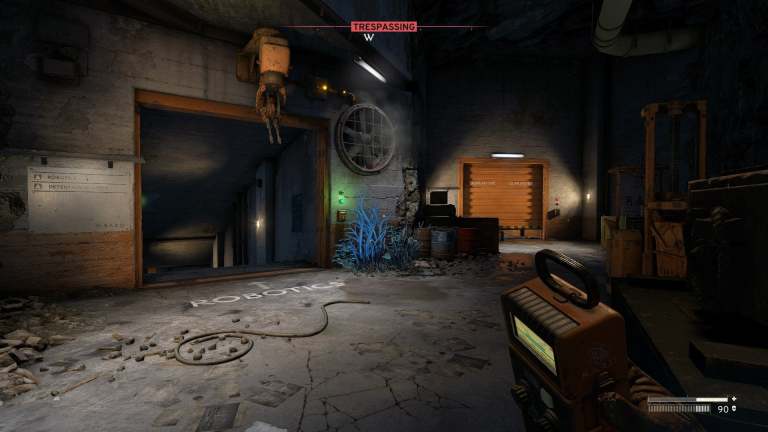 Where to find the Crane Control Keycard in AtomfallMar 28, 2025 am 02:17 AM
In Atomfall, discover hidden keys and passages, including multiple ways to access key locations. This guide focuses on using the Crane Control Keycard for easy, unguarded Entry to Skethermoor Prison, bypassing the need to cooperate with Captain Sims
 WWE 2K25: How To Unlock Everything In MyRiseMar 15, 2025 pm 12:03 PM
WWE 2K25's MyRise mode is one of the best career modes in WWE games in recent years, telling an exciting story: a group of disgruntled NXT superstars take over WWE. However, enjoying the plot is not the only reason to play this mode. By playing MyRise, you can also unlock many content such as new superstars, new arenas, extra costumes, special weapons, and more. However, you can't get everything in a round of games, so you may want to prioritize certain items. Before you do this, you need to know what unlockable content is and how to get them. All this information is included here. Unlocked content through plot promotion By advancing the main plot and completing the chapters, you can solve
 Assassin's Creed Shadows - How To Find The Blacksmith And Unlock Weapon And Armour CustomisationMar 22, 2025 am 01:06 AM
In Assassin's Creed Mirage, early game progression is limited until you recruit allies and unlock key features. Weapon customization, for instance, requires finding the blacksmith, Heiji. This unlocks through a side quest, impacting gameplay signif
 R.E.P.O. Chat Commands and How to Use ThemMar 17, 2025 pm 06:13 PM
R.E.P.O. provides some convenient chat instructions in the game to help you optimize the gaming experience. These instructions do not affect game balance, but are useful for taking clear screenshots or setting up visuals for content creation. How to use chat commands in R.E.P.O. To activate the command, please follow the steps below: Press the “T” key to open the chat window. Enter the “/” symbol, and then enter the command you want to use. Press Enter and the effect will take effect. To cancel the effect, enter the same command again or restart the game. Please note that these commands are only valid in multiplayer games and are not available in single player mode. Available chat commands /cinematic commands remove the game world


Hot AI Tools

Undresser.AI Undress
AI-powered app for creating realistic nude photos

AI Clothes Remover
Online AI tool for removing clothes from photos.

Undress AI Tool
Undress images for free

Clothoff.io
AI clothes remover

AI Hentai Generator
Generate AI Hentai for free.

Hot Article
Hot Tools

Safe Exam Browser
Safe Exam Browser is a secure browser environment for taking online exams securely. This software turns any computer into a secure workstation. It controls access to any utility and prevents students from using unauthorized resources.

SAP NetWeaver Server Adapter for Eclipse
Integrate Eclipse with SAP NetWeaver application server.

SublimeText3 Chinese version
Chinese version, very easy to use

DVWA
Damn Vulnerable Web App (DVWA) is a PHP/MySQL web application that is very vulnerable. Its main goals are to be an aid for security professionals to test their skills and tools in a legal environment, to help web developers better understand the process of securing web applications, and to help teachers/students teach/learn in a classroom environment Web application security. The goal of DVWA is to practice some of the most common web vulnerabilities through a simple and straightforward interface, with varying degrees of difficulty. Please note that this software

Dreamweaver Mac version
Visual web development tools

