


This tutorial demonstrates how to leverage Excel's built-in data entry form for efficient data input, surpassing the traditional cell-by-cell method. We'll cover activating the form, adding a custom button for easy access, and mastering its features.
Excel offers a powerful data entry form, ideal for streamlining data input, especially in large spreadsheets. The form allows focused entry of individual records, eliminating the need for constant horizontal scrolling. This minimizes errors and speeds up the data entry process.
This functionality is available in Excel 365, 2019, 2016, 2010, and 2007, but is absent in Excel Online.

Key Considerations:
- The form supports a maximum of 32 columns.
- As a modal dialog, the form cannot be printed; the worksheet remains unprintable until the form is closed.
Adding the Form Tool:
Excel's Form tool is hidden by default. To make it accessible:
- Access the Quick Access Toolbar (QAT) customization menu (the small arrow at the QAT's right end). Select "More Commands."
- In the Excel Options dialog, under Choose commands from, select "All Commands" or "Commands Not in the Ribbon."
- Locate "Form…" in the command list and click it.
- Click "Add" to move "Form" to the QAT commands.
- Click "OK" to save changes.


Creating the Data Entry Form:
- Enter column headers in the top row of your data range. (Skip this if using an existing dataset.)
- Select any cell within your data and press Ctrl T to convert the range into a table.
- Click the "Form" button.


The form's buttons provide functionality for adding, navigating, and modifying records. Navigation can also be done via Tab (next field), Shift Tab (previous field), and Enter (save and new record).

Adding New Records:
- Select a table cell.
- Click "Form."
- Click "New."
- Enter data, then press Enter or click "New" to add the record and prepare for the next.

Searching for Records:
Use "Find Prev," "Find Next," or the scroll bar for sequential navigation. The "Criteria" button enables conditional searches. Wildcards and logical operators (>,


Updating and Restoring Records:
Edit fields as needed and press Enter to save changes. "Restore" undoes changes before saving. Ctrl Z undoes saved changes.

Data Validation:
Apply data validation rules to your table columns; these rules will be enforced within the data entry form. Note that dropdown lists are not directly displayed, but their restrictions remain active.


Formulas in Data Entry Forms:
Formulas in your table will display their calculated results as non-editable text within the form to prevent accidental data corruption.

Opening the Form with VBA:
For enhanced user experience, create a VBA macro to open the form via a worksheet button. The code below provides a robust solution, handling potential naming conflicts:
Sub OpenDataEntryForm()
  Dim nName As Name
  Worksheets("Sheet1").Activate 'Change "Sheet1" to your sheet name if needed
  Range("B2").CurrentRegion.Name = "database" 'Adjust "B2" if your table starts elsewhere
  ActiveSheet.ShowDataForm
  For Each nName In ActiveWorkbook.Names
    If "database" = nName.Name Then nName.Delete
  Next nName
End Sub
Remember to assign this macro to a button on your worksheet.

Troubleshooting:
- Too Many Fields: Limit your table to 32 columns or less.
- Cannot Extend List: Remove data below your table or clear any trailing spaces/characters.
- Cursor Outside Table: Ensure the cursor is within the table before clicking "Form."
- Named Range "Database": Rename any existing range named "database."
This comprehensive guide empowers you to effectively utilize Excel's data entry form for improved data management.
The above is the detailed content of How to create and use Data Entry Form in Excel. For more information, please follow other related articles on the PHP Chinese website!

 MEDIAN formula in Excel - practical examplesApr 11, 2025 pm 12:08 PM
This tutorial explains how to calculate the median of numerical data in Excel using the MEDIAN function. The median, a key measure of central tendency, identifies the middle value in a dataset, offering a more robust representation of central tenden
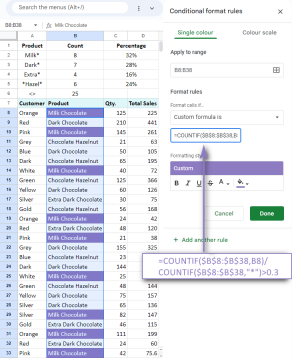 Google Spreadsheet COUNTIF function with formula examplesApr 11, 2025 pm 12:03 PM
Master Google Sheets COUNTIF: A Comprehensive Guide This guide explores the versatile COUNTIF function in Google Sheets, demonstrating its applications beyond simple cell counting. We'll cover various scenarios, from exact and partial matches to han
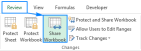 Excel shared workbook: How to share Excel file for multiple usersApr 11, 2025 am 11:58 AM
This tutorial provides a comprehensive guide to sharing Excel workbooks, covering various methods, access control, and conflict resolution. Modern Excel versions (2010, 2013, 2016, and later) simplify collaborative editing, eliminating the need to m
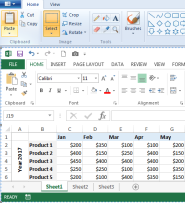 How to convert Excel to JPG - save .xls or .xlsx as image fileApr 11, 2025 am 11:31 AM
This tutorial explores various methods for converting .xls files to .jpg images, encompassing both built-in Windows tools and free online converters. Need to create a presentation, share spreadsheet data securely, or design a document? Converting yo
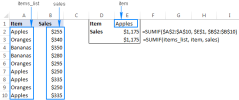 Excel names and named ranges: how to define and use in formulasApr 11, 2025 am 11:13 AM
This tutorial clarifies the function of Excel names and demonstrates how to define names for cells, ranges, constants, or formulas. It also covers editing, filtering, and deleting defined names. Excel names, while incredibly useful, are often overlo
 Standard deviation Excel: functions and formula examplesApr 11, 2025 am 11:01 AM
This tutorial clarifies the distinction between standard deviation and standard error of the mean, guiding you on the optimal Excel functions for standard deviation calculations. In descriptive statistics, the mean and standard deviation are intrinsi
 Square root in Excel: SQRT function and other waysApr 11, 2025 am 10:34 AM
This Excel tutorial demonstrates how to calculate square roots and nth roots. Finding the square root is a common mathematical operation, and Excel offers several methods. Methods for Calculating Square Roots in Excel: Using the SQRT Function: The
 Google Sheets basics: Learn how to work with Google SpreadsheetsApr 11, 2025 am 10:23 AM
Unlock the Power of Google Sheets: A Beginner's Guide This tutorial introduces the fundamentals of Google Sheets, a powerful and versatile alternative to MS Excel. Learn how to effortlessly manage spreadsheets, leverage key features, and collaborate


Hot AI Tools

Undresser.AI Undress
AI-powered app for creating realistic nude photos

AI Clothes Remover
Online AI tool for removing clothes from photos.

Undress AI Tool
Undress images for free

Clothoff.io
AI clothes remover

Video Face Swap
Swap faces in any video effortlessly with our completely free AI face swap tool!

Hot Article
Hot Tools

Dreamweaver Mac version
Visual web development tools

PhpStorm Mac version
The latest (2018.2.1) professional PHP integrated development tool

Dreamweaver CS6
Visual web development tools

Atom editor mac version download
The most popular open source editor

Safe Exam Browser
Safe Exam Browser is a secure browser environment for taking online exams securely. This software turns any computer into a secure workstation. It controls access to any utility and prevents students from using unauthorized resources.

