


On reading this blog post, you'll learn how to automatically switch images, attachments, and text in a shared Outlook template, depending on the current user.
Let's say, you have a really nice template, and your teammates would be happy to use it in their correspondence, but you're stuck on making this template dynamic. The problem is that each of your colleagues would like to get a different image, an individual attachment, and some specific text added to the template every time they use it. So, when the template is going to be pasted into the email body by another person, all this stuff should change automatically.
Do you think that such a task is too difficult? Nothing of the kind ... for our smart Shared Email Templates add-in :) Just a few steps to take, and a dynamic Outlook template for your team will be ready.
Step 1. Prepare your Excel table
First, make sure you have all the necessary variables in one and the same Excel table stored, say, in OneDrive. How would you do that? Check both the structure and the content of your table:
- The leftmost column of the table should contain your colleagues' email addresses. They will be sort of reference points for Shared Email Templates. Using them, the add-in will be able to find the right image, attachment, and text for each person.
- All the other columns are reserved for the items that will be dynamically inserted into an email. I mean pieces of text and links to files that your teammates are interested in. Be sure to create these links with the Shared Email Templates add-in as described below, otherwise they won't work the right way.
Step 2. Generate proper content for the table
At this stage, your table may be like this one:

Column B ('Image'), column C ('Text'), and column D ('Attachment') are still empty and have to be filled. Let's get proper data for them.
Images to insert: How to get a link that will work
- Run Shared Email Templates.
- Click the New Template button, and then click the Insert Macro icon.
- You'll see a list of all the macros the add-in has. Find and pick this one: ~%InsertPictureFromOneDrive.
- Select a file that contains one of the images you would like to swap.
Note. Don't forget to share these files beforehand. Otherwise, your colleagues won't have access to them.
- Fill in the boxes of the Insert picture dialog window (the way you need) and click Insert.
- Find the View HTML and View Template Content icons on the editor toolbar. They are neighbors :) Click any of them:

- Select and copy the ~%InsertPictureFromOneDrive macro along with the link created:
- Paste the copied line into your Excel table.
Note. Make sure that the email address of your teammate who the image is intended for is in the same row:
- Get links to other images in the same way and paste them in the corresponding rows:


Text to add: How to arrange it properly
Now, it's time to deal with text.
If you're happy with plain text that has no formatting at all, simply type the required extracts one by one in an individual cell each (on the right of the corresponding email address, of course). The add-in will bring this text to your template as is.
Would you rather get some phrases bold, colored, or printed in italics? If so, format them with standard HTML tags or let the add-in do that for you. Here's how:
- Create a new template by clicking the New Template button.
- Type the text that any of your colleagues needs and format it with icons on the editor toolbar:
- When you're done, click the View HTML icon to copy the lines you'll see in the View HTML window:
Tip. You can also copy these lines from View Template Content.
- Insert the lines into your Excel table. Don't forget that they should be in the same row as the email address of the person who is interested in using this text:
Tip. If there are line breaks in your text, select the cell of interest, and paste the text directly into the formula bar to avoid splitting.
- Fill the rest of the column likewise:


Files to attach: How to get a link that will work
As for the files that should be attached, process them with the ~%AttachFromOneDrive macro:
- Run Shared Email Templates and click New Template.
- Go to the editor toolbar, click Insert Macro, and select ~%AttachFromOneDrive.
- Find and pick one of those shared files that your colleagues would like to attach.
- Click View HTML or View Template Content.
- Select the ~%AttachFromOneDrive macro whole—from the tilde to the closing square bracket:
- Copy and paste the selected line to your Excel table:
- Do that for all the files of interest:


Step 3. Create a dataset from your Excel file
Convert your Excel table into a Shared Email Templates dataset. Here are the detailed instructions: Connect Excel table.
Step 4. Make your Outlook template dynamic
Finally, your dataset is ready, and all you need do is modify your template.
How to add an image for the current user
Let two macros of ours—~%DatasetValue and ~%ProfileProperty—work for you :)
- Find the existing template you want to make dynamic and open it in the Edit mode. (Or create a new template from scratch, if you like.)
- Decide where exactly the changing image will appear and place the cursor there.
- Click the Insert Macro icon and pick ~%DatasetValue from the list.
- In the macro's dialog window that you'll see, do the following:
- Choose the necessary dataset ('NewTeam_members' in my case).
- Pick the column containing the values to be returned (in my Excel table, it's 'Image').
- Select any item under "Key value" to delete it and type "~%ProfileProperty[EmailAddress]" instead.
- Click Insert and Save.

Congrats! :) You've just nested the ProfileProperty macro within the DatasetValue one. Would you like to know what for? :) The ProfileProperty macro will bring the current user's email address and thus 'point out' the right direction for the DatasetValue macro. In its turn, the DatasetValue macro will track down the right cell in your dataset and fetch the image of interest that the ~%InsertPictureFromOneDrive macro returns.
How to add certain text for the current user
The way of providing the current user with a specific piece of text doesn't differ substantially from getting a different image for them:
- Go back to editing your template to insert the ~%DatasetValue macro again.
- In the Dataset value dialog window, select the needed dataset, choose the column with text fragments (I'll opt for 'NewTeam_members' and 'Text'), and pick any line in the Key value drop-down menu to replace it with "~%ProfileProperty[EmailAddress]":
- Insert the macro and save your template.

From now on, the macros operating in coalition will easily find the email address of the current user in the specified dataset and return the text this colleague of yours needs.
How to add an attachment for the current user
With practiced ease :) insert one more DatasetValue macro in the text of your template. This time, it is necessary for bringing an individual attachment to each user.
- In the Edit mode, click Insert Macro and choose ~%DatasetValue.
- Fill in the boxes of the macro's dialog window picking the right dataset (I'll pick 'NewTeam_members'), selecting the column with the ~%AttachFromOneDrive macros in it (I'll select 'Attachment'), and putting "~%ProfileProperty[EmailAddress]" instead of any item from the Key value list:
- Click Insert and save the template.

Good to go :)
Hooray—your dynamic template is ready :) The part you've just modified may look like this:


Now you know the secret to creating dynamic Outlook email templates and can tell it to your colleagues. Or ... you can keep it and become indispensable for your team ;)
Available downloads
Why Shared Email Templates? Top 10 reasons (.pdf file)
The above is the detailed content of How to create dynamic Outlook email templates for current user. For more information, please follow other related articles on the PHP Chinese website!

 MEDIAN formula in Excel - practical examplesApr 11, 2025 pm 12:08 PM
This tutorial explains how to calculate the median of numerical data in Excel using the MEDIAN function. The median, a key measure of central tendency, identifies the middle value in a dataset, offering a more robust representation of central tenden
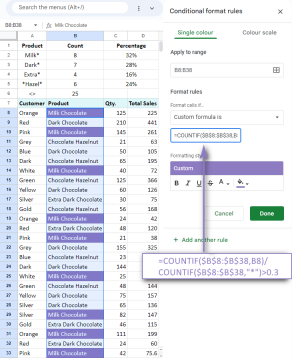 Google Spreadsheet COUNTIF function with formula examplesApr 11, 2025 pm 12:03 PM
Master Google Sheets COUNTIF: A Comprehensive Guide This guide explores the versatile COUNTIF function in Google Sheets, demonstrating its applications beyond simple cell counting. We'll cover various scenarios, from exact and partial matches to han
 Excel shared workbook: How to share Excel file for multiple usersApr 11, 2025 am 11:58 AM
This tutorial provides a comprehensive guide to sharing Excel workbooks, covering various methods, access control, and conflict resolution. Modern Excel versions (2010, 2013, 2016, and later) simplify collaborative editing, eliminating the need to m
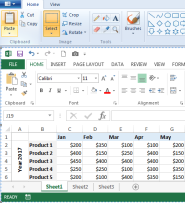 How to convert Excel to JPG - save .xls or .xlsx as image fileApr 11, 2025 am 11:31 AM
This tutorial explores various methods for converting .xls files to .jpg images, encompassing both built-in Windows tools and free online converters. Need to create a presentation, share spreadsheet data securely, or design a document? Converting yo
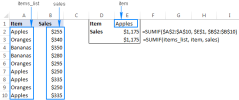 Excel names and named ranges: how to define and use in formulasApr 11, 2025 am 11:13 AM
This tutorial clarifies the function of Excel names and demonstrates how to define names for cells, ranges, constants, or formulas. It also covers editing, filtering, and deleting defined names. Excel names, while incredibly useful, are often overlo
 Standard deviation Excel: functions and formula examplesApr 11, 2025 am 11:01 AM
This tutorial clarifies the distinction between standard deviation and standard error of the mean, guiding you on the optimal Excel functions for standard deviation calculations. In descriptive statistics, the mean and standard deviation are intrinsi
 Square root in Excel: SQRT function and other waysApr 11, 2025 am 10:34 AM
This Excel tutorial demonstrates how to calculate square roots and nth roots. Finding the square root is a common mathematical operation, and Excel offers several methods. Methods for Calculating Square Roots in Excel: Using the SQRT Function: The
 Google Sheets basics: Learn how to work with Google SpreadsheetsApr 11, 2025 am 10:23 AM
Unlock the Power of Google Sheets: A Beginner's Guide This tutorial introduces the fundamentals of Google Sheets, a powerful and versatile alternative to MS Excel. Learn how to effortlessly manage spreadsheets, leverage key features, and collaborate


Hot AI Tools

Undresser.AI Undress
AI-powered app for creating realistic nude photos

AI Clothes Remover
Online AI tool for removing clothes from photos.

Undress AI Tool
Undress images for free

Clothoff.io
AI clothes remover

Video Face Swap
Swap faces in any video effortlessly with our completely free AI face swap tool!

Hot Article
Hot Tools

MantisBT
Mantis is an easy-to-deploy web-based defect tracking tool designed to aid in product defect tracking. It requires PHP, MySQL and a web server. Check out our demo and hosting services.

SublimeText3 Linux new version
SublimeText3 Linux latest version

VSCode Windows 64-bit Download
A free and powerful IDE editor launched by Microsoft

SublimeText3 Chinese version
Chinese version, very easy to use

MinGW - Minimalist GNU for Windows
This project is in the process of being migrated to osdn.net/projects/mingw, you can continue to follow us there. MinGW: A native Windows port of the GNU Compiler Collection (GCC), freely distributable import libraries and header files for building native Windows applications; includes extensions to the MSVC runtime to support C99 functionality. All MinGW software can run on 64-bit Windows platforms.

