


This tutorial provides a comprehensive guide to mail merge in Outlook, covering various methods and scenarios. Learn how to personalize emails for mass distribution, saving time and improving engagement.
Whether you're sending business updates or seasonal greetings, mail merge ensures each recipient receives a unique email containing their specific information.
We'll explore several approaches: mail merging directly within Outlook using your contacts, leveraging Word with Outlook contacts, utilizing Excel data sources, and employing the Shared Email Templates add-in for enhanced capabilities. We'll also address Outlook mail merge email limits.
What is Mail Merge?
Mail merge efficiently creates personalized mass emails by integrating data from a database, spreadsheet, or similar structured file. You design your email template with placeholders, and the mail merge process inserts recipient-specific details (name, email address, etc.) from your data source into these placeholders. This results in individual messages for each recipient, enhancing engagement.
Mail Merging Directly in Outlook
If your recipients are already in your Outlook Contacts, you can perform a mail merge directly within Outlook. This process involves six steps:
Step 1: Selecting Contacts: Navigate to your Outlook Contacts (Ctrl 3), choose the relevant folder, and select the desired contacts. Utilize filtering and sorting options (by category, company, location) to manage your selection efficiently. You can customize the view to display only the necessary fields for the merge.

Step 2: Initiating Mail Merge: On the Home tab, within the Actions group, click the Mail Merge button.

Step 3: Mail Merge Setup: In the Mail Merge Contacts dialog box, configure the settings. Choose between merging all contacts in the current view or only selected contacts. Select either all contact fields or only those visible in your current view. Choose to create a new document or use an existing one. Select Form Letters as the document type and Email as the merge destination. Enter your subject line.

Step 4: Creating the Mail Merge Document in Word: This opens a mail merge document in Word. Use the Write & Insert Fields group to add merge fields (placeholders for personal data). Insert a greeting line using the Greeting Line button, customizing it as needed. Then, type your message body, adding other merge fields as required using the Insert Merge Field button.


Step 5: Previewing Results: Click Preview Results to review your personalized emails before sending.

Step 6: Sending the Emails: Click Finish & Merge > Send E-mail Messages. Review the options and click OK to send.

Mail Merging from Word Using Outlook Contacts:
If your email text is already in Word, you can initiate the mail merge from there. The process is similar, using the Mail Merge Wizard or ribbon options. You'll select your Outlook contacts as the recipient list.
Mail Merging from an Excel Data Source:
If your recipient data is in Excel, you can use it as your data source. The steps are similar, but in the Mail Merge Wizard, you'll select Use an existing list and browse to your Excel file.


Outlook Mail Merge Add-in (Shared Email Templates):
The Shared Email Templates add-in offers advanced mail merge capabilities directly within Outlook, eliminating the need for Word. It supports attachments, images, custom merge fields, and adaptive layouts for optimal display across various email clients. A video demonstration is available.

Outlook Mail Merge Email Limits:
Be aware of sending limits imposed by Office 365, Outlook.com, and your internet service provider to avoid exceeding quotas.
This enhanced summary provides a more concise and organized overview of the original content, maintaining the core information while improving readability and clarity. Image placements are preserved.
The above is the detailed content of Mail Merge in Outlook: send bulk email individually. For more information, please follow other related articles on the PHP Chinese website!

 MEDIAN formula in Excel - practical examplesApr 11, 2025 pm 12:08 PM
This tutorial explains how to calculate the median of numerical data in Excel using the MEDIAN function. The median, a key measure of central tendency, identifies the middle value in a dataset, offering a more robust representation of central tenden
 Google Spreadsheet COUNTIF function with formula examplesApr 11, 2025 pm 12:03 PM
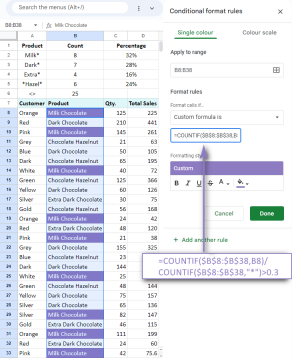
Master Google Sheets COUNTIF: A Comprehensive Guide This guide explores the versatile COUNTIF function in Google Sheets, demonstrating its applications beyond simple cell counting. We'll cover various scenarios, from exact and partial matches to han
 Excel shared workbook: How to share Excel file for multiple usersApr 11, 2025 am 11:58 AM
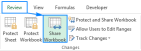
This tutorial provides a comprehensive guide to sharing Excel workbooks, covering various methods, access control, and conflict resolution. Modern Excel versions (2010, 2013, 2016, and later) simplify collaborative editing, eliminating the need to m
 How to convert Excel to JPG - save .xls or .xlsx as image fileApr 11, 2025 am 11:31 AM
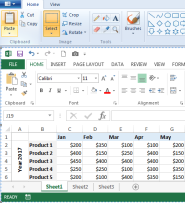
This tutorial explores various methods for converting .xls files to .jpg images, encompassing both built-in Windows tools and free online converters. Need to create a presentation, share spreadsheet data securely, or design a document? Converting yo
 Excel names and named ranges: how to define and use in formulasApr 11, 2025 am 11:13 AM
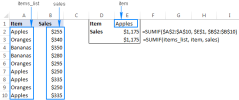
This tutorial clarifies the function of Excel names and demonstrates how to define names for cells, ranges, constants, or formulas. It also covers editing, filtering, and deleting defined names. Excel names, while incredibly useful, are often overlo
 Standard deviation Excel: functions and formula examplesApr 11, 2025 am 11:01 AM
This tutorial clarifies the distinction between standard deviation and standard error of the mean, guiding you on the optimal Excel functions for standard deviation calculations. In descriptive statistics, the mean and standard deviation are intrinsi
 Square root in Excel: SQRT function and other waysApr 11, 2025 am 10:34 AM
This Excel tutorial demonstrates how to calculate square roots and nth roots. Finding the square root is a common mathematical operation, and Excel offers several methods. Methods for Calculating Square Roots in Excel: Using the SQRT Function: The
 Google Sheets basics: Learn how to work with Google SpreadsheetsApr 11, 2025 am 10:23 AM
Unlock the Power of Google Sheets: A Beginner's Guide This tutorial introduces the fundamentals of Google Sheets, a powerful and versatile alternative to MS Excel. Learn how to effortlessly manage spreadsheets, leverage key features, and collaborate


Hot AI Tools

Undresser.AI Undress
AI-powered app for creating realistic nude photos

AI Clothes Remover
Online AI tool for removing clothes from photos.

Undress AI Tool
Undress images for free

Clothoff.io
AI clothes remover

Video Face Swap
Swap faces in any video effortlessly with our completely free AI face swap tool!

Hot Article
Hot Tools

SublimeText3 Linux new version
SublimeText3 Linux latest version

SublimeText3 Chinese version
Chinese version, very easy to use

Dreamweaver CS6
Visual web development tools

EditPlus Chinese cracked version
Small size, syntax highlighting, does not support code prompt function

WebStorm Mac version
Useful JavaScript development tools

